Heeft deze informatie u geholpen?
Hoe kunnen we dit artikel nog verbeteren?
Administrator's Guide - Identity and Access Management (IAM)
Lyve Cloud’s identity and access management (IAM) enables you to manage users and access to Lyve Cloud console resources.
Create users and assign roles, add multi-factor authentication for enhanced security, or set up federated login using your organization’s IDP (identity provider) and SAML 2.0.
Role-based access to IAM
The following table describes access to IAM features based on your role.
| Actions | Admin | Storage Admin | Auditor (Read only) |
|---|---|---|---|
| IAM | ✓ | × | ✓ |
| Users | ✓ | × | ✓ |
| MFA | ✓ | × | ✓ |
| SAML Federation | ✓ | × | ✓ |
| Notification Recipients | ✓ | × | ✓ |
Managing users and roles
The Users page allows you to create users and set user roles. A user is an individual customer who can perform various actions in the Lyve Cloud console based on the assigned role. A role restricts the actions a user may perform, which prevents unauthorized access to Lyve Cloud features.
About user roles
You can set distinct roles for Lyve Cloud users. These users can perform actions based on assigned roles, see Role-based access sections in the respective topics.
- Administrator —An administrator can perform all the operations in the Lyve Cloud console.
- Storage Administrator—The storage administrator can manage all storage-related actions that includes managing buckets, permissions and service accounts in Lyve Cloud.
- Auditor —An auditor has read only access to the Lyve cloud console, and thus cannot perform any actions.
About user and authentication types
User types
In Lyve Cloud, there are two distinct user types:
- Password user—Users whose username and password are managed in Lyve Cloud
- Federated user—Users who are authenticated via their organization's identity provider (IdP).
Authentication types
Set an authentication type while creating a user. The following are the available authentication types for each of the user types.
Multi-factor authentication (MFA) is enabled by default for IAM users. Multi-Factor Authentication required two authentication methods:
- Password—Set a password as the first factor of authentication. All IAM users must set a password. For more information, see Registration workflow for password authentication type.
A password policy is applied to all user accounts created and managed directly in Lyve Cloud. For more information, see Password policy.
- OTP or SMS—Set SMS or OTP as the second authentication factor. For more information, see Using multi-factor authentication (MFA).
Federated users have the following authentication type:
- Federated—This option is available only when configuring SAML Federation for the account. For more information, see Configuring Federated Login.
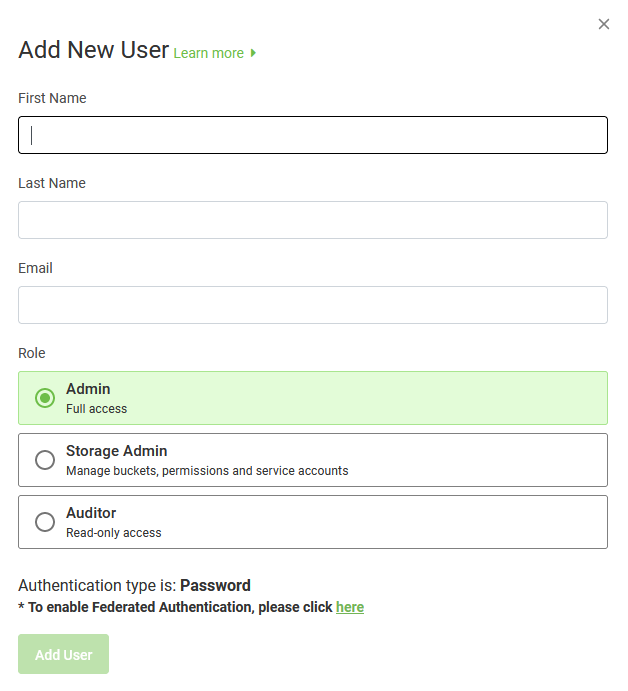
Add a user
To add a user:
- On the left-hand menu, select Users.
- On the Users page, select Add User.
- In the Add New User dialog box, enter the following:
- First Name: Enter the first name of the user.
- Last Name: Enter the last name of the user.
- Email: Enter the email address of the user.
- Role: Select from the options Admin, Storage Admin, Auditor.
- Authentication Type:
If SAML Federation is not configured, no selection is required, and the following are possible display options:
- Password
If SAML Federation is configured, no selection is required, and the following are possible display options:
- Federated
- Password
- Select Add User.
An invitation email is sent to the IAM user to complete the registration process. For information, see Registering an IAM user in Lyve Cloud.
The following image displays the Add New User dialog box.
Registering an IAM user in Lyve Cloud
When an IAM user is registered in Lyve Cloud, the user receives an email invitation. They must register in Lyve Cloud by Multi-factor Authentication (MFA), a security method that is set by default for all accounts.
The following image displays a sample email invite. This email invitation link expires within 72 hours.
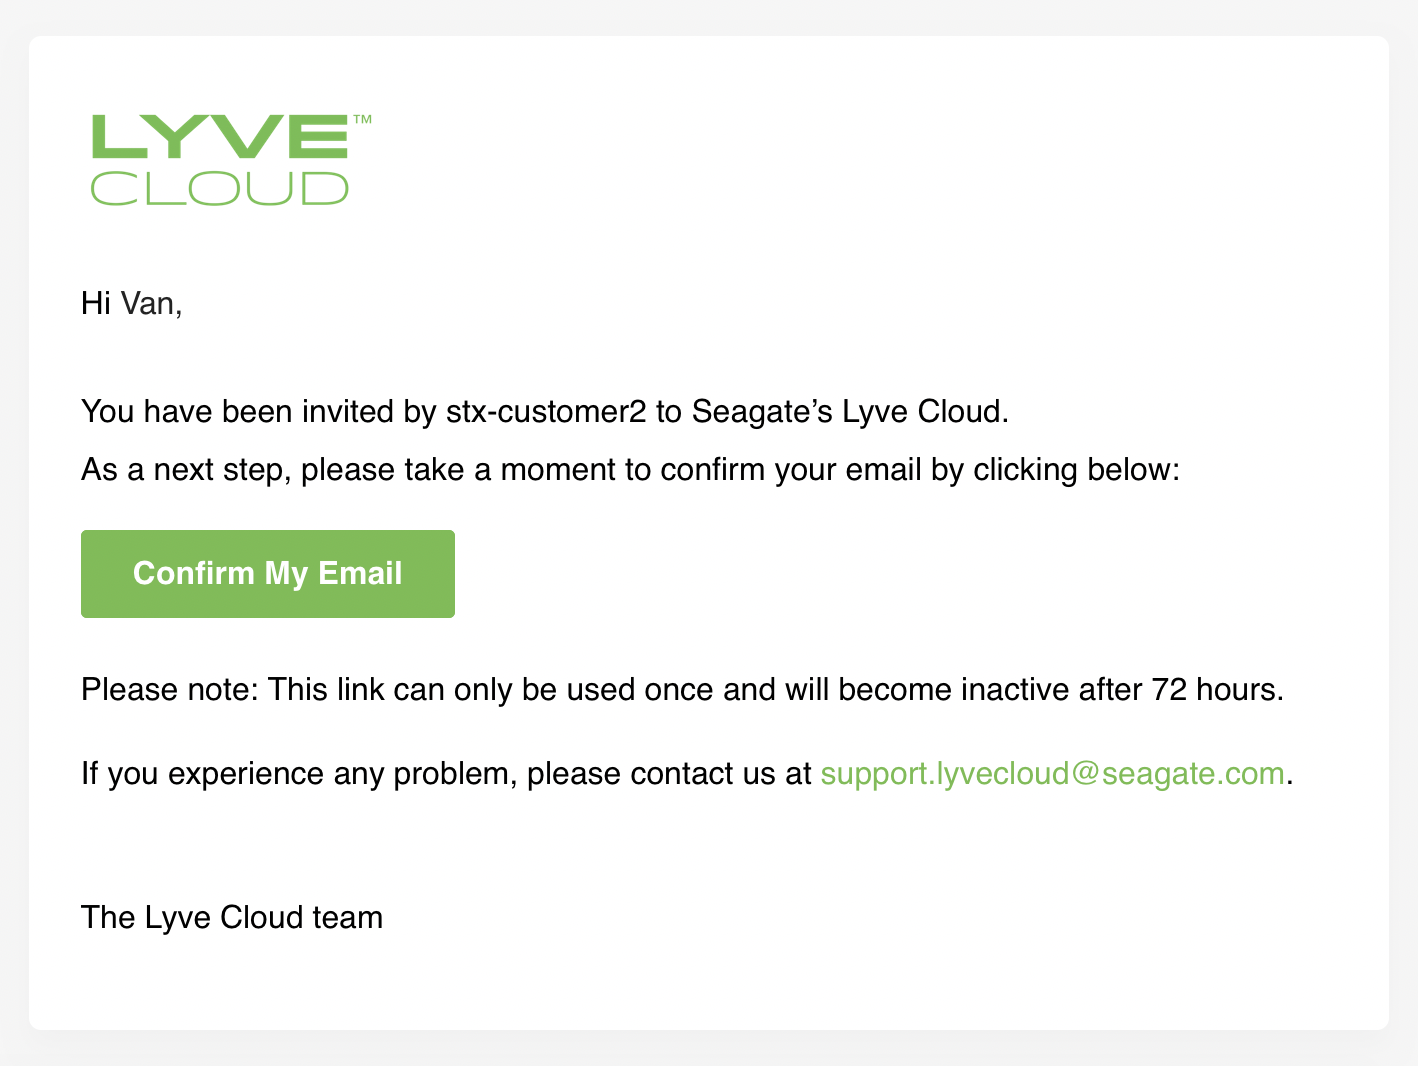
If the user doesn't select the link within 72 hours, they should select Forgot Password on the login page. For more information, see Registering after an email invitation link expires. Check your spam folder if you believe you did not receive an email invitation or contact the support team at support.lyveloud@seagate.com to complete the registration process.
Registration workflow for password authentication type
After the user is registered in Lyve Cloud and receives an email invitation, they should complete the registration.
To complete the registration:
- Select the link provided in the invitation email to get started.
- in the Create Password dialog, enter and confirm your password and then select Create.
- Once a password is created, the user is taken to the Lyve Cloud Login page.
Registering after an email invitation link expires
To complete registration after an email invitation expires:
- Select the Forgot Password link. This page appears after you select the Click on this link to get started link in the invitation mail.
- Follow step 2 onwards from the Registration workflow for Password Authentication Type.
Viewing and editing a user
An administrator can change the first name, last name, and the assigned role of an IAM user. Only administrators can edit or redefine roles for users, they cannot edit or change roles defined for themselves. If a change to an administrator role is desired, a different administrator must make the change.
The following table describes the column names in the user's table:
| Column Name | Description |
|---|---|
| First Name | Displays the user's first name. |
| Last Name | Displays the user's last name. |
| Displays the user's email address. | |
| Authentication Type | Displays the user's authentication type. For more information, see Using multi-factor authentication. |
| Role | Displays role of the selected user. See About user roles. |
| Status | Displays the user's status as either Enabled or Disabled. |
To view or edit a user:
- On the left-hand menu, select Users.
- On the Users page, find the user you want to change.
- Select the ellipses (...) in the right-most column of the user's role and then select Edit.
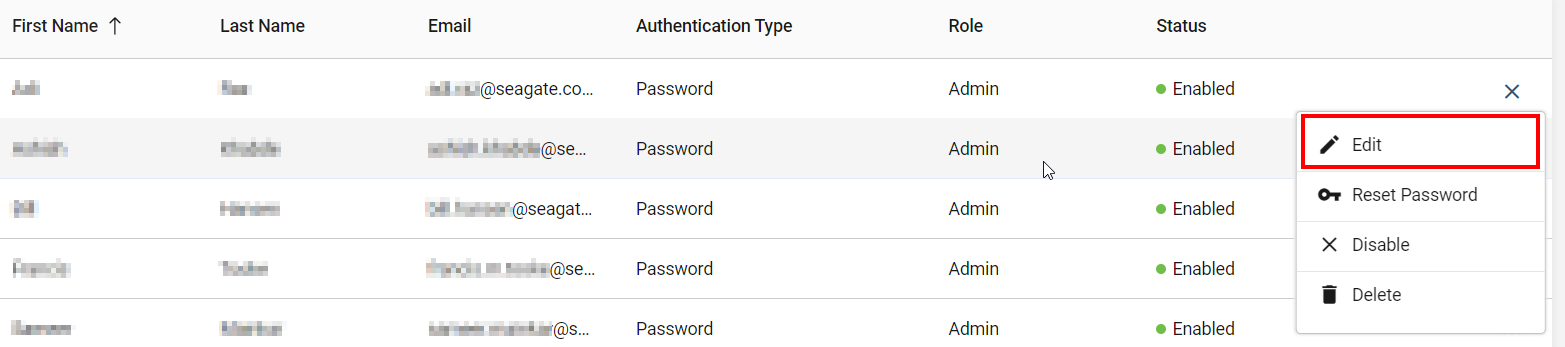
- In the Edit User dialog box, edit the following and select Save.
- First Name: Enter the first name of the user.
- Last Name: Enter the last name of the user.
- Select a Role to modify from the following options: Admin, Storage Admin, or Auditor.
You can also see the Authentication Type of the user, which is read-only and not editable.
Disabling or enabling a user
To enable or disable a user:
- On the left-hand menu, select Users.
- On the Users page, find the user you want to enable/disable.
- Select the ellipsis and select Disable or Enable.
- Select Yes in the confirmation to change the status.
Deleting a user
To delete a user:
- On the left-hand menu, select Users.
- On the Users page, find the user you want to delete.
- Select the ellipsis and select Delete.
- Select Yes in the confirmation to change the status.
Resetting password
To reset user password:
- On the left-hand menu, select Users.
- On the Users page, find the user whose password you want to reset.
- Select the ellipsis and select Reset Password.
- Select Yes in the confirmation to reset the password.
Video: Lyve Cloud - How to manage users and assign roles
Seagate on Vimeo: Lyve Cloud - How to manage users and assign roles
Password policy
A password policy is applied to all user accounts that are created and managed directly in Lyve Cloud.
The following password policy options are defined and must be fulfilled.
| Property | Requirements |
|---|---|
| Characters allowed | A – Z, a - z, 0 – 9, (!, @, #, $, %, ^, &;, *) |
| Number of characters | between 8 - 128 characters |
| Password Type | The password must contain three of the following four character types:
|
| Password restrictions |
|
Password change history
This prevents users from recycling old passwords; the last five passwords can't be used again when the user changes a password. The password change history determines the number of unique new passwords associated with a user account before an old password can be reused.
Password expiration
The password expiration policy determines the period of time (in days) that a password can be used before it requires the user to change it. The password will expire 180 days from the date when the password is updated. The password expiration date is updated to 180 days once the user changes the password.
Example: The password that is changed on 1 January 2022 will be set to expire on 30 June 2022.
Users will receive two email notifications, the first one before seven days, and another one before three days to reset the password. This email includes a link to change the password.
Restricting password
The password policy does not allow users to use the most commonly used passwords. The following restrictions include:
- Commonly used password
See the restricted list to view the list of passwords that are not allowed.
- Personal data
It prohibits users from setting passwords that contain any of their personal data.
For example: name, username, nickname, user_metadata.name, user_metadata.first, user_metadata.last, first part of the user's email (firstpart@example.com)
If the user's name is John, the user would not be allowed to include John in their password. For example, John1234 will not be allowed.
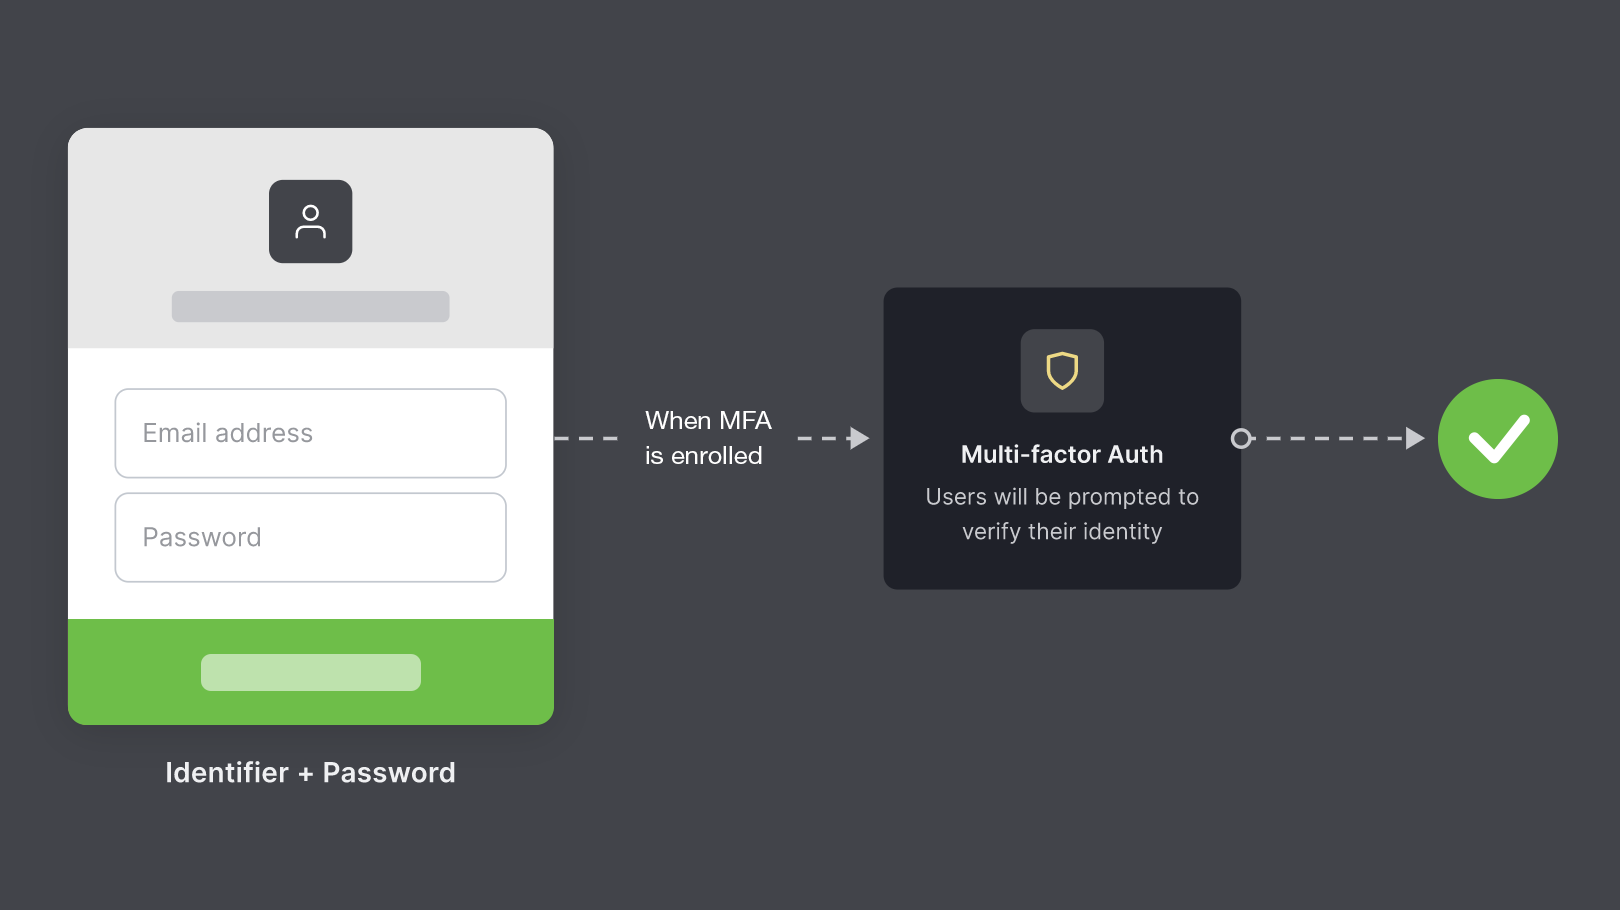
Using multi-factor authentication (MFA)
Multi-factor authentication (MFA) is a security mechanism that adds a layer of protection to the sign-in process to access the Lyve Cloud console. Choose the one-time password (OTP) option (using third-party authenticator apps such as Google, Microsoft, or Oracle Mobile Authenticator) or the SMS text message as the second level of authentication.
By default, MFA is configured for all Lyve Cloud users and users must go through an additional registration step to complete MFA setup. The registration occurs during their successful first sign-in attempt. Users are then prompted to use the second level of authentication for subsequent login attempts. Setting cannot be changed to disable MFA.

About MFA
MFA configuration provides these 2nd-factor authentication options:
- Password + SMS text message—Sets password and SMS as a two-factor authentication policy for users to sign in to the Lyve Cloud console.
- Password + One-Time Password (OTP)—Sets password and OTP as a two-factor authentication policy for users to sign in to the Lyve Cloud console. To use OTP, users must download a third-party authenticator to their phone.

How does MFA work?
If MFA is enrolled
All IAM users are required to set up their 2nd-factor authentication separate from their password. Users can choose one of these MFA methods:
- Using the authenticator app—The authenticator app must be installed on your phone. Use the authenticator app to scan the QR code during the MFA enrollment. This enables the one-time password (auto-generated every 30 seconds) to be entered whenever you log in to Lyve Cloud.
- Using an SMS service—Use any mobile device with a phone number able to receive SMS text messages. When an MFA code is needed, Lyve Cloud sends a six-digit verification code to the phone number configured by the IAM user. Text messaging charges from the mobile carrier apply when choosing SMS-based MFA.
When a user attempts to login to Lyve Cloud, a code is sent via SMS, which the user has to enter to complete the transaction.
If MFA is not enrolled
If any user (new user or existing user) has set a password as the first method of authentication but does not enroll in MFA, in that case the user is prompted to enroll either using SMS service or the authenticator app after successful login using the password.
Users are not allowed to login into the Lyve Cloud console if they do not enroll in MFA.
Enrolling in MFA
MFA is configured for all Lyve Cloud users in the account to include an additional verification method. You can enroll after you have set the password. For more information, see Registration workflow for password authentication type.
To enroll in MFA:
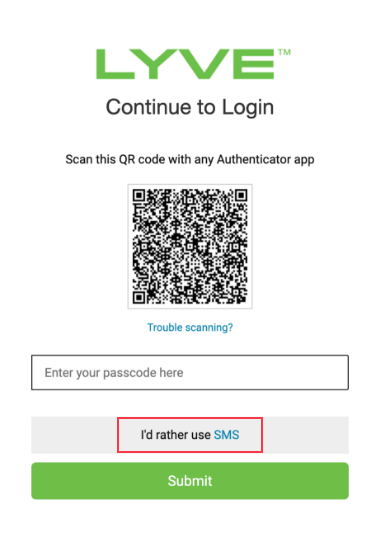
You must set up the required MFA enrollment to access Lyve Cloud. Every time you log in to Lyve Cloud, you must follow the two-step authentication process. Lyve Cloud requests users to enter the OTP generated from the authenticator application or SMS.
- Log in to Lyve Cloud using your credentials.
- Select either the authenticator app or SMS as your second authentication method:
If you choose the authenticator app option, scan the QR code from the authenticator app on your phone.

Enter the the one-time passcode (OTP) displayed on the authenticator app and select Submit.
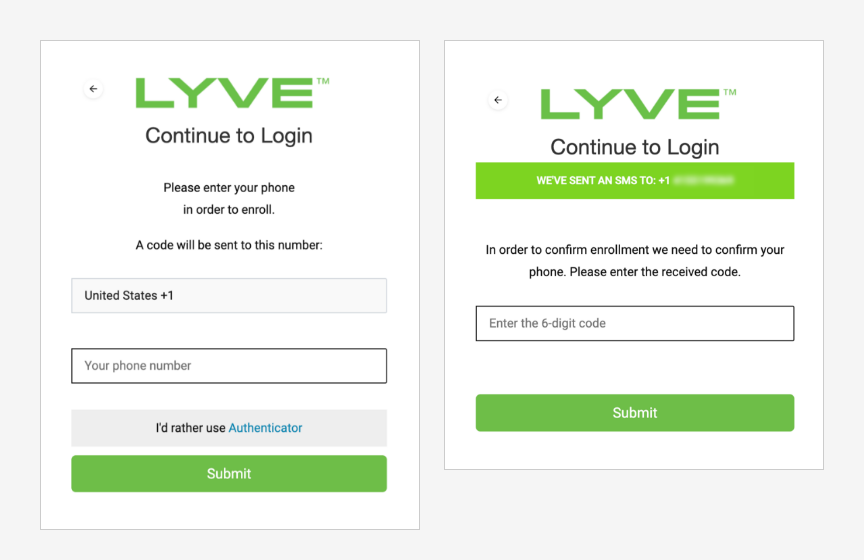
If you choose to use SMS, select I'd rather use SMS located below the QR code field:
- Select the Country code.
- Enter the phone number to receive the SMS passcode and select Continue.
- Enter the code received on your phone as an SMS and then select Submit.
- Once the verification code is entered, save the recovery code.
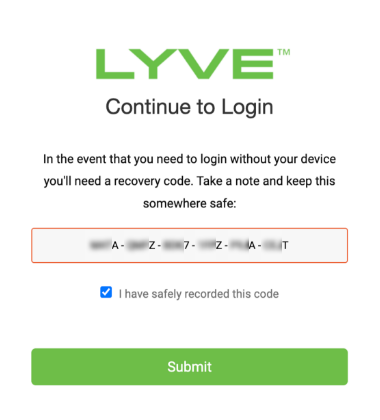
- Check the I have safely recorded this code checkbox and select Submit to complete MFA enrollment.
Resetting MFA for an individual IAM user
The Reset MFA feature allows admins to reset the IAM users' MFA enrollment. The reset action removes the old MFA entry. The user will then be unable to sign in to the Lyve Cloud console until they reset the MFA.
Make sure the users have an active phone number if you want to set Password + SMS Text Message, or an authenticator app installed on their phone if you want to set Password + One-Time Password (OTP) as your authentication type.
To reset MFA:
- On the left-hand menu, select Users. A list of users is displayed on the Users page.
- Select the ellipsis next to the user, then select Reset MFA.
- To reset that user’s MFA, select Yes.
After MFA is reset, users must re-enroll in MFA. See Enrolling in MFA.
Configuring Federated Login
Federated Login provides authentication without revealing user login credentials to the Lyve Cloud service. Federated Login enables your users to use a single authentication method with the help of your organization’s Identity Provider (hereafter referred to as IdP) for Lyve Cloud users. Once the Lyve Cloud user signs in and has access to your organization's domain, the user then has direct access to the Lyve Cloud console. Hence the user need not perform a separate login process. To use Federated Login feature, your organization must have an authentication system which uses the SAML 2.0 protocol.
To configure Federated Login, contact your organization's IdP administrator to obtain the metadata file in XML format. Upload this file to configure Federated Login.
Security Assertion Markup Language (SAML) protocol
The Security Assertion Markup Language (SAML) protocol is an open-standard, XML-based framework for authentication and authorization between two entities without a password:
- A Service Provider (SP) agrees to trust the identity provider to authenticate users.
- An Identity Provider (IdP) authenticates users and provides to service providers an authentication assertion that indicates a user has been authenticated.
In this scenario, Lyve Cloud is a Service Provider that will connect with your organization's Identity Provider to establish a Single Sign-On (SSO) access to your users.
Configure Lyve Cloud as a SAML service provider
To configure Lyve Cloud as a SAML service provider, you will need to:
- Obtain metadata and certificate from your IdP administrator
- Configure Lyve Cloud as a service provider
- Add service provider metadata to the identity provider
- Configure the identity provider to send email attribute
Obtain metadata and certificate from your IdP administrator
Contact your organizations IdP administrator and obtain the metadata file in XML format to upload and configure Federated Login.
For more information on generating a metadata file for Okta, Google Gsuite, and Microsoft Azure, see Generating XML Metadata files for IdP.
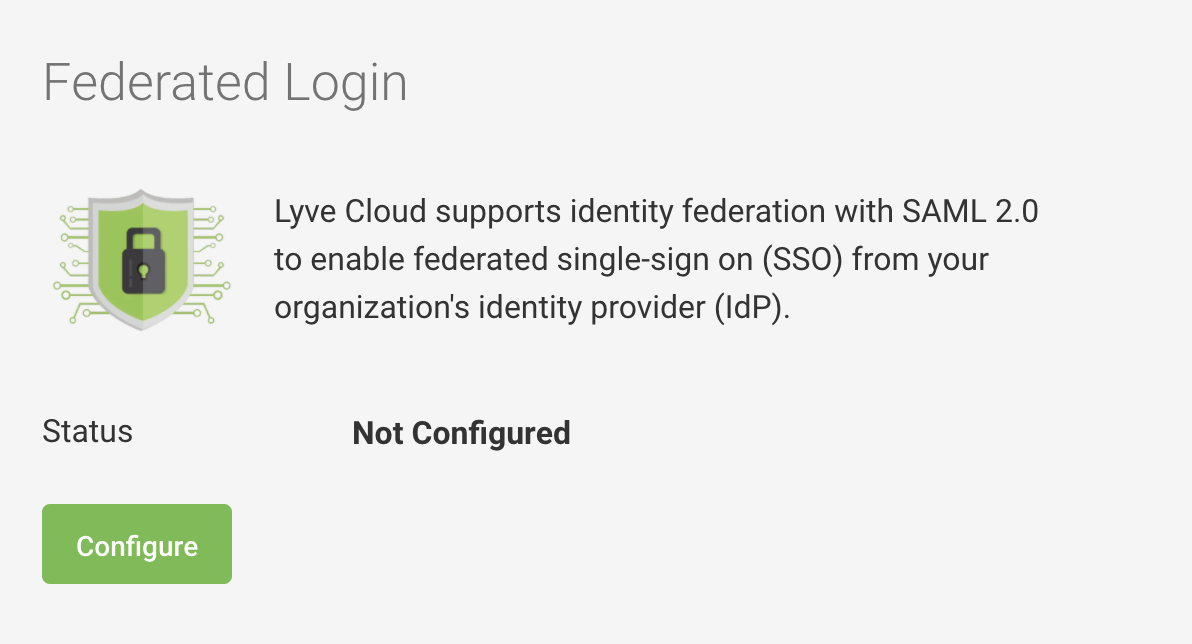
Configure Lyve Cloud as a service provider
- On the left-hand menu, click the SAML Federation menu.
- On the Federated Login page, click Configure.
- In the Configure Federated Login page, click Upload.
- Select the XML file from the desired location, and select Open.
- After SAML Metadata File is uploaded successfully, click Apply.
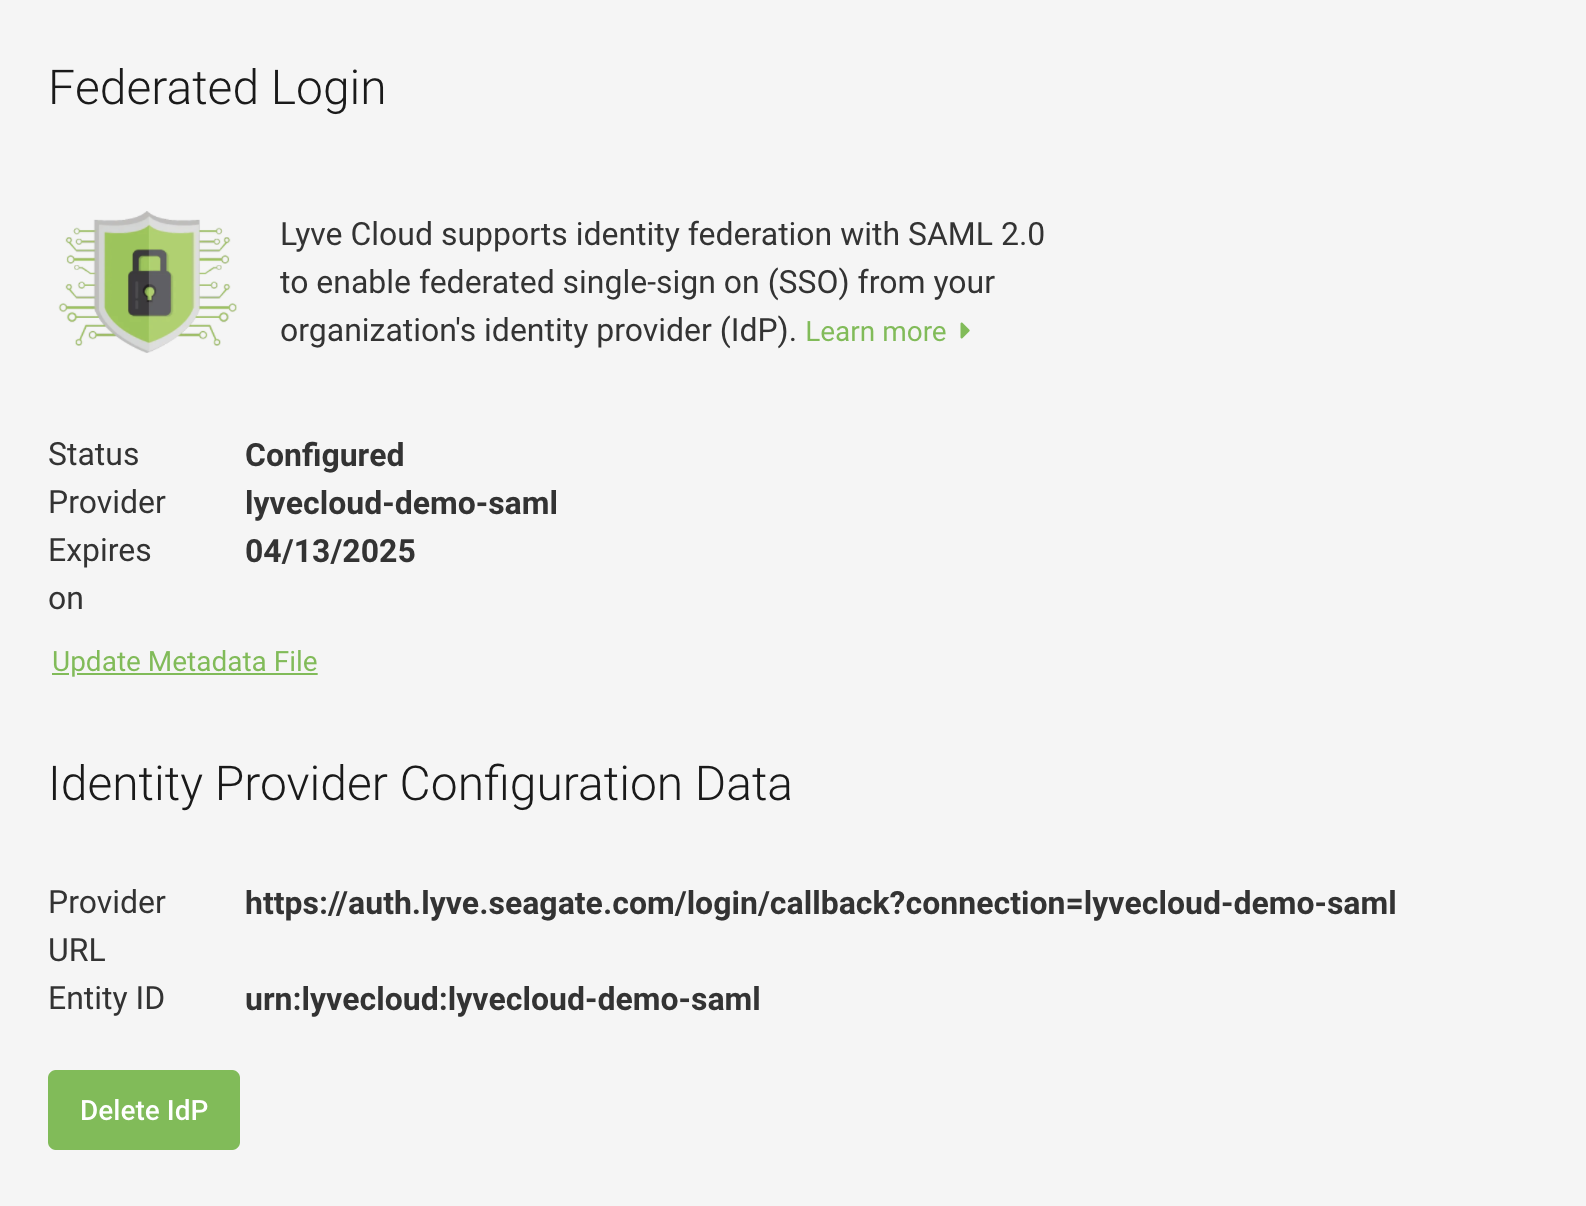
The following image displays a Federated Login set up.

After configuration, the Federated Login page displays:
- Status as Configured
- Status name of the IdP Provider
- Metadata file's Expiry Date.
In addition, the Identity Provider configuration details are provided. The following attributes are used to configure the IdP:
- Provider URL
- Entity ID
The following image displays sample IdP configuration details.
Add service provider metadata to the identity provider
In this section, you will add some information to the IdP, so it knows how to receive and respond to SAML based authentication requests from the Lyve Cloud service provider. The instructions provided here are generic. You will need to find the appropriate screens and fields on the Identity Provider.
- Locate the screens from the Identity Provider that allow you to configure SAML.
- The IdP must know where to send the SAML assertions after it has authenticated a user. This is the Provider URL in Lyve Cloud. The IdP might call this Assertion Consumer Service URL or Application Callback URL.
https://YOUR_TENANT_URL/login/callback?connection=YOUR_CONNECTION_NAME - The connection URL parameter is required for identity provider-initiated flow.
https://auth.lyve.seagate.com/login/callback?connection=YOUR_ACCOUNT_ID.- Enter Entity ID in the Audience or Entity ID field from Lyve Cloud:
audience:urn:lyvecloud:YOUR_TENANT:YOUR_CONNECTION_NAME - If IdP provides a choice for bindings, you should select HTTP-Redirect for Authentication Requests.
- The Single Logout Service URL, where SAML logout requests and/or responses from the Identity Provider must be sent and should be configured as:
https://YOUR_DOMAIN/logout - Signing Logout Requests: When configuring the IdP, make sure that SAML Logout Requests sent to the service provider are signed.
Configure the identity provider to send email attribute
Lyvecloud reads “email” attribute from your identity profile. Some identity providers send “email” by default, while some require you to configure it to send “email”.
Auth0 and Azure
Sends email by default. No additional configuration is required.
G Suite
Requires a configuration to send an email attribute.
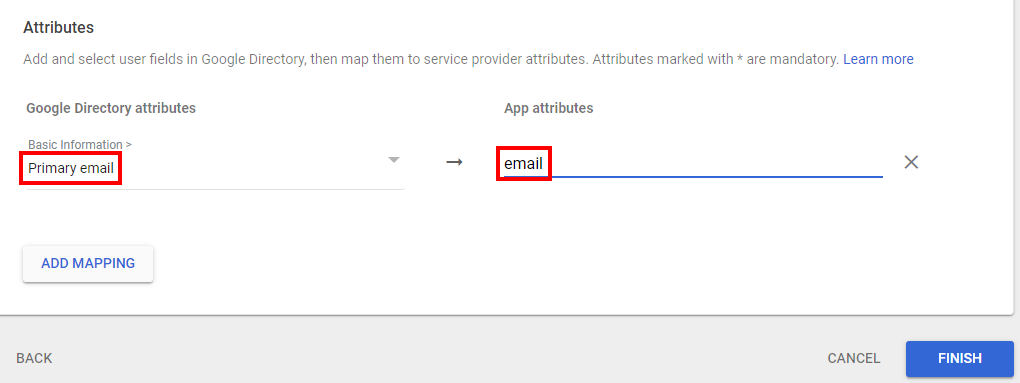
To configure an email attribute for G Suite:
- Log in to the GSuite app. Click Apps in the left menu, and then click Web and mobile apps.
- Select the SAML app to edit and update attribute mapping.
- In the SAML attribute mapping section, click the arrow to edit.

- In the Attributes mapping section, add the following attributes and click Save.
Okta
Requires a configuration to send an email attribute.
To configure an email attribute for Okta:
- On the left-hand menu, select Applications and then click Applications.
- On the Applications page, click the application to edit, and then select General.
- Click Edit in SAML settings.
- Click Next in General Settings without making any change.
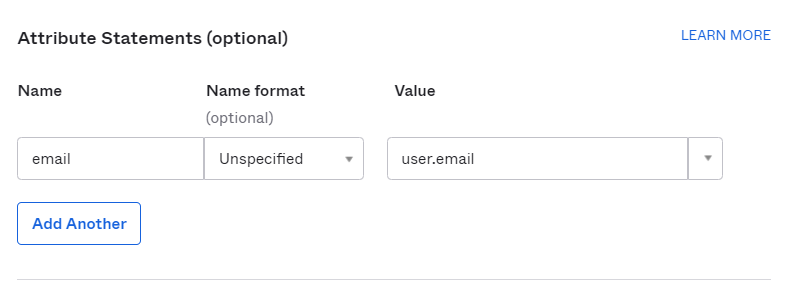
- In the Attribute Statements (optional) section, click Add Another to add an attribute statement, and update the following attributes:
- Name = email
- Value = user.email

Troubleshooting SSO
If your application doesn't work the first time, you should clear your browser history and cookies before you test again. The browser may otherwise not pick up the latest version of your HTML page or it may have outdated cookies that impact execution.
While troubleshooting SSO:
- Capture an HTTP trace of the interaction: Use any of the available tools to capture the HTTP traffic from your browser for analysis.
- Search for HTTP Trace
- Capture the login sequence from start to finish and analyze the sequence of GETs to determine how far in the expected sequence is achieved.
- See a redirect from your original site to the Service Provider and then to the Identity Provider.
- A post of credentials if you had to log in.
- Then a redirect back to the callback URL or the Service Provider.
- Finally a redirect to the callback URL specified in your application.
- Ensure the cookies and javascript are enabled for your browser.
- Check to make sure that the callback URL specified by your application in its authentication request is listed in the Allowed Callback URLs field.
- The http://samltool.io tool can decode a SAML assertion and is a useful debugging tool.
Updating the metadata file
You need to update the metadata file before the certificate expires. Contact your IdP administrator to get the updated XML file. If you make any updates and regenerate metadata.xml, you must delete the old metadata file and reupload the updated file. If you just upload the updated file, it may not make changes to the old file.
To update the metadata file:
- On the left-hand menu, click SAML Federation.
- On the SAML Federation page, click Update Metadata File.
- Select the XML file from the desired location and click Open.
- After the SAML Metadata File is uploaded successfully, click Apply.
Deleting existing IdP configuration
To delete the IdP:
- On the left-hand menu, click SAML Federation.
- On the SAML Federation page, click Delete IdP.
- In the Delete IdP configuration confirmation box, click Yes.
Generating XML metadata files for IdP
Different types of IdP products have their own way of generating XML metadata files. See the following sections for details on generating XML metadata files for:
- Okta
- Google GSuite
- Microsoft Azure Active Directory (AD)
Generating XML metadata files for Okta
Pre-requisites
- Create an Okta account and add a user as an administrator for configuration.
- Lyve Cloud account name (Tenant name) and administrators account in the console.
Generate an XML file for Okta
To generate an XML file for Okta:
- Create an application in Okta for Lyve Cloud and log in as administrator.
- On the left-hand menu, select Applications and then click Applications.
- Click Create App Integration.

- In the Create a new app integration dialog, select SAML 2.0, and then click Next.

- In the Create SAML Integration section, enter the App name in the General Settings.
- In the Configure SAML section, select the following SAML Settings:
- Audience URI (SP Entity ID): Enter the SP entity ID in the following format: urn:lyvecloud:<TENANT>-saml
- Single sign on URL: Enter the URL in the following format: https://auth.lyve.seagate.com/login/callback?connection=<TENANT>-saml.
For example, consider your Lyve Cloud account (tenant) is mylctenant1 in this case:
- The Single sign on URL is: https://auth.lyve.seagate.com/login/callback?connection=mylctenant1-saml
- The SP Entity ID uri: lyvecloud: mylctenant1 –saml
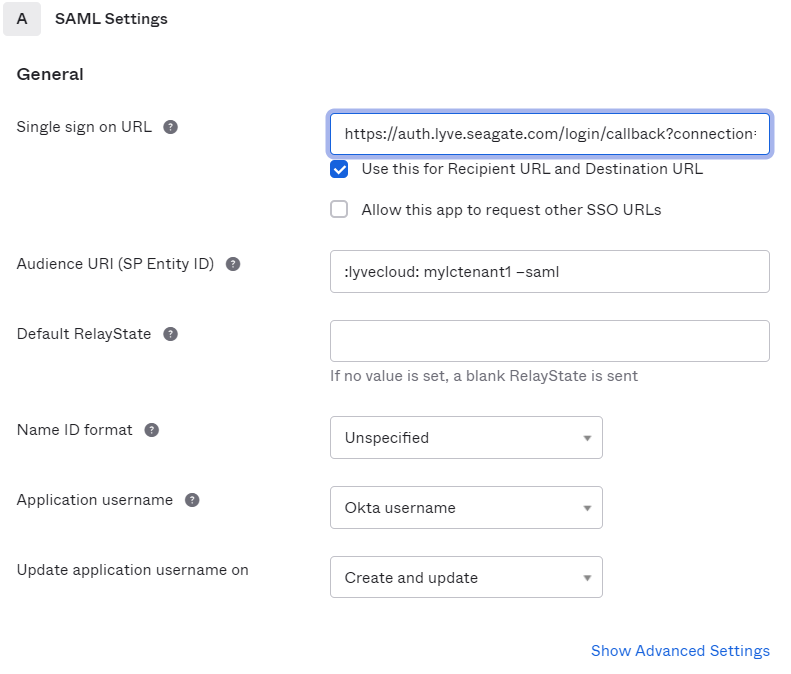
- In the Attribute Statements section set the following values and click Next.
- Name: email
- Value: user.email
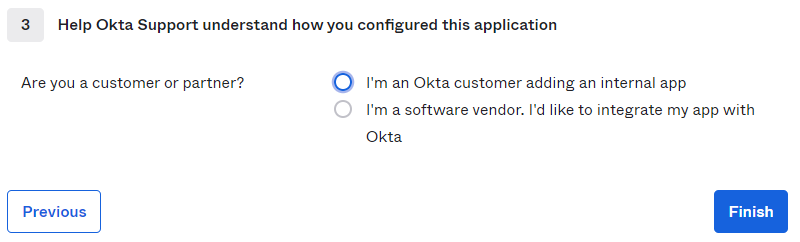
- In the Feedback section, provide feedback to help them understand why the Okta application was configured.
- Select the appropriate option if you are an OKTA customer or a partner, and click Finish.
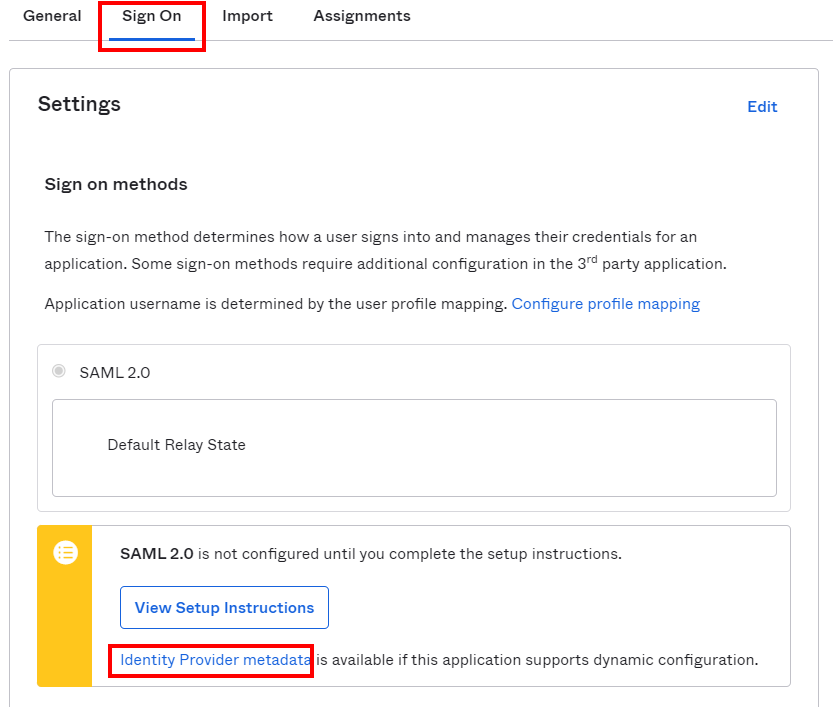
- After the application is generated, you must retrieve the XML metadata file.
To retrieve XML metadata file:
- Click the Sign On tab.
- In the Settings section, click Save and add .xml extension to the file.
- This is the XML file that is used to configure Lyve Cloud federation.
How can an Okta user log in to Lyve Cloud?
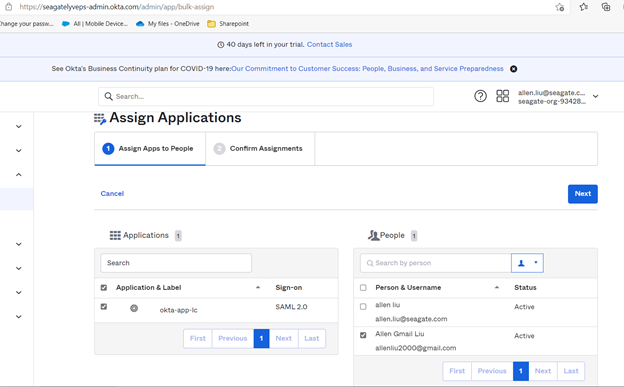
To login to Lyve Cloud user as an Okta user:
- Add a user to your Okta account and assign apps to the users.
- First assign the Okta application to the users. Create a user and assign the authentication type as Federated, ensure that the account is configured as Federated Login. For more information, see Add a user.
An Okta user can log in to Lyve Cloud account by two ways:
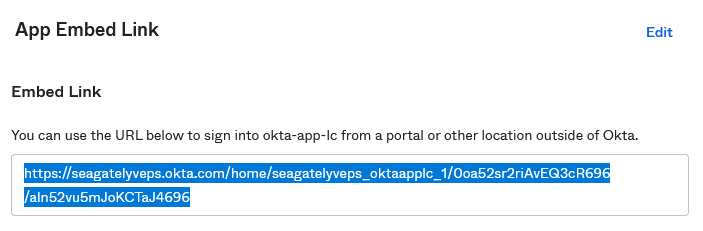
- Select the tile on the Okta Home page to connect to Lyve Cloud. You are redirected to the Lyve Cloud console and are logged in automatically.
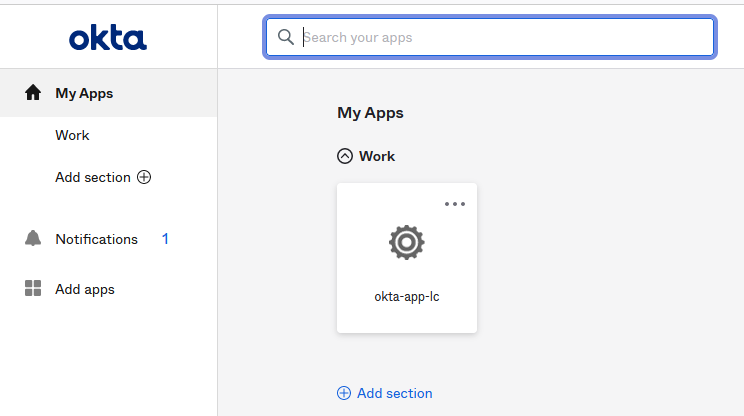
- Copy the embed link from the General tab of the Okta application and paste into a browser.
Generating XML metadata files for Google GSuite
To generate an XML file for Google GSuite:
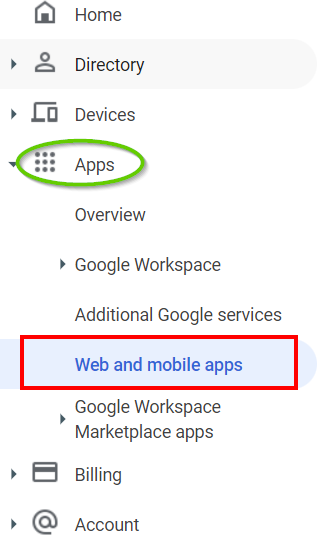
- Create an application in GSuite for Lyve Cloud and log in as administrator.
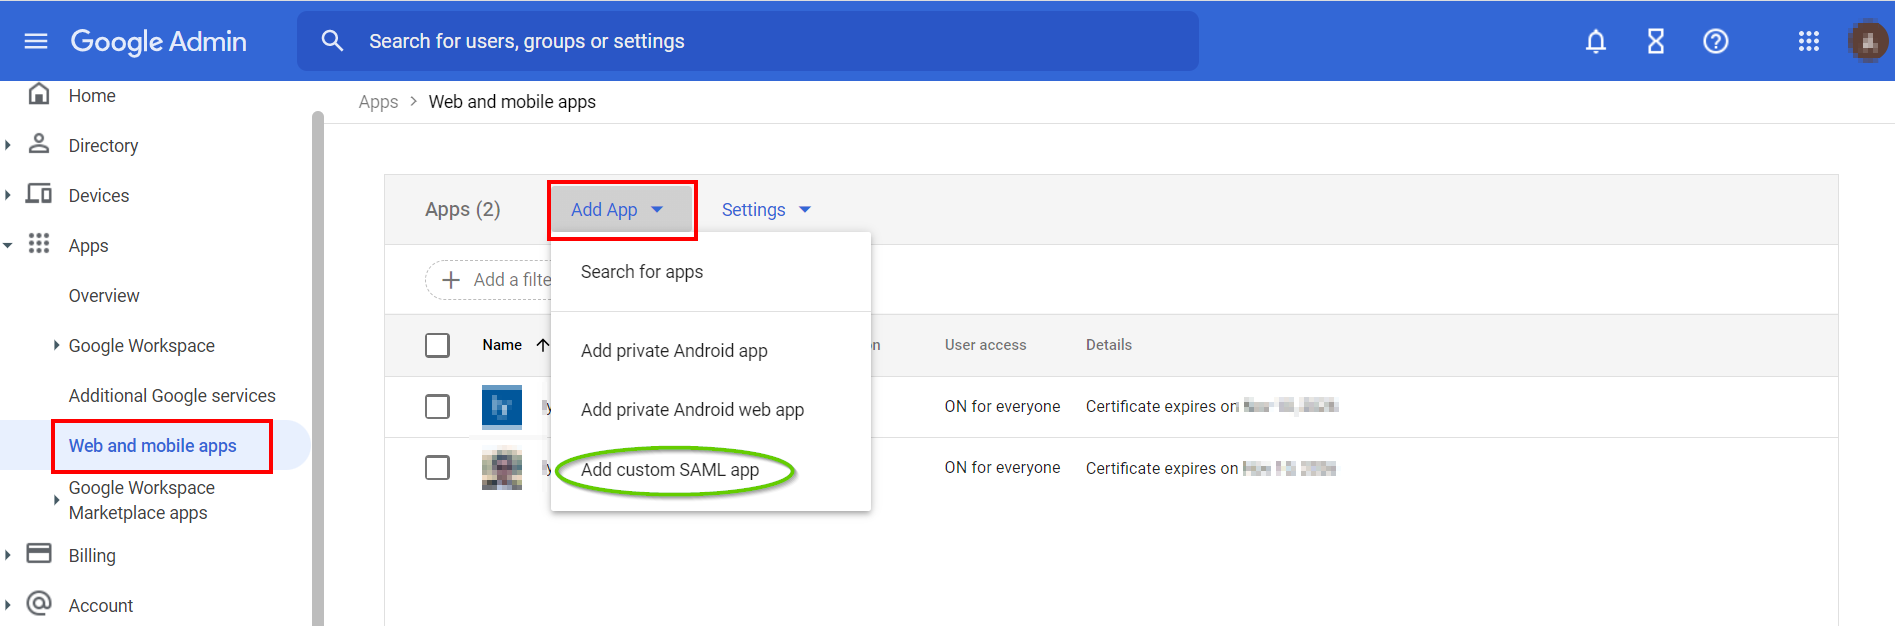
- Click Apps in the left menu, and then click Web and mobile apps.
- In the Web and mobile apps section, click Add App and then select Add custom SAML app.
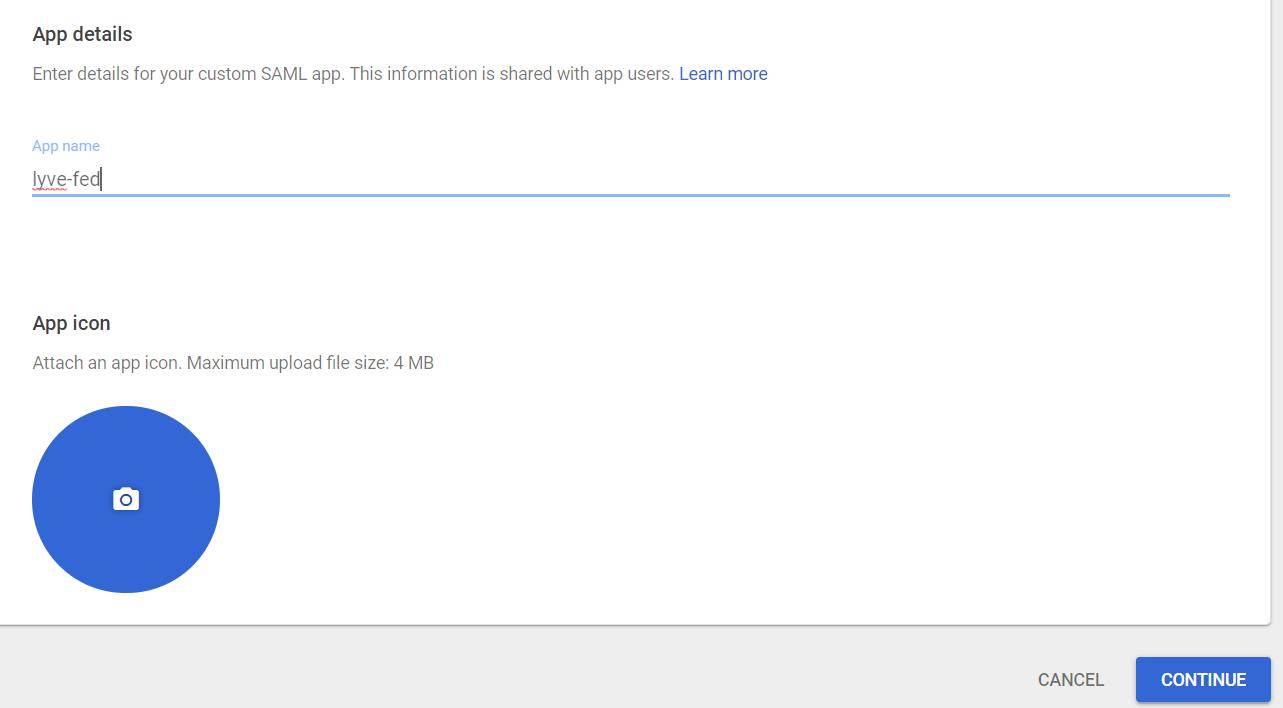
- In the App details section, provide the App name and optionally upload the App icon. Select Continue.
- Click DOWNLOAD METADATA and save the file as an .xml extension. Select Next.
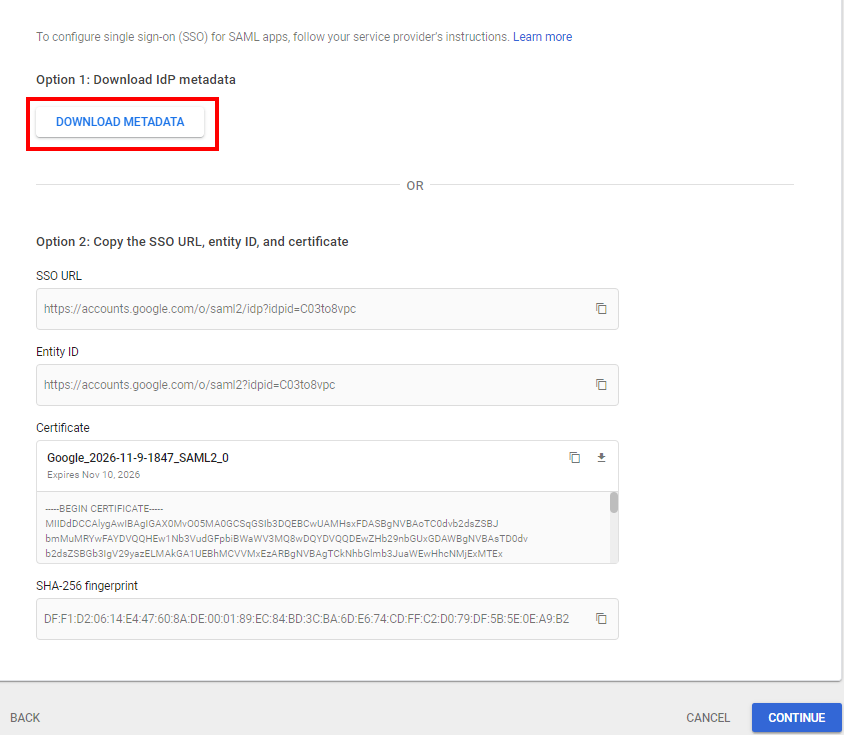
- In the Service Provider details section, enter the following info:
- ACS URL: Enter the URL in the following format: https://auth.lyve.seagate.com/login/callback?connection=<TENANT>-saml
- Entity ID: Enter the SP entity ID in the following format: urn:lyvecloud:<TENANT>-saml
- For example, Consider your Lyve Cloud account (tenant) is mylctenant1 in this case:
- The Single sign on URL is https://auth.lyve.seagate.com/login/callback?connection= mylctenant1 -saml
- The SP Entity ID is urn:lyvecloud: mylctenant1 –saml
- Enter the following info in the NAME ID section:
- In Name ID Format, select EMAIL from the drop-down list.
- Select Basic Information> Primary email from the drop-down list.
- Select Continue.

- In the Attributes mapping section, add the following attributes and click Finish.
- Google Directory attributes: Select Primary email.
- App attributes: Select email.
 /p>
/p>
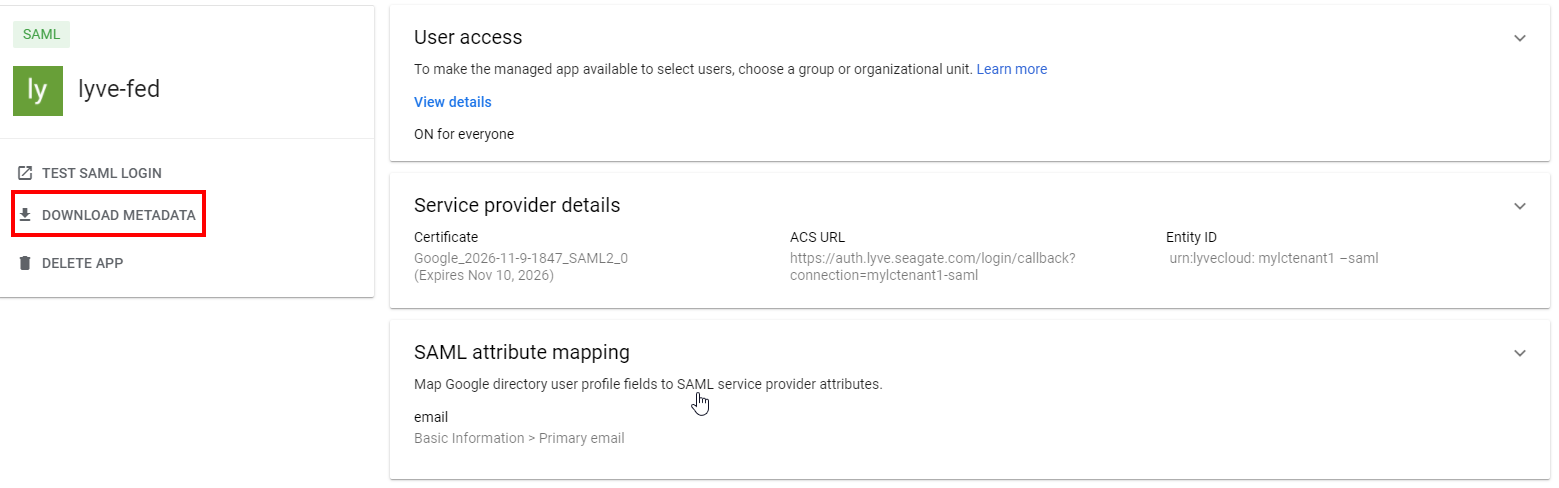
- Once the app is successfully created, the configuration details are displayed.
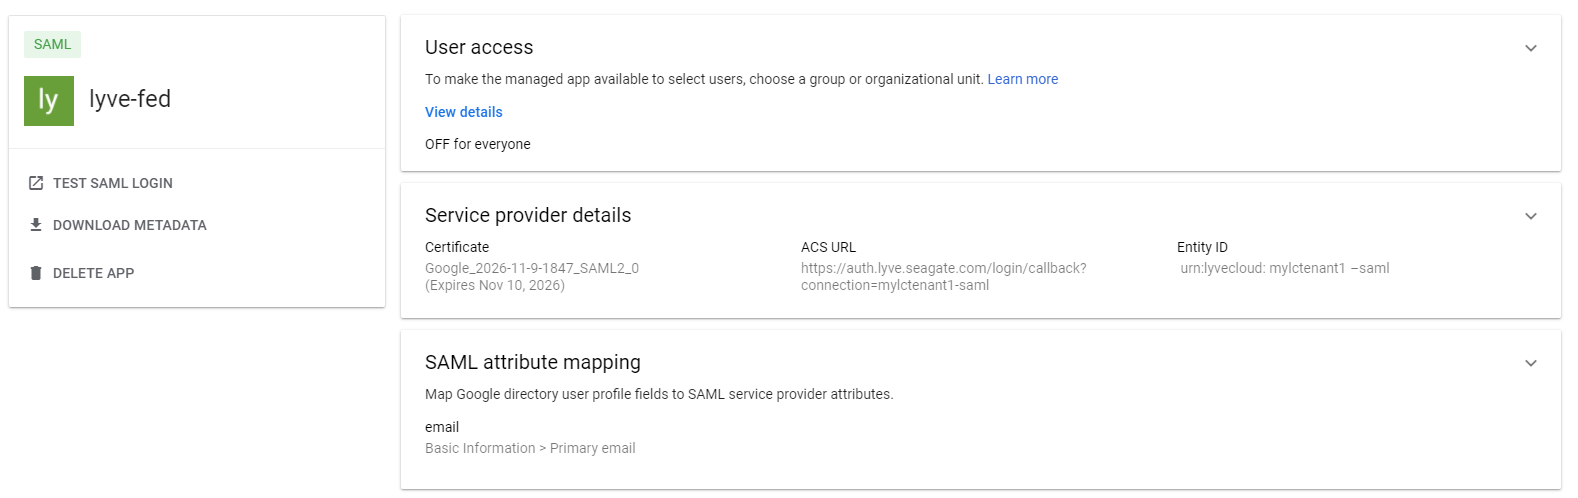
- In the User access section, enable the user access. Select ON for everyone and then select Save.

- Download the Metadata file from the account.
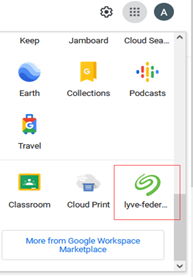
How can a GSuite user log in to Lyve Cloud?
To login to Lyve Cloud user as an GSuite user:
- Log in to your Google account at www.google.com.
- In the right-up corner of the page, select the Lyve Cloud app icon:
Generating XML metadata files for Microsoft Azure AD
To generate an XML file for Microsoft Azure AD:
- Create an application in Azure portal for Lyve Cloud and log in as administrator.
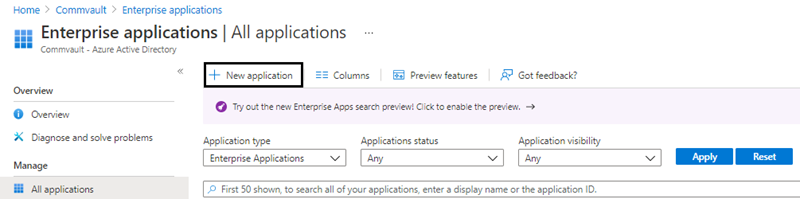
- In the navigation pane, click Azure Active Directory and then select Enterprise applications.
- In the Enterprise application section, click New application.
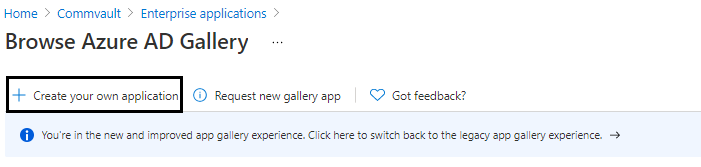
- In the Browse Azure AD Gallery section, click Create your own application.
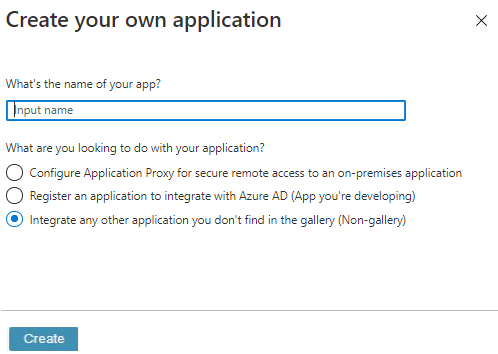
- In Create your own application, enter a name for the application and select the purpose of using the application as Integrate any other application you don't find in the gallery (Non-gallery), and then select Create.
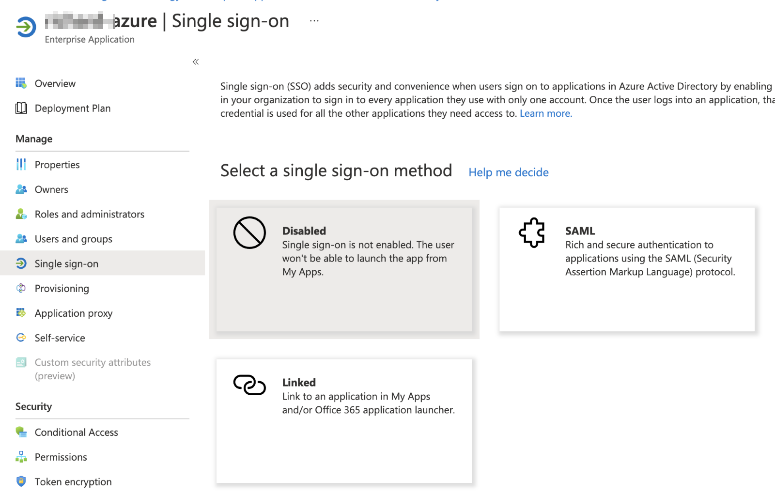
- In the navigation pane, select Single sign-on, and then click the SAML.
In the Basic SAML Configuration section, click Edit:
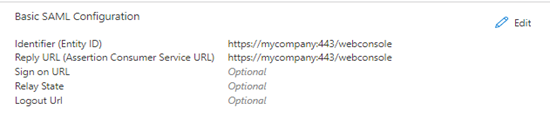
Enter the following:
- Identifier (Entity ID): urn:lyvecloud:<tenant_short_name>-saml.
For example: urn:lyvecloud:seagate-saml
- Reply URL (Assertion Consumer Service URL): https://auth.lyve.seagate.com/login/callback?connection=<tenant_short_name>-saml .
For example: https://lyvecloud-sandbox.us.auth0.com/login/callback?connection=seagate3-saml
- In the SAML Signing Certificate section, click Download against Federation Metadata XML.
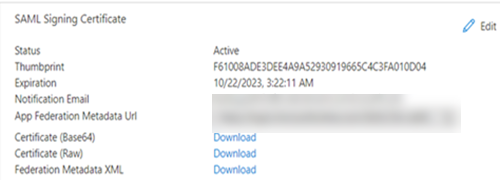
This XML metadata file is used to upload for Federation configuration on Lyve Cloud console. For more information, see Configure Lyve Cloud as a service provider.
How can a Microsoft Azure user log in to Lyve Cloud?
Before you login, ensure the user must be an existing AD user, so users can utilize SSO via Azure AD.
To login to Lyve Cloud user as an Azure user:
- Log in to the Azure account as the administrator.
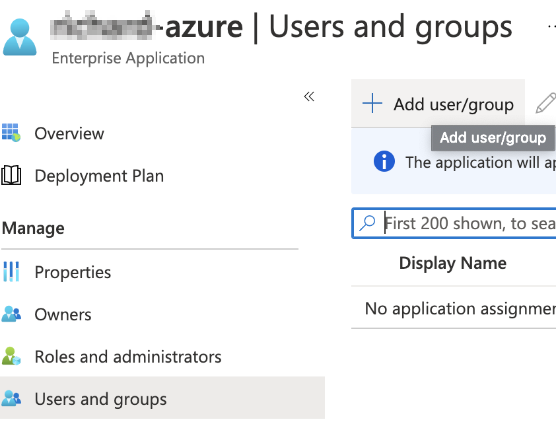
Select Users and groups and then select Add user/group to add the existing Azure user. This user is granted permission to use Lyve Cloud application.
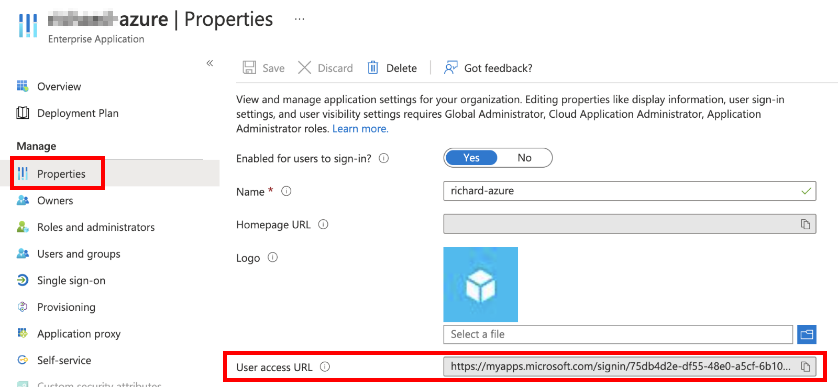
- Select Properties and copy the User access URL. You must provide this URL to the user to login Lyve Cloud using Azure credentials
Managing notification recipients
The notification feature allows people to receive service notices and other important Lyve Cloud information via email. Add any number of notification recipients, even if they are not registered as Lyve Cloud users. Any user that is added as an Administrator, Storage Administrator, or Auditor is automatically added to the recipient list.
Once you add someone to the notification list, they start receiving service announcements and product-related emails.
Recipients can stop receiving these notifications in the following ways:
- An administrator removes the recipient from the notification list.
- The recipient selects the Unsubscribe link in any notification email.
- An administrator disables the registered Lyve Cloud user.
Adding a recipient
To add a recipient to receive notifications:
- On the left-hand menu, select Notifications.
- On the Recipients page, select Add New Recipient.
- Enter the First Name, Last Name, and Email, and then select Add.
Editing a recipient
You can only edit data for recipients who are not registered as users in Lyve Cloud.
To edit a recipient:
- On the left-hand menu, select Notifications.
- On the Notifications page, select Edit.
- Edit the user information and select Edit.
The recipient's list on the Notifications page displays the changes.
Removing a recipient
To remove a recipient:
- On the left-hand menu, select Notifications.
- On the Notifications page, select Remove next to the recipient's name.
- Select Yes, Remove in the confirmation.
The recipient is now removed from the list.
Video: Lyve Cloud - How to add a notification request
Seagate on Vimeo: Lyve Cloud - How to add a notification request