Esse conteúdo foi útil?
Como poderíamos tornar este artigo mais útil?
Lyve Cloud with NAKIVO Backup and Replication
Add a Lyve Cloud account in the Invventory
Lyve Cloud is one of the supported S3-compatible object storage vendors in NAKIVO Backup & Replication.
Prior to creating backup, replication, or recovery jobs, you need to add your virtual/cloud/physical infrastructure or supported storage device to the product’s Inventory.
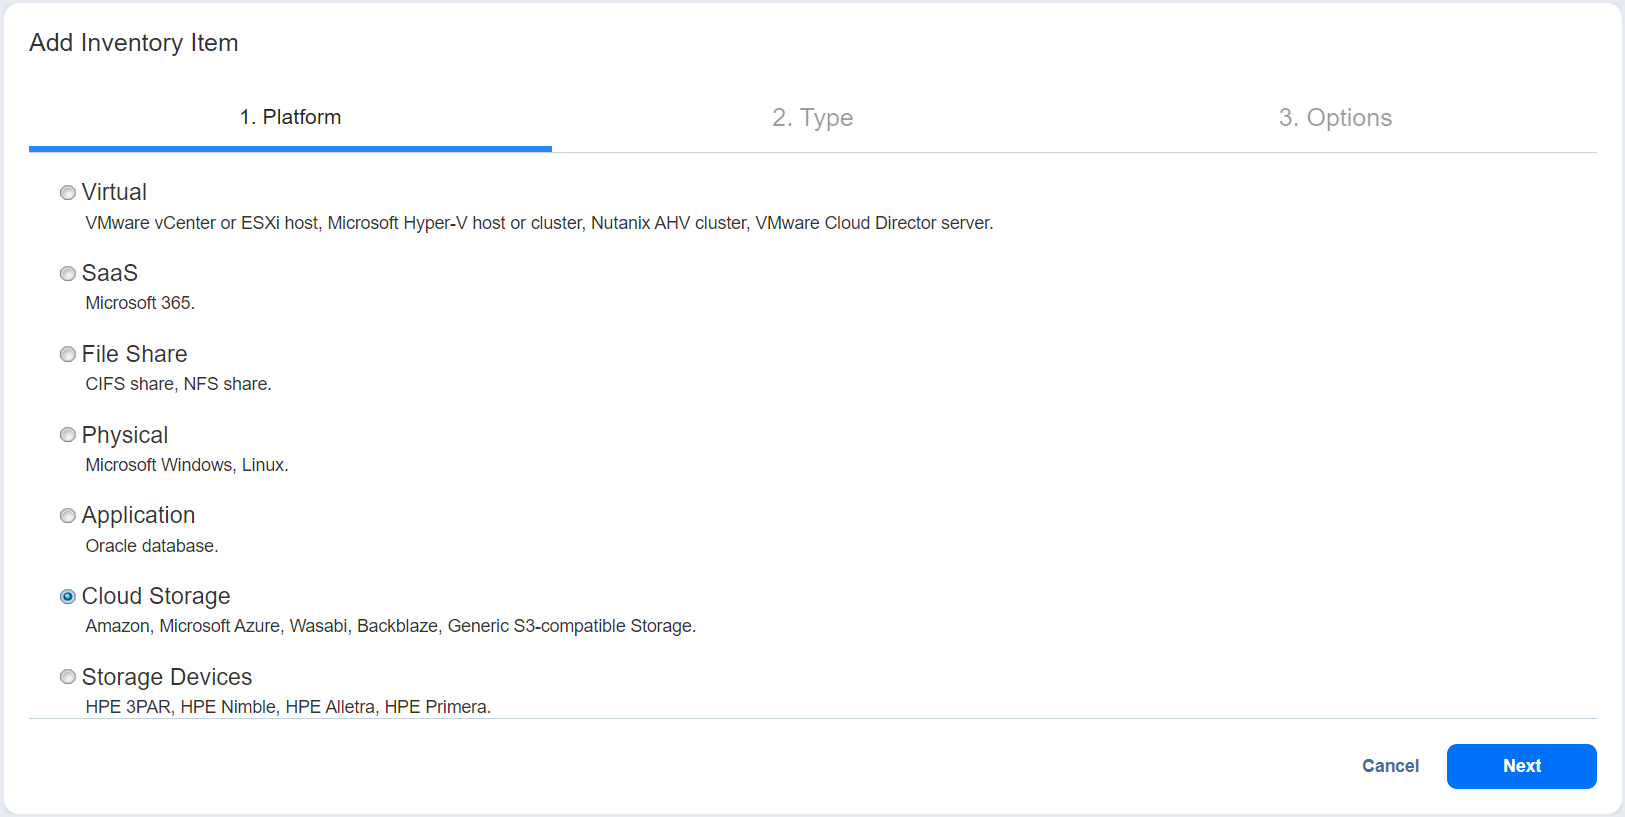
To add a Lyve Cloud storage account to the Inventory in NAKIVO Backup & Replication:
- Select Settings in the main menu of NAKIVO Backup & Replication.
- Go to the Inventory page and select the + icon.
- On the Platform tab, select Cloud Storage, and then select Next.
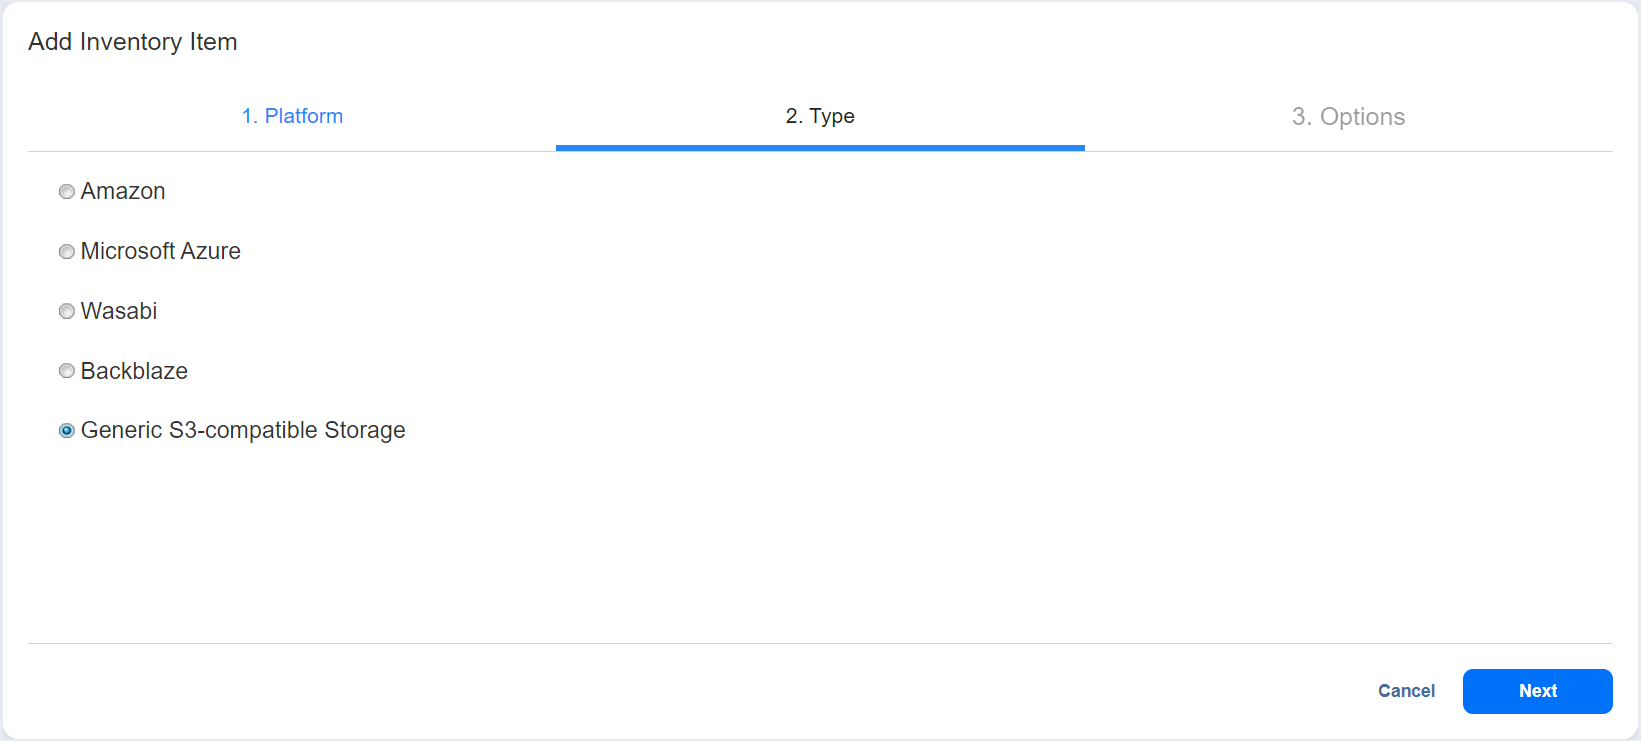
- On the Type tab, select Generic S3-compatible Storage, and then select Next.
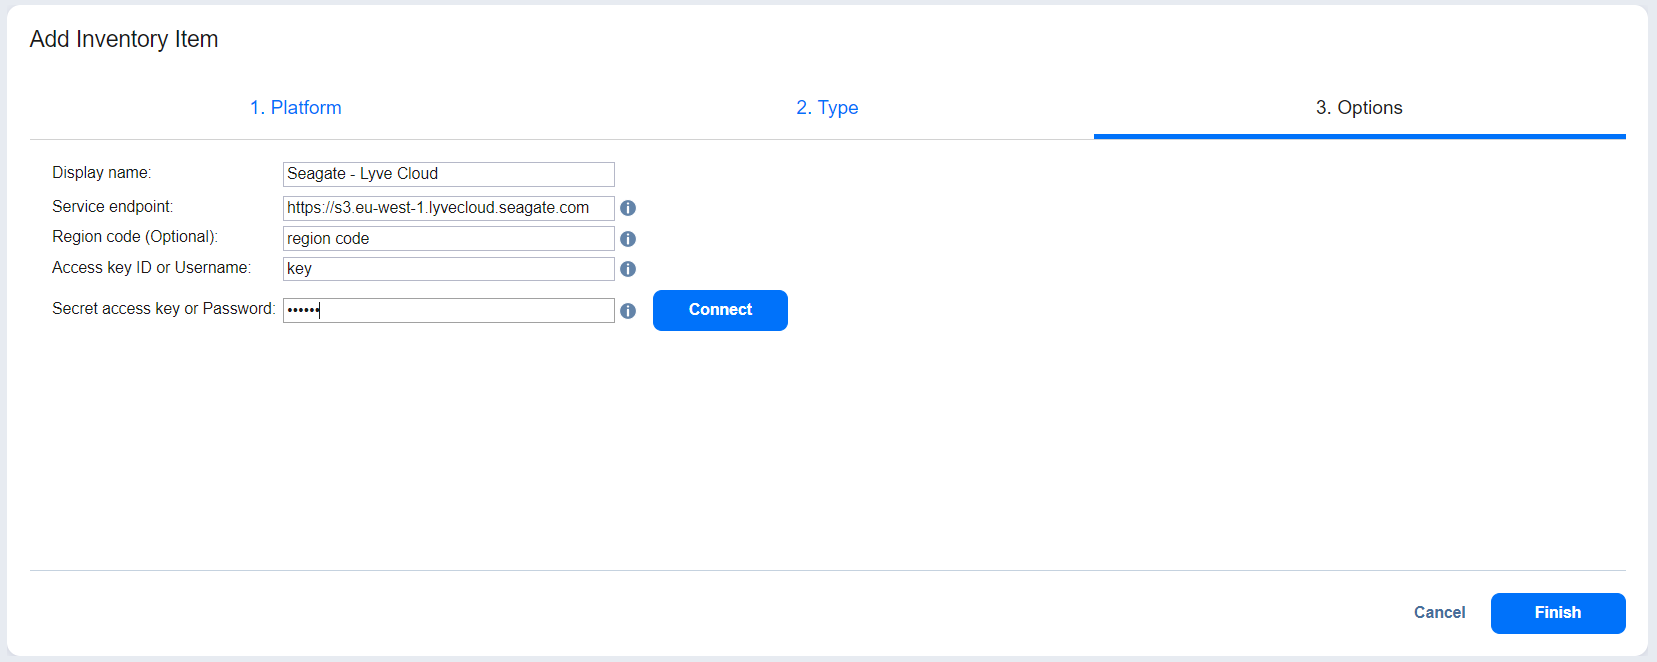
- On the Options tab, enter the following details:
| Display name | Specify a name for the S3-compatible object storage device. This name will be displayed in the Inventory. |
| Service endpoint | Enter a full HTTP/HTTPS URL that is used to access the storage. |
| Region code | (Optional) Enter the technical region code where the data is stored. To enter several region codes, separate them using a semicolon ; character. It is strongly recommended to leave this field blank. |
| Access key ID or Username | Enter the storage access key ID or username that was created during account setup or on the App Keys page in your storage account. |
| Secret access key or Password | Enter the storage secret access key or password that was created during account setup or on the App Keys page in your storage account. |
- Select the Connect button to bring up the Certificate Details dialog.
(Optional) Select Auto accept new certificate if this certificate is expired or changed.
Select Accept to confirm the certificate.
- Select Finish.
Create a Backup Repository in Lyve Cloud
NAKIVO Backup & Replication allows you to create Backup Repositories for storing backups. You can use a local folder, NFS share, CIFS share, public cloud, or deduplication appliance as a Backup Repository location.
To add a Backup Repository to Lyve Cloud in NAKIVO Backup & Replication:
- Select Settings in the main menu of NAKIVO Backup & Replication.
- Go to the Repositories page. Select the + icon, and then select Create new backup repository.
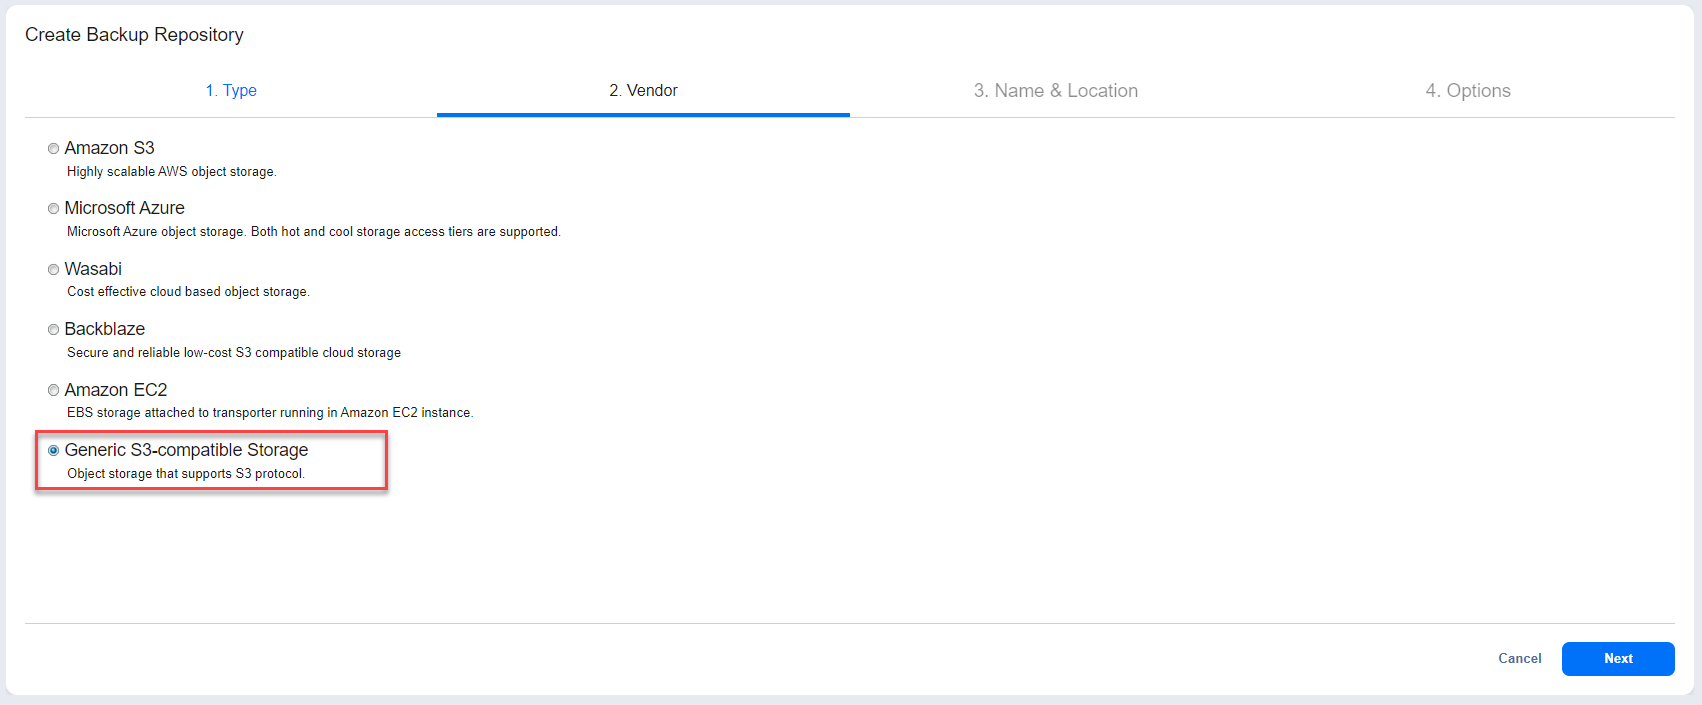
- On the Type tab, select Cloud & S3-Compatible Storage, and then select Next.
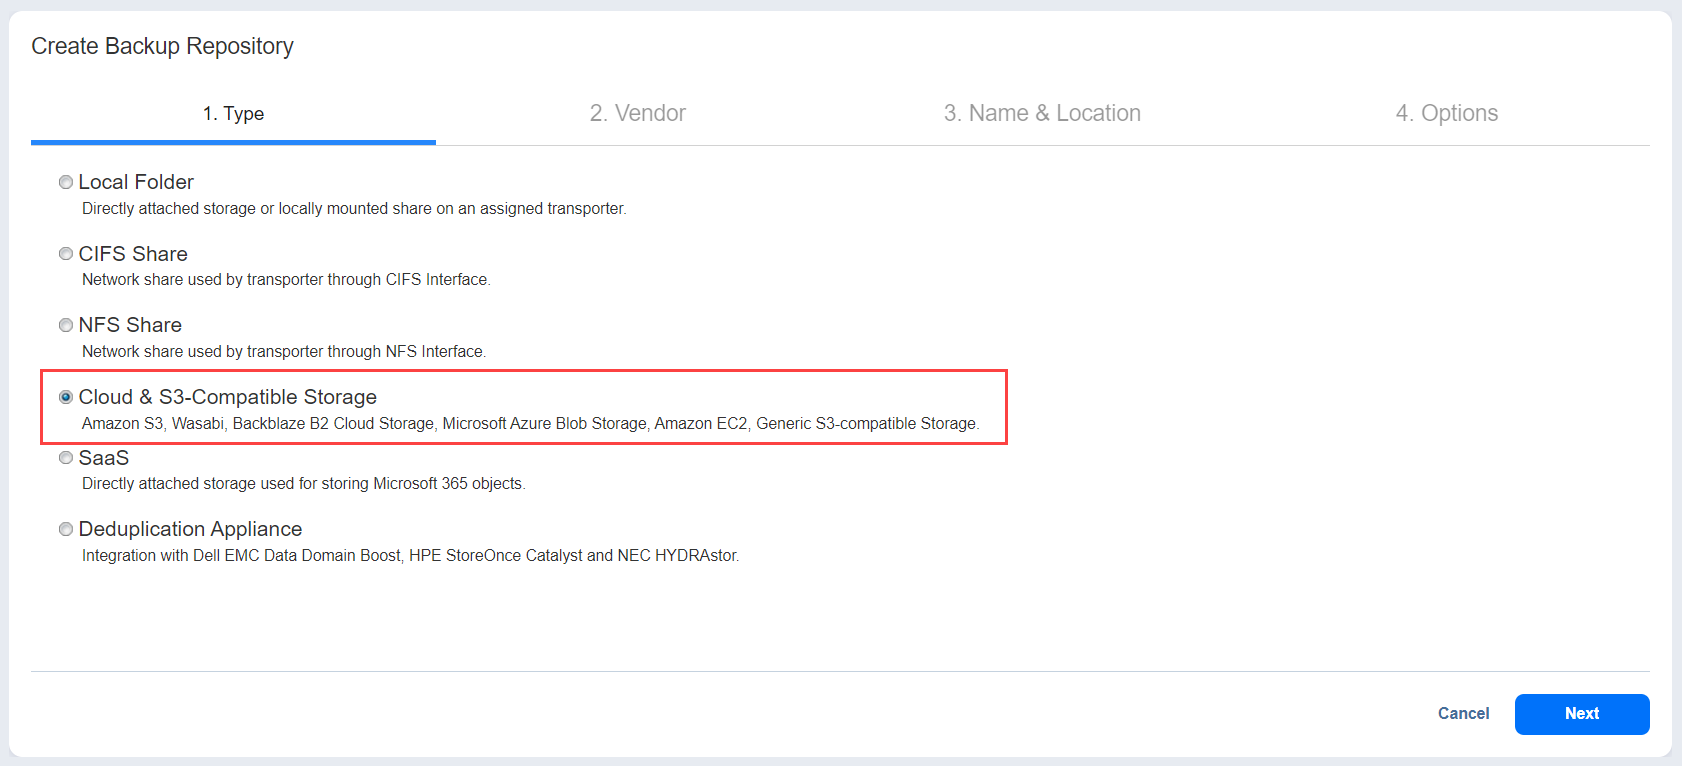
- On the Vendor tab, select Generic S3-Compatible Storage, and then select Next.
- On the Name & Location tab, enter the following:
| Name | Enter the name of the backup repository. |
| Assigned transporter | Select Transporter. |
| Account | Select the existing S3-compatible object storage where the backup repository will be located. (Optional) Select the Add new account link if you have not yet added a generic S3-compatible object storage account to the Inventory. |
| Bucket | Select the bucket where you want to store your backups. |
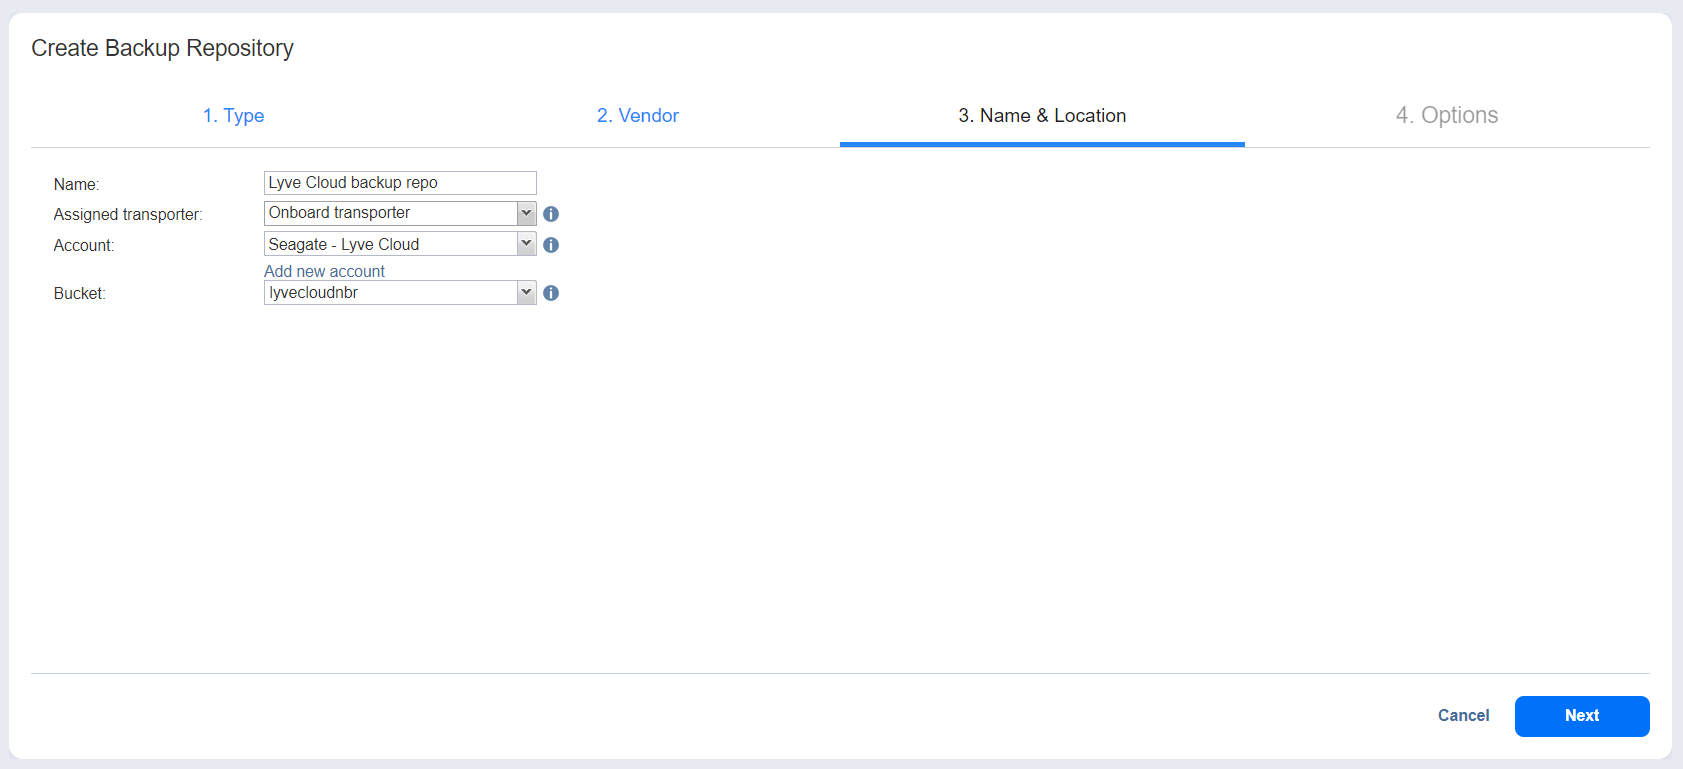
Select Next.
- On the Options tab, specify the following:
| Storage Savings | |
|---|---|
| Data size reduction | Enable or disable compression for reducing the data size in the backup repository. Note that higher compression levels consume considerably more CPU and may slow down the backup speed. When enabled the following settings are available:
|
| Reliability | |
| Run full data verification on schedule OR Stop backup and recovery to run full data verification |
When Run full data verification on schedule is selected, the product runs full verification of all data available in the backup repository according to the specified schedule. The product reads each block of data and ensures that it is identical to the data block that was read on the source machine during the backup. In this way, the product verifies each recovery point in the backup repository. When Stop backup and recovery to run full data verification is selected, any running jobs that use this backup repository are stopped to run scheduled data verification. When this option is not selected, scheduled data verification is skipped if there are running jobs on this backup repository. Note—Backup verification is a time-consuming process and utilizes the CPU resources of the Transporter assigned to the Backup Repository. It is recommended that you schedule backup verification during non-working hours. |
| Enforce explicit file system sync | When this option is selected, explicit sync with the file system is enforced during all backup operations to this repository. This setting is considered more reliable but may lead to lower performance on certain storage devices. By default, the option is disabled. |
| Scheduled Detach | |
| Detach this repository on schedule OR Delete and re-create the repository on attach |
Select Detach this repository on schedule if you want to detach and then attach the backup repository on a schedule. Detaching a backup repository saves its data and metadata in a consistent state and then stops the product's interaction with the backup repository (so that it can be copied or moved). You can use this feature, for example, for the disk-to-disk-to-tape (D2D2T) data protection approach, in which backups are stored on a disk for fast operational recovery, and copied to a tape (while the repository is detached) for archiving and long-term storage. Select Delete and re-create the repository on attach if you want all the data in the backup repository erased prior to attaching the repository to the product. As a result, jobs that write to this backup repository create full backups. You can use this option, for example, to create full daily, weekly, or monthly backups and write them to tape or removable media. |
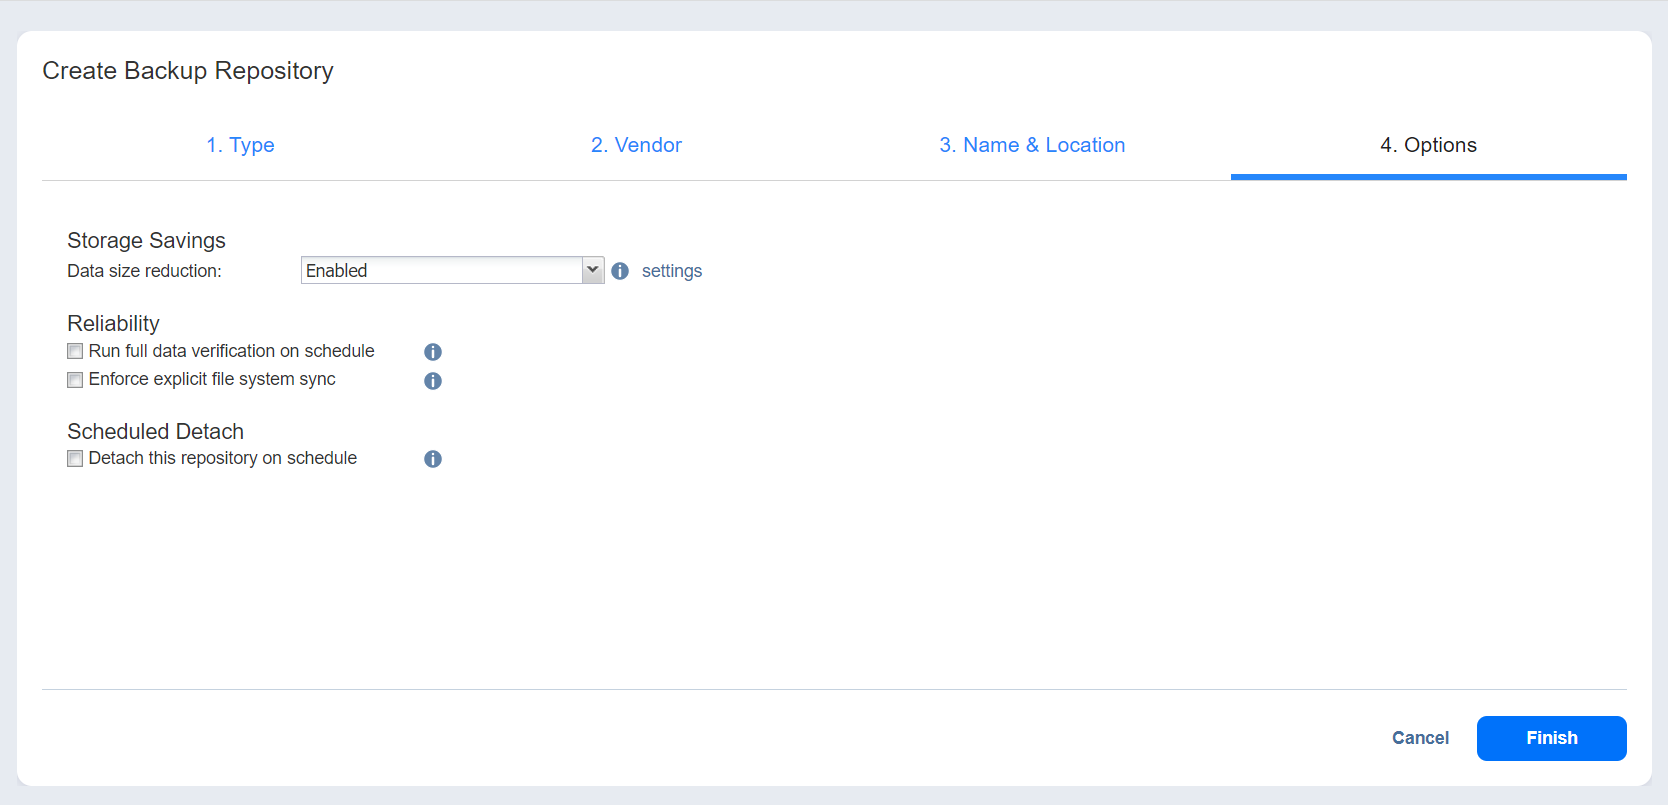
- Select Finish to complete the backup repository setup.
Create a Backup Job
NAKIVO Backup & Replication offers a complete suite of backup features to protect physical, virtual, and cloud environments.
Below are the steps to back up VMware VMs to a repository in Lyve Cloud.
With NAKIVO Backup & Replication, you can back up VMware VMs by creating a backup job that specifies which VMs should be backed up, where the backups should be located, how often the backup should be run, and what backup options should be used.
To get started, select the + icon on the Jobs menu, and then select Backup for VMware.
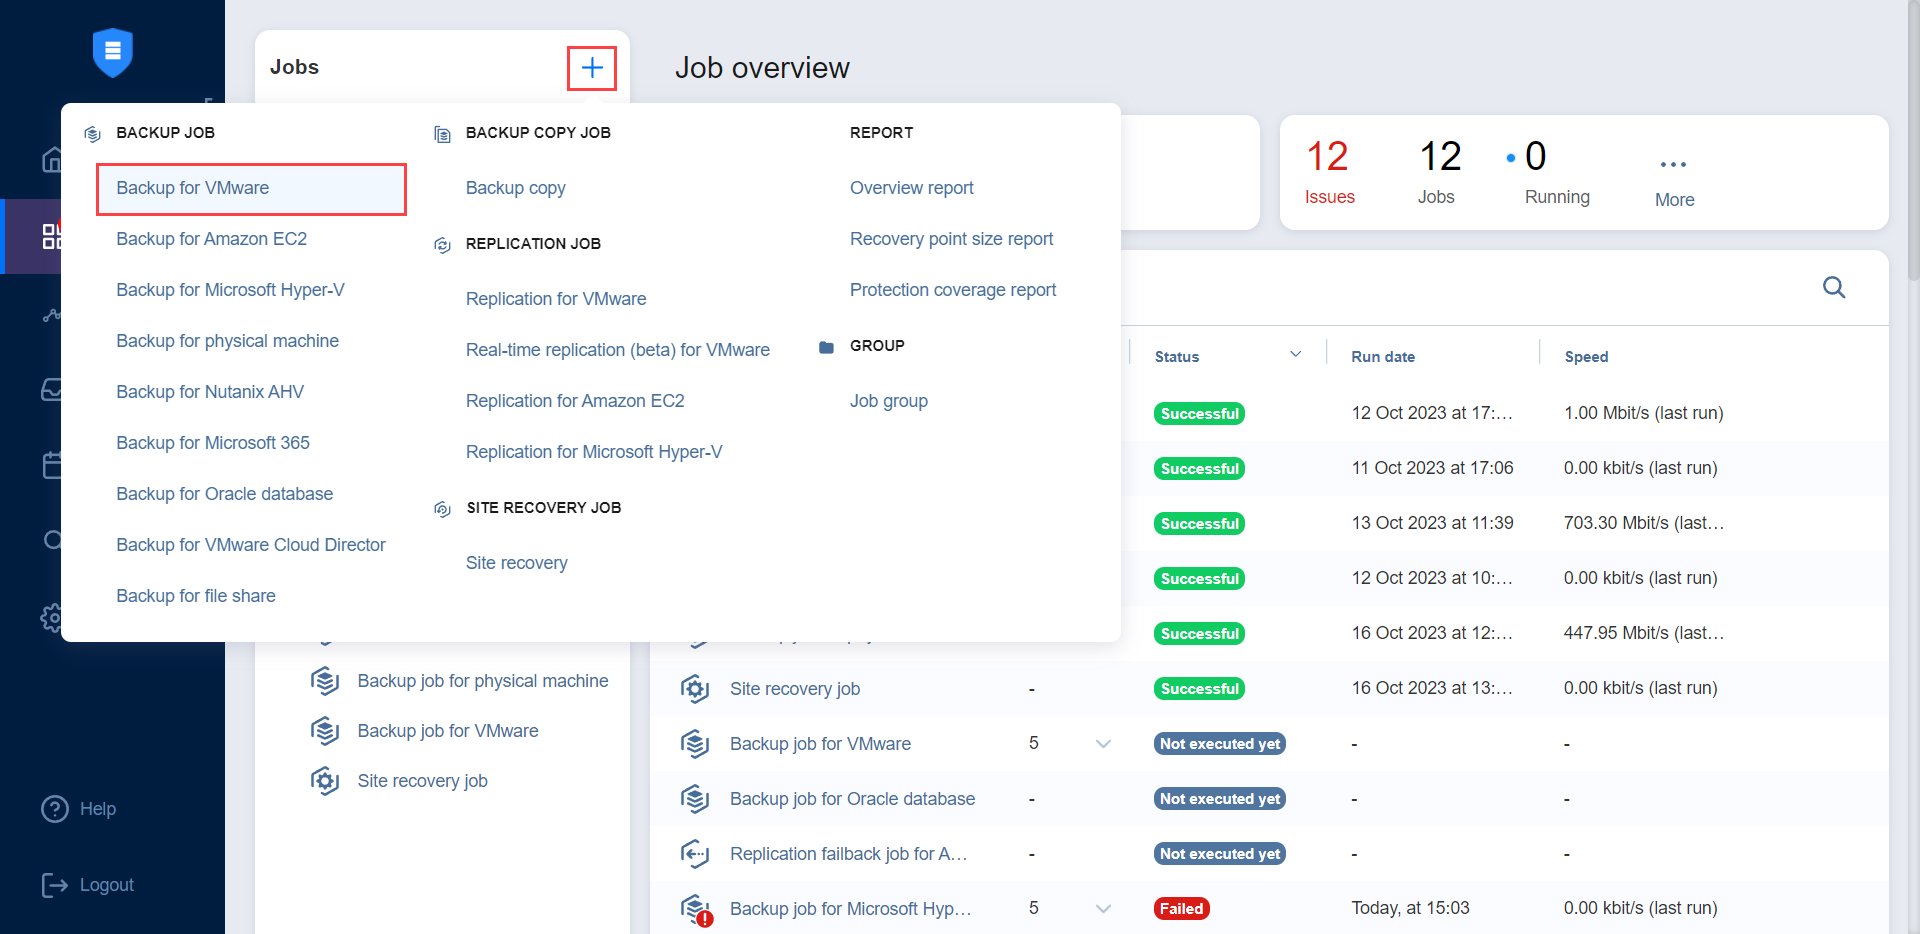
Complete the steps in the New Backup Job Wizard for VMware.
Source step
On the Source tab in the wizard, you can add VMware VMs to your backup job by using one of the inventory views.
- Hosts and Clusters
- VMs and Templates
- Policy
The Hosts & Clusters view is selected by default. The inventory tree displays all VMware items: clusters, hosts, folders, resource pools, and VMs. Proceed as follows:
- If needed, filter the inventory tree by entering a string into the Search field. You can enter some or all of an item name.
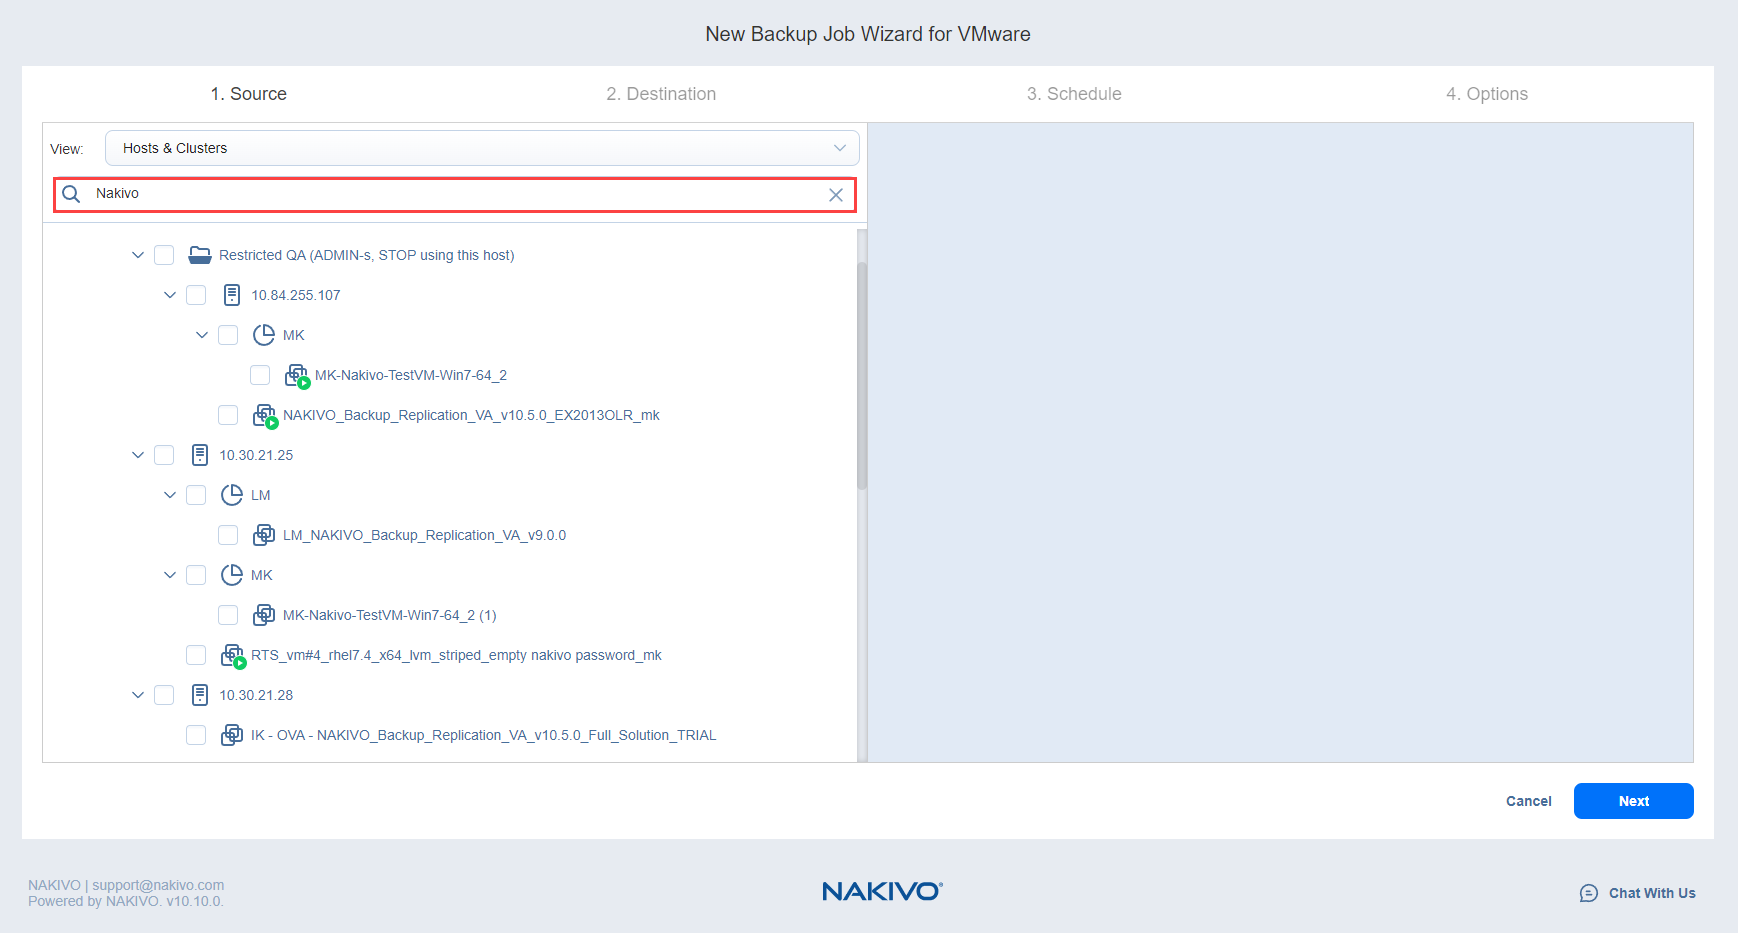
- Select checkboxes of VMware items for backup. Selected items appear in a source list on the right side of the page.
- If needed, you can reorder source items by dragging a VM or container to a new position in the list. The source list prioritzes the items being backed up.
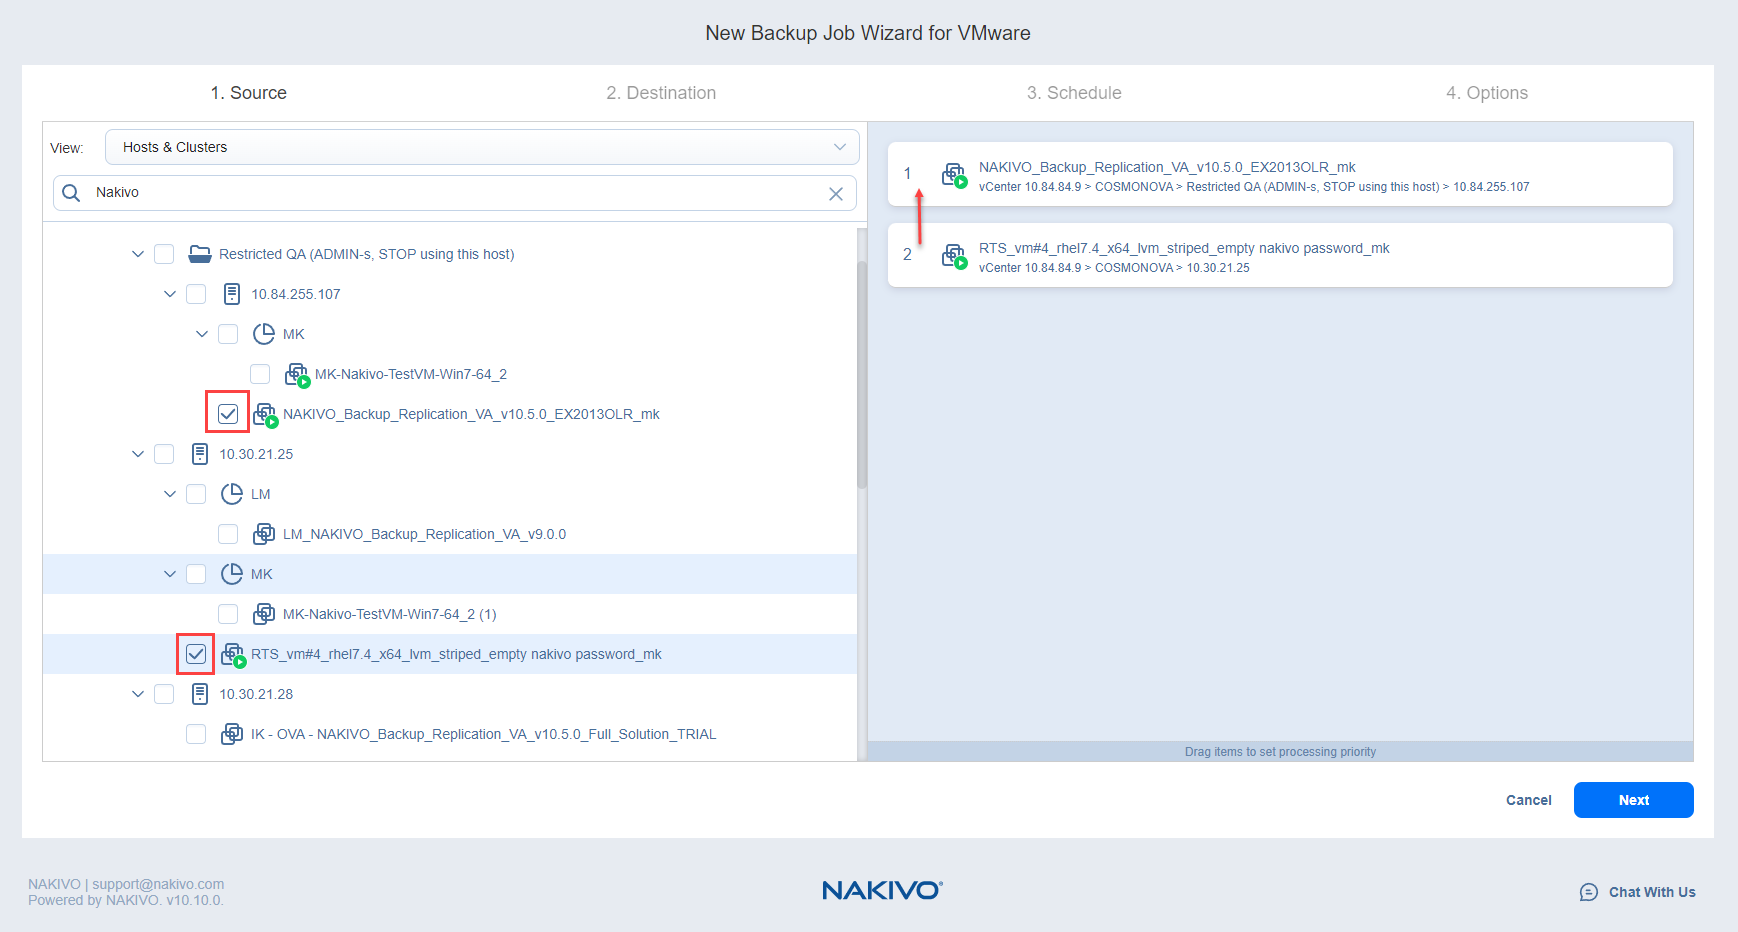
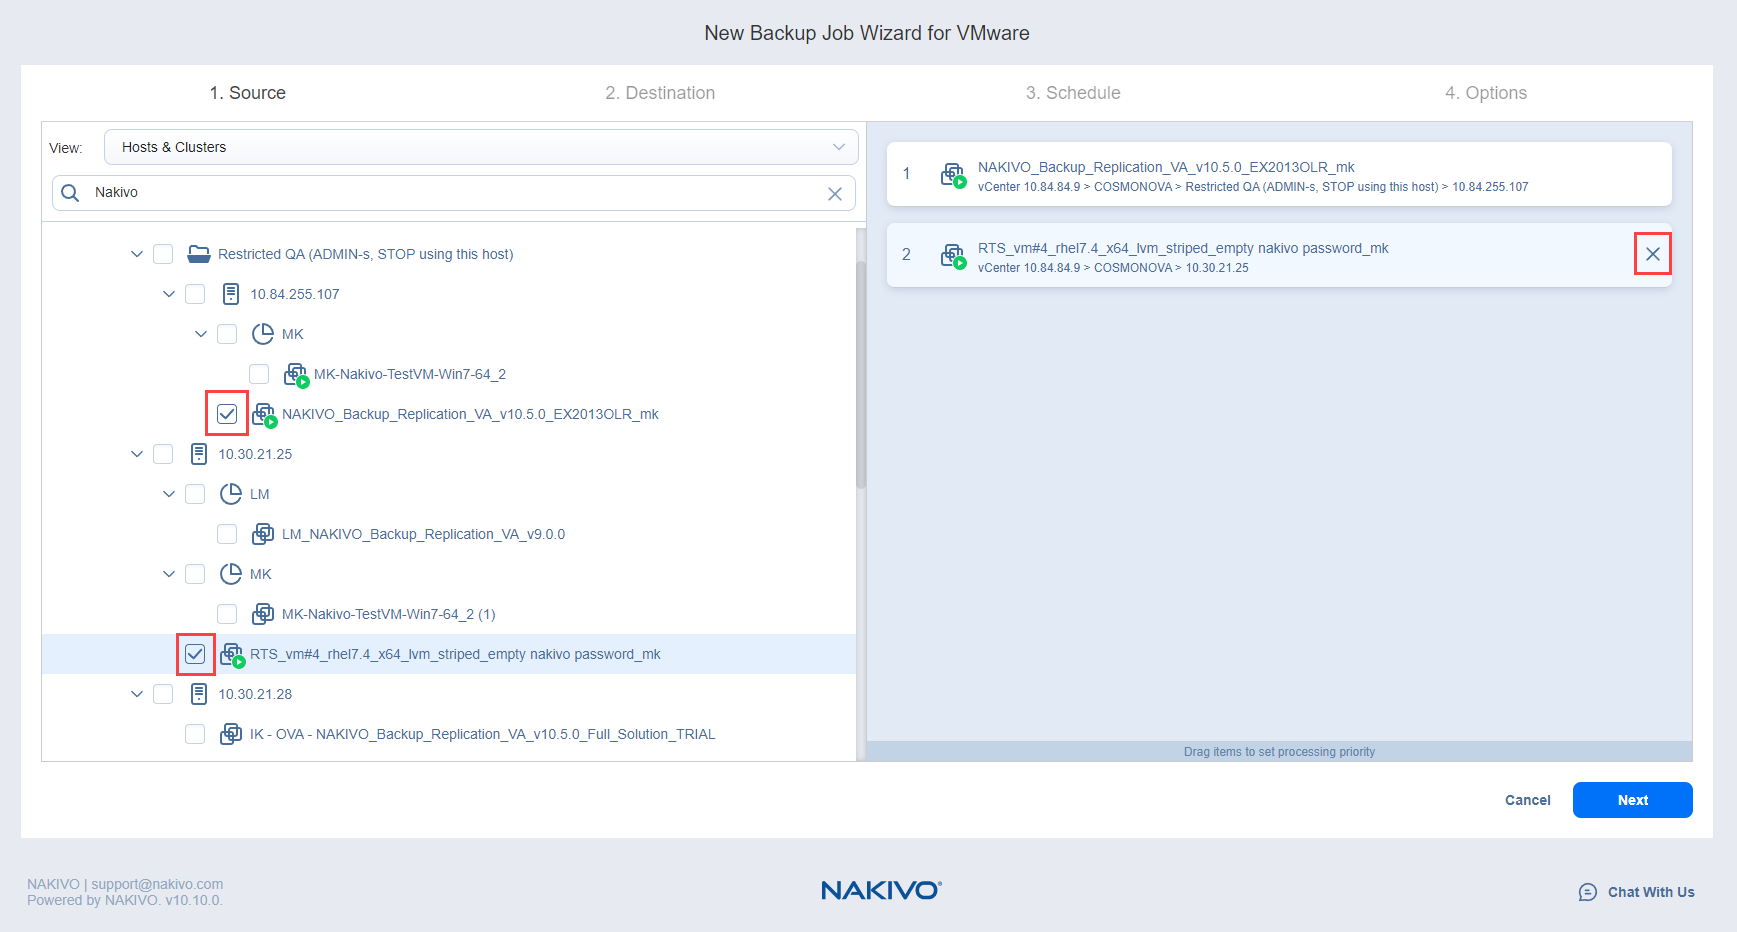
- Review items in the source list. If needed, you can remove a selected VM or container from the backup job in one of two ways:
- Deselect the object in the inventory tree. This will remove the object from the source list.
- Hover over an item in the source list and select the X icon. This will deselect the item in the inventory tree.
- Select Next.
Destination step
- On the Destination tab, choose the added Lyve Cloud repository from the Destination drop-down list.
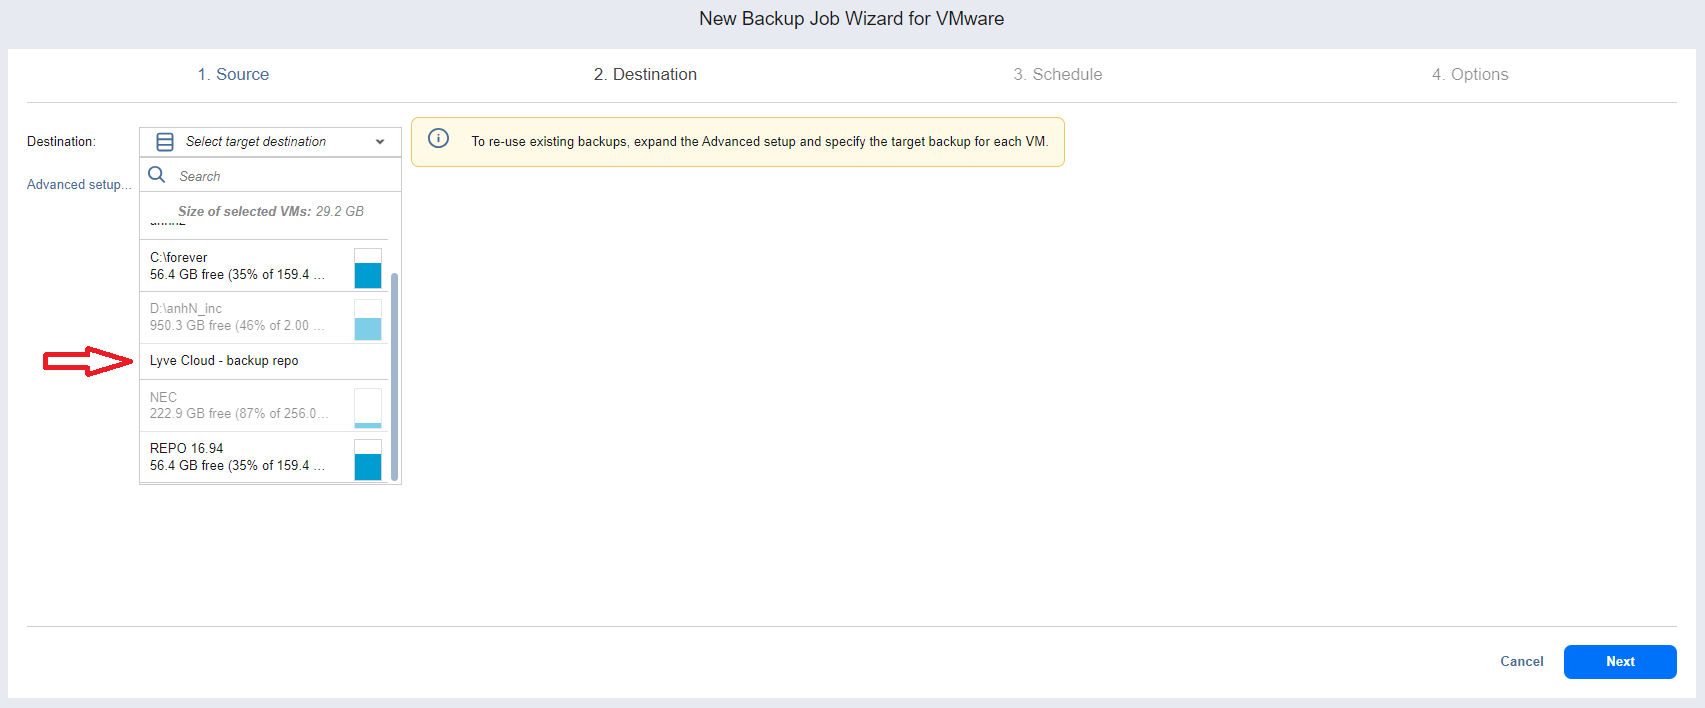
- Select Next.
Schedule step
On the Schedule tab, specify whether to run the backup job manually or as a scheduled job.
Creating new schedules
Before creating a new schedule, you can enable the following settings:
- Do not schedule, run on demand—Enable this option if you want to start the job manually.
- Prioritize schedules—When this option is selected, NAKIVO Backup & Replication starts treating schedules based on their priority. The Yearly schedule will have higher priority than the Monthly schedule, and so on. If two or more schedules overlap, the schedule(s) with the lower priority will be skipped.
When creating any type of schedule, use the Show Calendar / Hide Calendar options to control the calendar display.
When Amazon EC2, Amazon S3, generic S3-compatible storage, Wasabi, Azure Blob Storage, Backblaze B2 Cloud Storage, or Local Folder is selected as the backup repository type and the only backup destination, you can make recovery points in these repositories immutable during schedule creation. With immutability enabled, the recovery points are immutable and stored using the write-once-read-many (WORM) model. For Amazon EC2, Amazon S3, generic S3-compatible storage, Wasabi, Azure Blob Storage, or Backblaze B2 Cloud Storage types of backup repository, immutable recovery points cannot be overwritten, deleted, or changed by the root user until the specified period has expired. For a Local Folder type of backup repository, the root user can still clear immutability.
When creating the schedules, you can create schedules of the following types:
- Weekly
- Monthly
- Yearly
- Periodical
- After Another Job
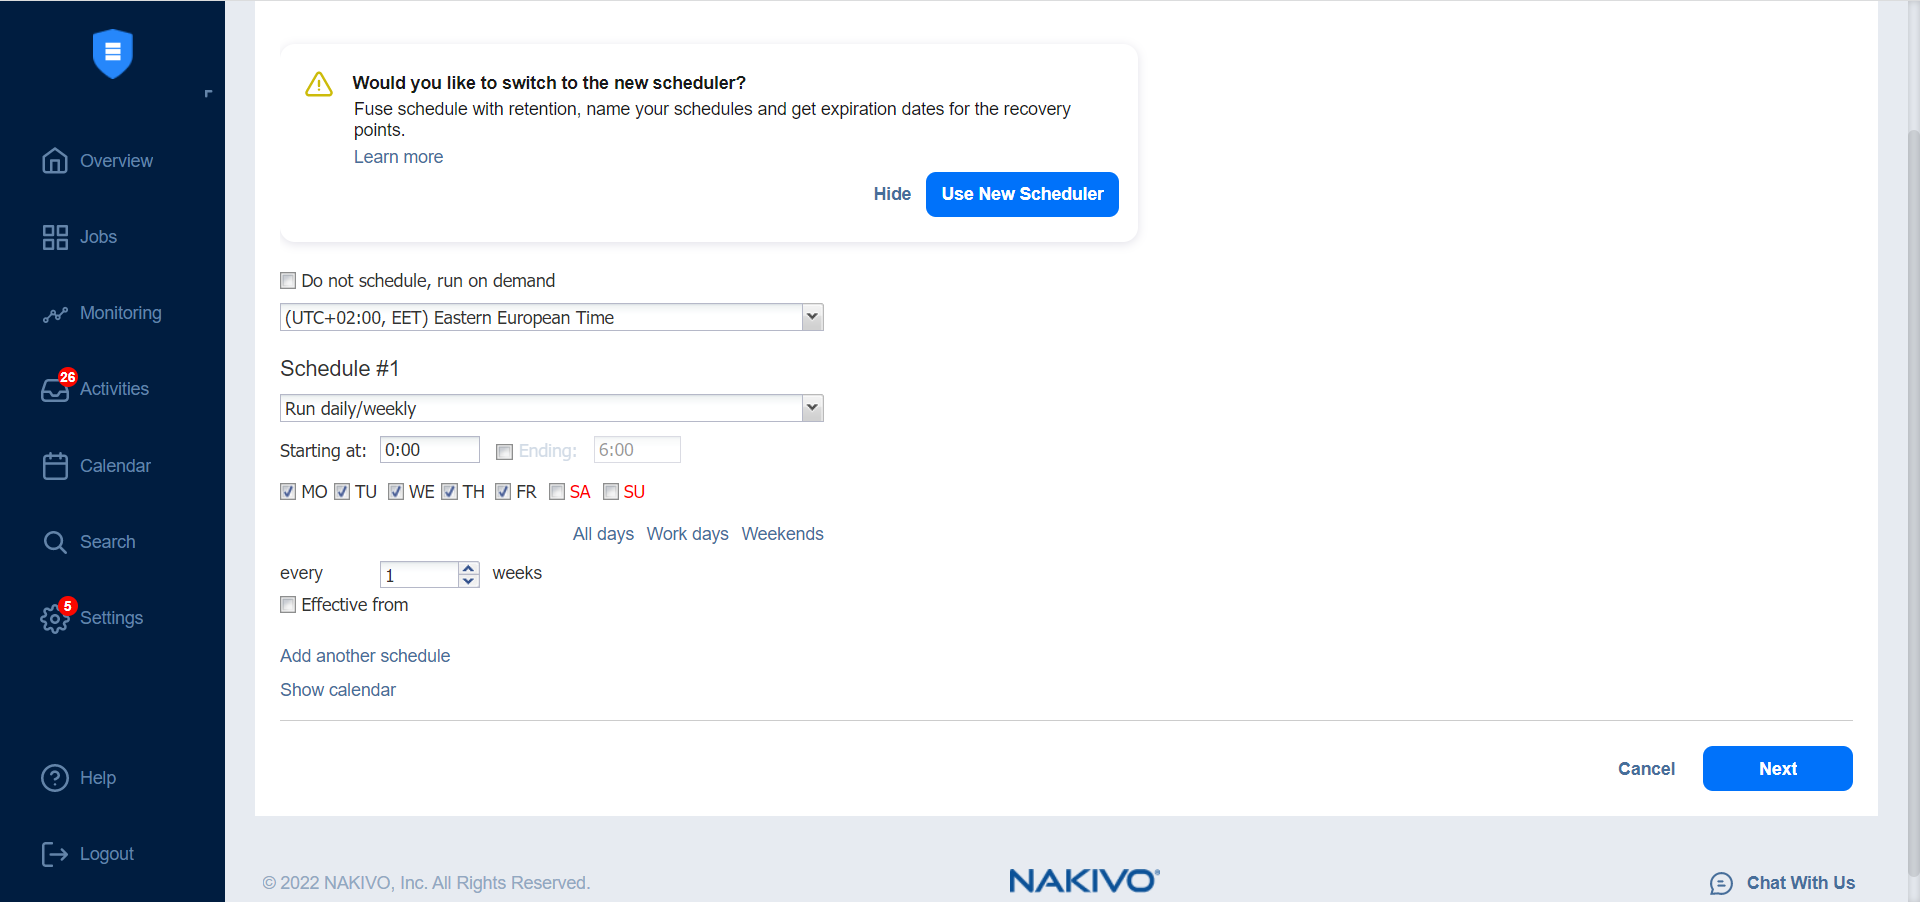
Creating legacy schedules
Before creating a new schedule, you can optionally enable the following settings:
- Use New Scheduler—Select to switch to the Improved Retention Approach.
- Do not schedule, run on demand—Enable if you want to start the job manually.
- Add another schedule—Select if you want to add more than one schedule.
When creating any type of schedule, use the Show Calendar / Hide Calendar options to control the calendar display.
You can create schedules of the following types:
- Run daily/weekly
- Monthly/yearly
- Run periodically
- Run after another job
Switching to Improved Retention Approach
NAKIVO Backup & Replication offers two approaches to retention and scheduling: the legacy or the improved approach. To learn more about how the legacy and improved approaches work, see Recovery Point Retention. If you create a new job or edit the existing one that uses the legacy approach, a dialog appears offering that you to switch to the improved retention approach in the following cases:
- You have updated your instance of the product to v10.8 or later from an older version.
- You have imported a configuration to an instance of NAKIVO Backup & Replication v10.8 or later from an older version.
Note—If you install NAKIVO Backup & Replication v10.8 or higher, the new approach is enabled by default.
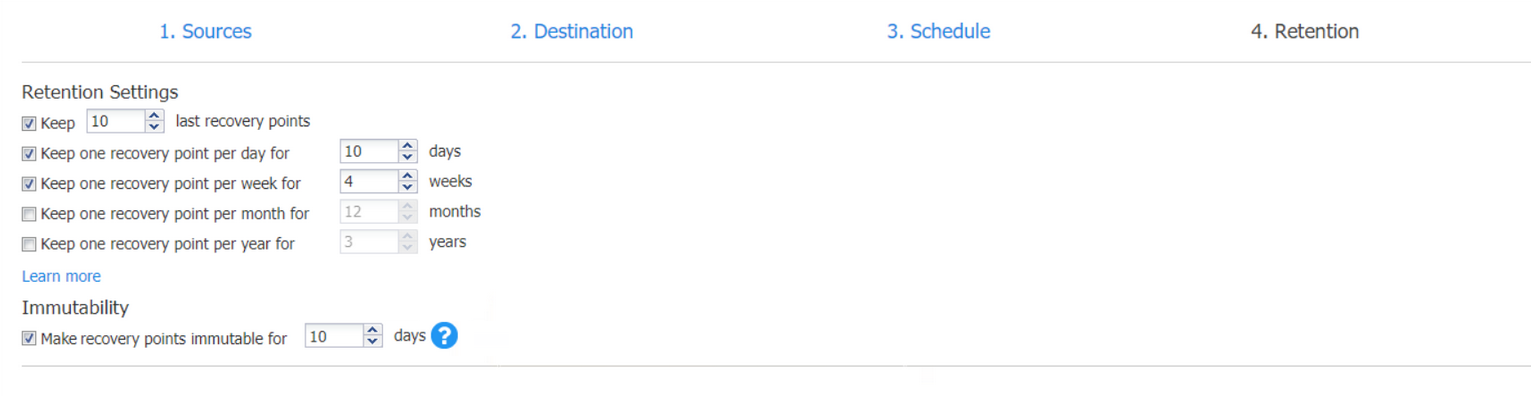
Retention step
Note—This page is not displayed if the new scheduler is enabled.
After each job run, NAKIVO Backup & Replication creates a recovery point for each VM in the Backup Repository. A recovery point represents the backed up VM as of a particular moment in time and allows you to recover individual files, application objects, or the entire VM from the Backup Repository. You can specify how many recovery points you want to be retained in the backup repository using the Grandfather-Father-Son (GFS) backup rotation scheme.
When Amazon EC2, Amazon S3, generic S3-compatible storage, Wasabi, Azure Blob Storage, Backblaze B2 Cloud Storage, or Local Folder is selected as the backup repository type and the only backup destination, you can make recovery points in these repositories immutable. With immutability enabled, the recovery points are immutable and stored using the write-once-read-many (WORM) model. For Amazon EC2, Amazon S3, generic S3-compatible storage, Wasabi, Azure Blob Storage, or Backblaze B2 Cloud Storage types of backup repository, immutable recovery points cannot be overwritten, deleted, or changed by the root user, until the specified period has expired. For a Local Folder type of backup repository, the root user can still clear immutability.
Retention Settings
You can set the retention settings for the backup job:
- Keep x last recovery points—Retains the specified number of last recovery points for each VM in the job.
- Keep one recovery point per day for x days—Retains one last recovery point per day for the specified number of days.
- Keep one recovery point per week for x weeks—Retains the last available backup of every week for the specified number of weeks.
- Keep one recovery point per month for x months—Retains the last available backup of every month for the specified number of months.
- Keep one recovery point per year for x years—Retains the last available backup of every year for the specified number of years.
Immutability
You can configure the Make recovery points immutable for x days option. The recovery points remain immutable for the specified number of days.
For more details and an example of job retention settings, refer to the Keeping Recovery Points article in the Knowledge Base.
Options step
On the Options tab, you can set up options for the backup job.
Job Options
Specify a name and a priority level for the backup job and enable/disable app-aware mode, change tracking, network acceleration, encryption, VM Verification, and other options.
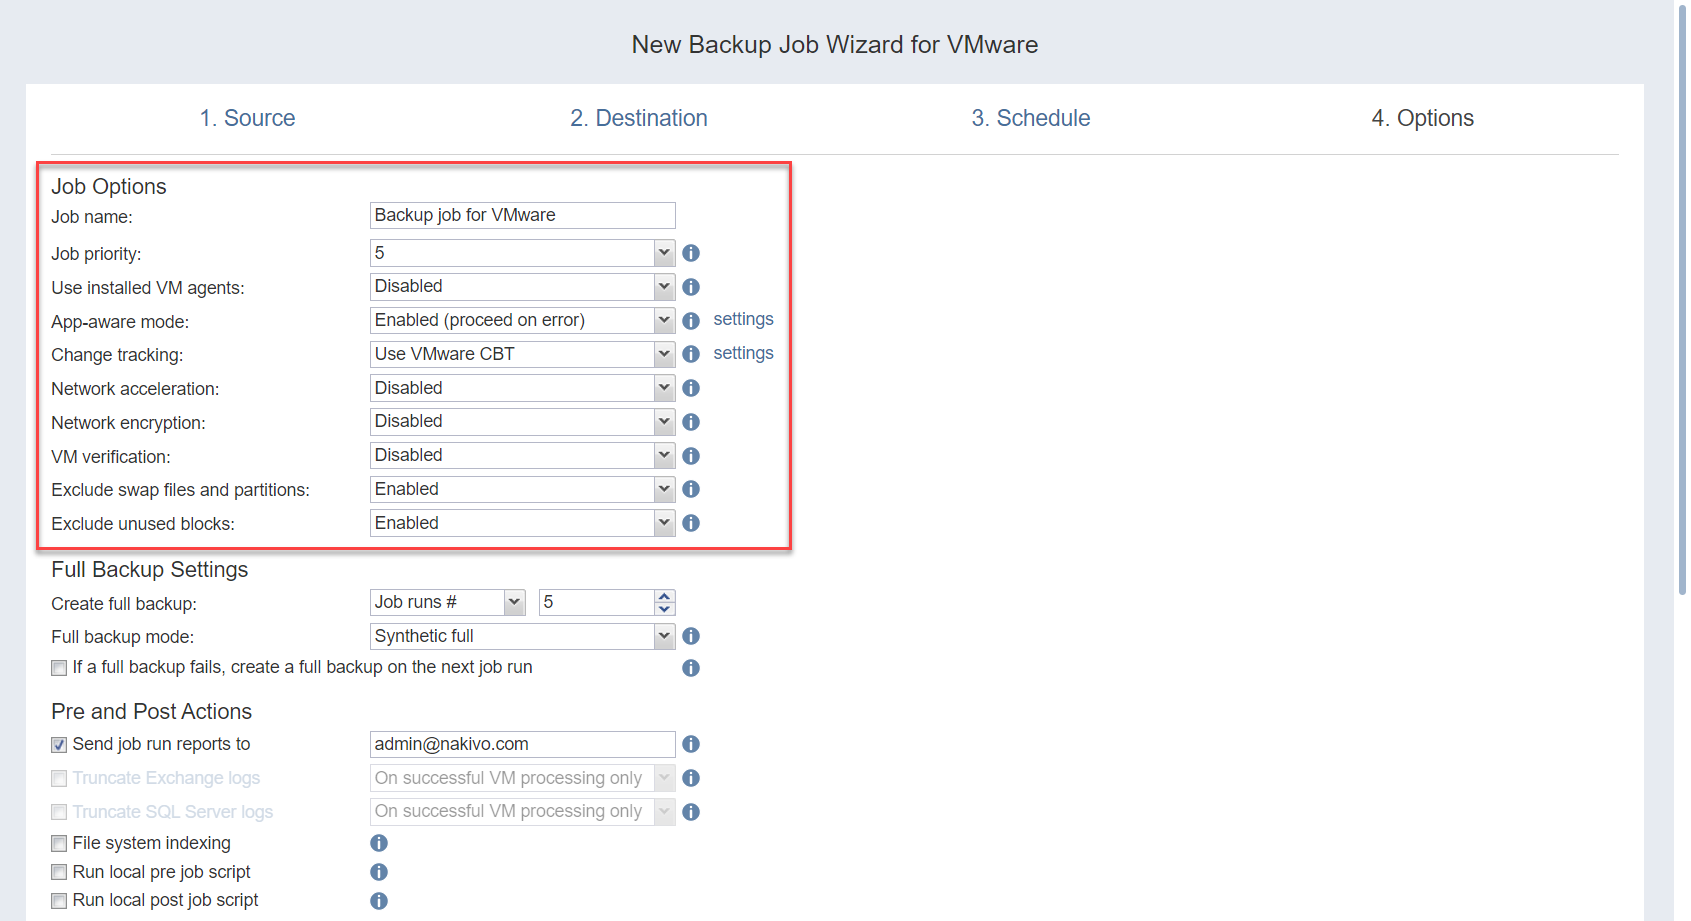
| Job Options | |
|---|---|
| Job Name | Enter a name for the backup job. |
| Job Priority | Select a job priority level between 1 and 5, with 1 being the highest priority. Jobs with higher priority levels are prioritized by Transporters during job processing. |
| Use Installed VM Agents | Enable this option if you wish to use installed VM agents for this job.
|
| App-Aware Mode | When the app-aware mode option is enabled, VM backup is performed using VMware Guest OS quiescing, which relies on Microsoft VSS to ensure that application data is consistent. |
| Change Tracking | Select one of the options from the Change tracking dropdown list:
|
| Network Acceleration | When enabled, NAKIVO Backup & Replication uses compression and traffic reduction techniques to speed up data transfer. Select this option if you plan to back up over WAN or slow LAN links. |
| Encryption | When enabled, VM data is protected with AES 256 encryption while traveling over the network.
|
| VM Verification | When enabled, the NAKIVO Backup & Replication checks the integrity of the backup by starting it and interacting with it. You can choose one of the following VM verification options:
|
| Exclude Swap Files and Partitions | With enabled, NAKIVO Backup & Replication automatically excludes swap files and partitions during the backup process. |
| Exclude Unused Blocks | With enabled, NAKIVO Backup & Replication automatically excludes unused disk blocks and blocks occupied by deleted files during processing of source objects running Windows OS. This feature allows for reducing backup storage space and object processing time. |
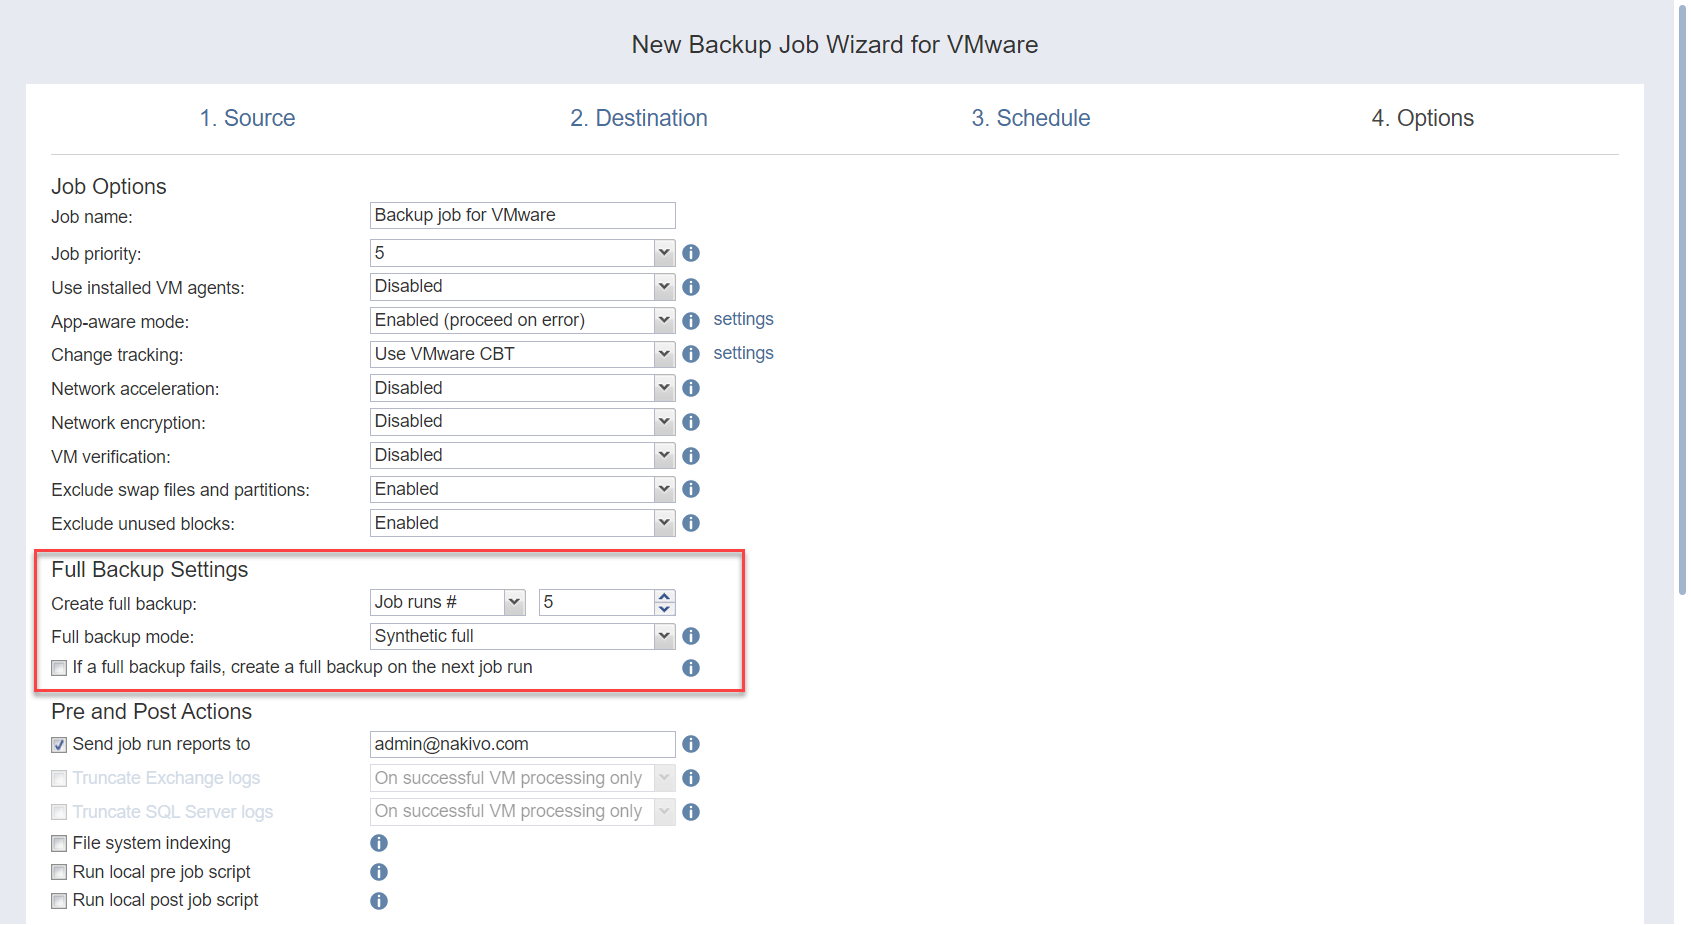
Full Backup Settings
If the type of backup repository that you've selected on the Destination page of the wizard is set to Incremental with full backups (and the Store backups in separate files option is selected), you can specify the following options:
| Job Options | |
|---|---|
| Create full backup | Specify how often full backups should be created. |
| Full backup mode | Specify how the full backup should be created. You can choose one of the following options:
|
Pre- and Post-Job Actions
NAKIVO Backup & Replication allows you to enable certain actions before a backup job begins and after it has completed. You can choose to send job run reports, truncate Microsoft Exchange and Microsoft SQL Server logs on specified VMs, and run local pre- and post- job scripts.
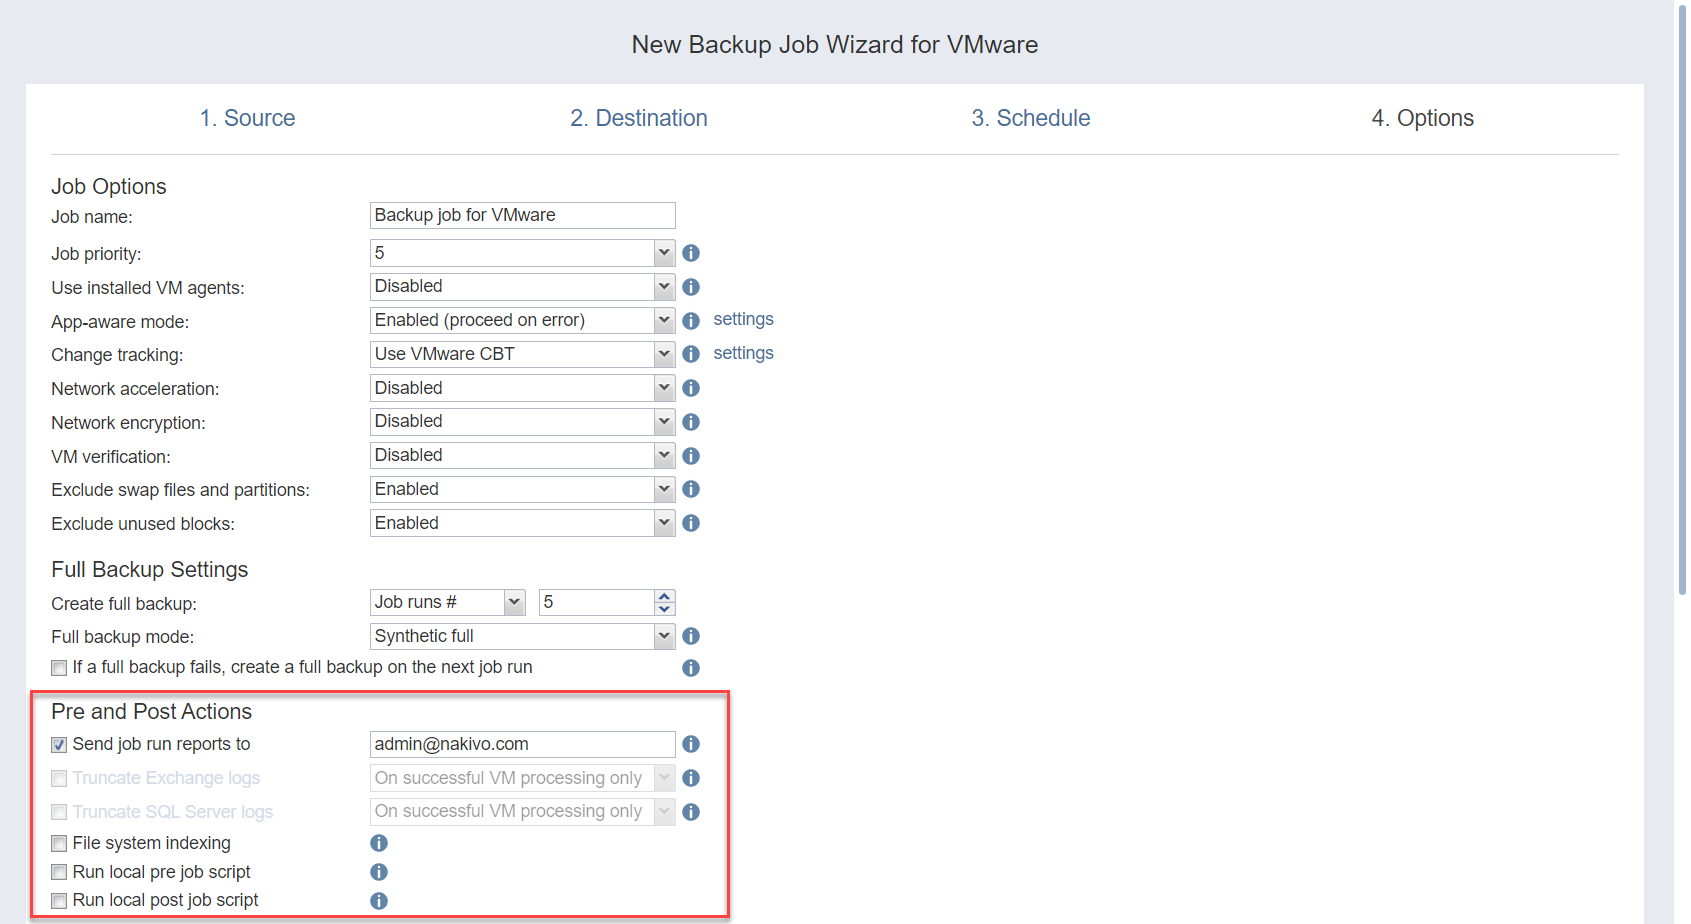
Email Notifications
NAKIVO Backup & Replication can send email notifications about job completion status to specified recipients. This feature complements global notifications and allows you to configure notifications on a per-job level.
To enable this option, configure your Email settings. To send email notifications, select Send job run reports to and specify one or more email addresses in the text box. Use semicolons to separate multiple email addresses.
Truncation of Microsoft Exchange Server Transaction Logs
Microsoft Exchange Server database transaction logs record all changes to an Exchange Server database. Over time, these log files accumulate and can consume all of the available disk space if not periodically removed. NAKIVO Backup & Replication provides an option to delete (aka truncate) Microsoft Exchange Server logs on the source VMs after job completion.
The transaction logs are deleted after the job is completed so that the log files are available in the VM backup. Note that the product deletes only those transaction logs which are already committed to (available in) the Microsoft Exchange database.
Note: Truncation is not supported for items added using Direct Connect.
To set up Microsoft Exchange log truncation, do the following:
- Select the Truncate Exchange logs option.
- In the dialog box that opens, select the checkboxes next to the VMs running Microsoft Exchange and then select the credentials next to each VM. These credentials will be used to log in to the VMs that you have selected.
Truncation of Microsoft SQL Server Transaction Logs
Microsoft SQL Server database transaction logs record all changes to an SQL Server database. Over time, these logs accumulate and can consume all of the available disk space if not periodically removed. NAKIVO Backup & Replication provides the option to delete (or truncate) Microsoft SQL Server logs on the source VMs after job completion.
The transaction logs are deleted after the job is completed so that the original log records are available in the VM backup. Note that the product deletes only those transaction logs that are already committed to (available in) the Microsoft SQL Server database.
To set up Microsoft SQL Server log truncation, do the following:
- Select the Truncate SQL Server logs option.
- In the dialog box that opens, select the checkboxes next to the VMs running Microsoft SQL Server and then select credentials next to each VM. These credentials will be used to log in to the VMs that you have selected.
File System Indexing
Select this option to create an index of files and folders during the backup job run.
To use a temporary agent for file system indexing:
- Make sure that the Use installed VM agents option is disabled in the Job Options section.
- Enable the File system indexing option and click the settings link to open the File system indexing popup.
- In the Instances tab, select the appropriate credentials for each VM for which you would like to enable file system indexing in the Select credentials column. You may also manage your existing credentials or create new ones in the Credentials tab. See Managing Credentials for more information.

Notes:
- The source VM must be turned on during backup for data to be indexed.
- If the source VM contains files/folders a user has no access to, data about such files/folders is not indexed.
- If the backup jobs fails or is stopped, or the existing recovery point is removed, the index is deleted.
- If the original backup is removed but a copy is retained, the indexed data is retained.
- If the existing backup job is removed but the backup is retained, the indexed data is also retained.
- Indexing starts with VM processing within a running backup job.
- Indexed data is not duplicated when a backup copy to tape job is created.
Pre Job Script
To run a script before the product begins backing up VMs, do the following:
- Place a script file on the machine on which the Director is installed.
- Select the Run local pre job script option.
- Specify the following options in the dialog box that opens:
| Script path | Specify a local path to the script on the machine on which the Director is installed. A script interpreter should be specified.
|
| Job behavior | Choose one of the following job behaviors in relation to script completion:
|
| Error handling | Choose one of the following job behaviors in relation to script failure:
|
Post Job Script
To run a script after the product has finished backing up all VMs, do the following:
- Place a script file on the machine on which the Director is installed.
- Select the Run local post job script option.
- Specify the following options in the dialog box that opens:
| Script path | Specify a local path to the script on the machine on which the Director is installed. A script interpreter should be specified.
|
| Job behavior | Choose one of the following job behaviors in relation to script completion:
|
| Error handling | Choose one of the following job behaviors in relation to script failure:
|
Data Transfer
In the Data Transfer section of the Options page, you can choose a transport mode, select a Transporter to be used for reading data from source VMs, specify a b load, and configure bandwidth throttling.

Transport Mode
In the Data Transfer section, choose a transport mode for retrieving VM data:
- Automatic selection: When this option is selected, NAKIVO Backup & Replication automatically selects the best transport mode available:
- When the source Transporter is installed on a VM, NAKIVO Backup & Replication tries to use transport modes in the following order: Hot Add > SAN > LAN.
- When the source Transporter is installed on a physical machine, NAKIVO Backup & Replication tries to use transport modes in the following order: SAN > LAN. Hot Add is not supported for physical machines.
- SAN only: When this option is selected, NAKIVO Backup & Replication only uses direct SAN access to retrieve VM data. If direct SAN access to VM data is not available, the job fails.
- Hot Add only: When this option is selected, NAKIVO Backup & Replication only uses Hot Add to retrieve VM data. If direct Hot Add is not available, the job fails. Note: When hot-add cannot be enabled for at least one disk of a source VM (even if the disk is deselected in the job), Hot Add is unavailable for all disks of the VM. Do not create a manual snapshot of the transporter VM housing NAKIVO Backup & Replication while the Hot Add disks are attached it. In case you need to create a snapshot or restart a VM, make sure to stop all jobs and then detach all Hot Add disks in NAKIVO Backup & Replication.
- LAN only: When this option is selected, NAKIVO Backup & Replication only retrieves VM data over LAN.
Transporter Pool
If this option is enabled, only the transporters that belong to the selected transporter pool shall be used during the job run.
Transporters
In NAKIVO Backup & Replication, Transporters perform all of the heavy lifting: reading data from the source VM, compressing the data, transferring the data over the network, performing data deduplication, and so on. In large and geographically distributed environments, multiple Transporters can be deployed to distribute the data protection workload, optimize network traffic, and improve data transfer speeds. Thus, if more than one Transporter is deployed for NAKIVO Backup & Replication, it is important to determine which should be used to read data from a particular source VM (the target Transporter is always the one that is assigned to the Backup Repository).
By default, the product automatically determines which Transporter should be used to read data from the source VM. However, you can manually specify which Transporters should be used for the job. To manually specify Transporters, proceed as follows:
In the Data Transfer section, choose one of the following options:
- Automatic selection: The product automatically determines which Transporters are the closest to source hosts (the hosts that run selected VMs) and uses those Transporters to retrieve data from source VMs.
- Manual - configured for all VMs: Select this option to manually specify a single Transporter to be used to retrieve data from source VMs.
- Manual - configured per host: Select this option to manually specify which Transporter should be used to retrieve data from each source host.
Replacement Transporters
When configuring NAKIVO Backup & Replication, you can manually select a primary and replacement Transporter for each separate host or set them to be selected automatically.
Note: This option becomes available only if you select Manual - configured per host from the Transporters drop-down list.
You have the following options:
- Select automatically: When selected, the replacement Transporters are selected automatically for each host.
- Use only primary transporters: When selected, only primary Transporters are used during job execution.
- Select manually per host: When selected, the Transporters can be selected manually or can be set to be chosen automatically for each separate host.
Transporter Load
You can limit the maximum number of Transporter tasks used by the job. By default, this number is set to 3 concurrent tasks.
To change the default number of tasks, do the following:
- In the Data Transfer section, select the Limit transporter load to checkbox.
- Specify the number of concurrent tasks in the corresponding box.
Bandwidth Throttling
Follow the steps below to regulate the speed of data transfer over the network for your backup job:
- For the Bandwidth throttling option, choose Enabled.
- Click the settings link that becomes available.
- The Job Bandwidth Rules dialog box opens, displaying the list of available rules. You have the following options:
| Create a new bandwidth rule for your backup job |
|
| Activate an existing bandwidth rule for your job | Select the checkbox to the left of the required bandwidth rule. To deactivate a bandwidth rule for your job, deselect the corresponding checkbox. |
| Edit a bandwidth rule | Click the Edit link for a bandwidth rule and modify. |
| Disable a bandwidth rule | Click the Disable link. The bandwidth rule is disabled for all jobs. |
| Remove a bandwidth rule | Click the Remove link, and then click Delete to confirm your operation. |
Backup from Storage Snapshots
With NAKIVO Backup & Replication, you can enable backup from storage snapshots. This approach can be helpful when you back up large volumes of data. Enabling this option can significantly reduce the load on the production environment. For more information, refer to Backup from HPE 3PAR, HPE Nimble, HPE Primera, and HPE Alletra Storage Snapshots.
Proceed by choosing one of the following options:
- Enabled (proceed on error): With this option selected, NAKIVO Backup & Replication proceeds even if an error is encountered.
- Enabled (fail on error): With this option selected, NAKIVO Backup & Replication automatically fails the job if an error is encountered.
- Disabled: Selecting this option disables backup from storage snapshots.
Bottleneck detection
When the Bottleneck detection option is enabled, additional information is collected and recorded in NAKIVO Backup & Replication logs in the course of data transfer for the purpose of bottleneck detection. Check this option to enable the Bottleneck detection capability of the Transporters engaged in the job.
Complete the New Backup Job wizard for VMware
Click Finish or Finish & Run to complete job creation.
Reference documents
Inventory tab:
- https://helpcenter.nakivo.com/User-Guide/Content/Settings/Inventory/Inventory.htm
- https://helpcenter.nakivo.com/User-Guide/Content/Settings/Inventory/Adding-Generic-S3-Compatible-Object-Storage.htm
Backup Repository:
- https://helpcenter.nakivo.com/User-Guide/Content/Deployment/Architecture/Backup-Repository.htm
- https://helpcenter.nakivo.com/User-Guide/Content/Settings/Backup-Repositories/Creating-Backup-Repositories/Backup-Repository-in-Generic-S3-Compatible-Object-Storage.htm
Backup job: