Cet article vous a-t-il été utile ?
Comment pourrions-nous l'améliorer ?
Conception générale du système
Le système 4 bay NAS est un boîtier contenant des disques durs. Il peut contenir jusqu'à quatre disques durs de 3,5 pouces dans son châssis avant et un unique disque dur USM (voir l'illustration ci-dessous) dans son emplacement USM. Les disques pris en charge sont les disques SATA 3 Gbits/s d'une vitesse de rotation maximale de 7 200 tr/min. Chaque disque individuel est échangeable et remplaçable sur site.
Windows Storage Server 2012 Workgroup figure sur une partition du premier disque du boîtier (le plus à gauche). Les fonctions de gestion des disques, des volumes, des systèmes RAID et de tous les autres disques sont gérées à partir du système d'exploitation. Seagate vous recommande de ne confier l'administration du système 4 bay NAS qu'à des utilisateurs maîtrisant Windows Server.
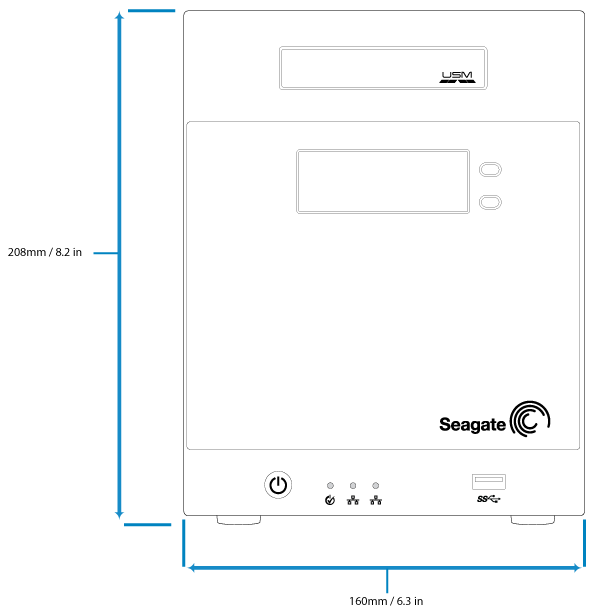
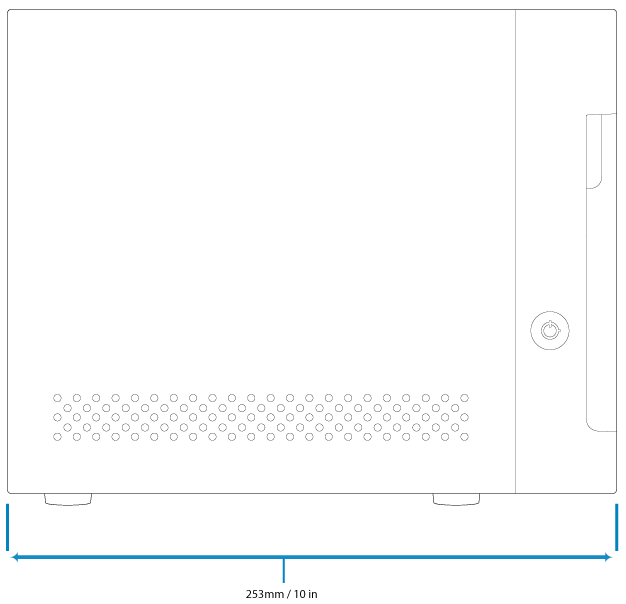
Dimensions du système NAS


Vue du panneau avant

- Emplacement USM : insérez un disque USM compatible dans cet emplacement.
- Écran LCD : utilisez les boutons vers le haut ou vers le bas pour parcourir les menus et accéder aux paramètres généraux de l'appareil. Pour en savoir plus, consultez la section Écran LCD.
- Bouton d'alimentation : permet de mettre le système sous tension et hors tension. Un voyant s'allume lorsque vous appuyez sur ce bouton. Lorsque le produit est en cours de fonctionnement, une brève pression sur le bouton Marche/Arrêt entraîne la mise hors tension du système 4 bay NAS ou le place en mode de veille prolongée si cette option a été configurée dans NAS OS. Une pression prolongée de plus de quatre secondes a pour effet de couper l'alimentation à partir du système NAS, causant sa mise à l'arrêt immédiate. Il est déconseillé d'appuyer de façon prolongée sur le bouton Marche/Arrêt, car vous risquez alors de perdre des données. Pour en savoir plus, consultez la section Utilisation.
- Voyant d'état : indique que l'appareil est sous tension et fournit des signaux d'état. Pour en savoir plus, consultez la section Voyants système.
- Voyants Ethernet : le voyant du port Ethernet concerné s'allume lorsqu'il est connecté à un réseau actif. Pour en savoir plus, consultez la section Voyants système.
- Port SuperSpeed USB 3.0 : permet le branchement de périphériques USB compatibles.
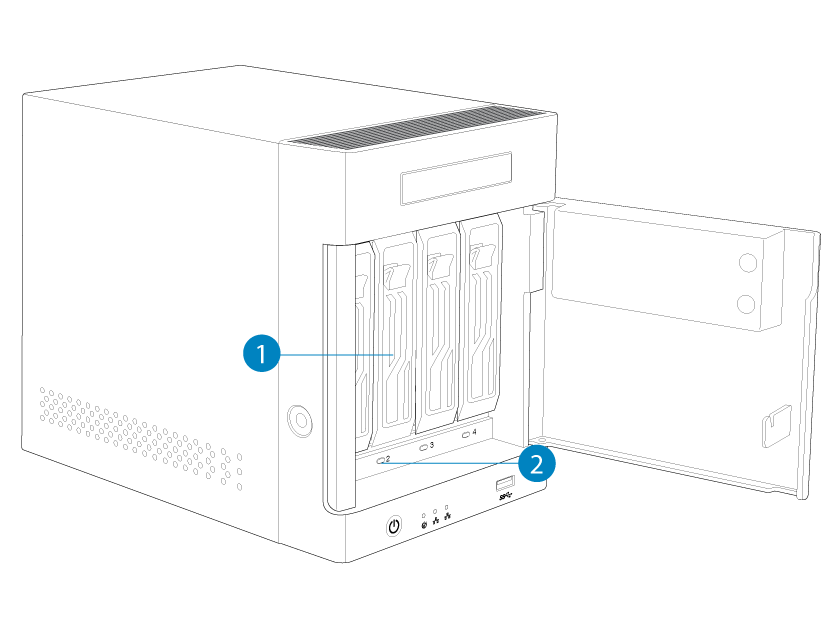
Intérieur (disques)
Ouvrez la porte avant pour voir les disques.

- Poignée du support de disques : verrouillez le disque pour l'installer ou retirez-le à l'aide de la poignée.
- Voyant de disque : indique l'état ou l'activité des disques situés dans le boîtier. Pour en savoir plus, consultez la section Voyants système.
Pour plus d'informations sur l'installation des disques, consultez la section Maintenance du matériel et des disques.
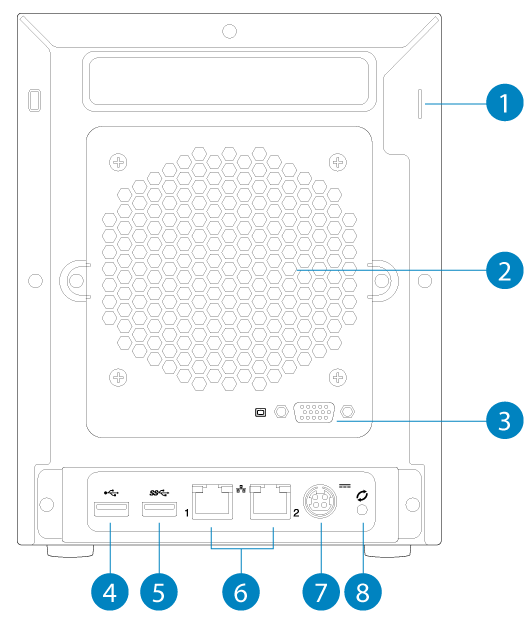
Vue du panneau arrière

- Verrou Kensington : attachez le système NAS à un bureau à l'aide d'un câble compatible.
- Ventilation : contribue à maintenir les blocs d'alimentation de votre système NAS à une température suffisamment basse durant le fonctionnement. Veillez à ne pas obstruer l'évacuation du ventilateur lors de l'utilisation du produit.
- Port vidéo VGA : permet de brancher un écran VGA à des fins de maintenance.
- Port USB 2.0 Hi-Speed : peut être utilisé pour le stockage à connexion directe ou les périphériques USB tels qu'une souris et un clavier.
- Ports USB 3.0 SuperSpeed : peuvent être utilisés pour le stockage à connexion directe ou les périphériques USB tels qu'une souris et un clavier.
- Ports Gigabit Ethernet : permettent de brancher des câbles Ethernet entre l'appareil et le réseau. Pour en savoir plus, consultez la section Configuration.
- Alimentation : prise sur laquelle vous branchez l'adaptateur secteur fourni avec le disque. Pour en savoir plus, consultez la section Configuration.
- Bouton de récupération : appuyez sur ce bouton en même temps que sur le bouton d'alimentation situé à l'avant de l'appareil pour forcer le système NAS à démarrer à partir d'un périphérique USB. Procédez ainsi pour réparer ou réinstaller le système d'exploitation.
Ports USB et emplacement USM
Le système 4 bay NAS comporte un port USB 3.0 et un emplacement USM à l'avant. Il est également équipé d'un port USB 3.0 et d'un port USB 2.0 à l'arrière. Vous pouvez lui ajouter de la capacité en connectant des équipements de stockage compatibles aux ports USB et à l'emplacement USM. Les systèmes de stockage connectés au NAS doivent être formatés à l'aide de l'un des systèmes de fichiers suivants : FAT16, FAT32, exFAT, NTFS ou ReFS. Les autres formats de stockage ne sont pas reconnus par le système NAS. Les limitations de capacité dépendent du format du disque.
Les ports USB peuvent servir à connecter des périphériques USB compatibles, tels qu'une souris, un clavier, etc.
Consultez la section Maintenance du matériel et des disques pour obtenir des instructions sur la façon d'insérer un disque USM dans l'emplacement USM.