Was this content helpful?
How could we make this article more helpful?
Camera
You can add cameras connected to the local network using:
- UPnP (cameras must support UPnP)
- Camera search tool
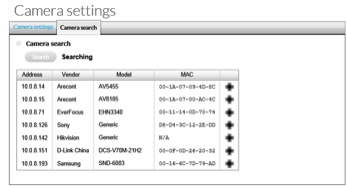
Add cameras by searching the local network
- Click Settings.
- Click the Camera search tab.
- Click Search.
The cameras found on the network are listed. Cameras that have been added to a server are blue. - Click the + icon to add a camera.
- Name the camera and enter the admin username and password.
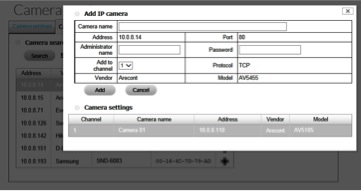
Important info: Administrator privileges are recommended when creating a camera’s credentials. - Click Add.
Add cameras manually
- Click Settings.
- Click the Camera settings tab.
- In the camera list, select the channel you want to add.
- Enter the camera’s information.
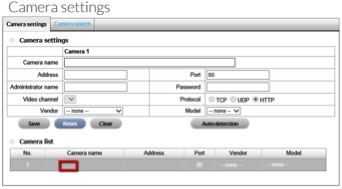
Important info: Administrator privileges are recommended when creating a camera’s credentials. - (Optional) After entering the IP address, port, username, and password, click Auto detection to add additional camera data.
- Click Save.
Note: To return to the camera’s previous settings, click Reset. To use the camera’s default settings, click Clear
Modify camera information
- Click Settings.
- Click the Camera settings tab
- Select the camera you want to modify.
- Make the changes and click Save.
Replace a camera
- In the navigation bar under Camera, click Settings.
- Click the Camera settings tab.
- Select the camera you want to replace.
- Add the information about the new camera and click Save.
Video Quality
Adjust video settings
Mobile clients require a stream profile. Live stream displays with lower frames per second (FPS).
- Click Video.
- Click the Camera parameter tab and select the camera you want to modify.
- Make your changes and click Save.
Configure the lens
Important info: Configure the lens settings when the lens is properly installed on the camera. If the lens is not installed, a warning message appears regarding access to the Live View page.
- Click Video.
- Click the Lens settings tab and select the camera you want to modify.
- Make your changes.
Note: For Lens Type, Generic Dewarp is suitable for most fisheye cameras. - Click Save.
View camera status
- Click Status.
- Click the Camera status tab.
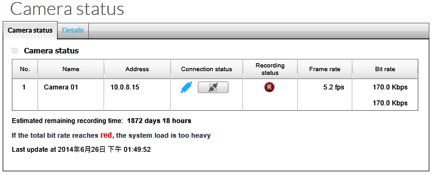
- Connection status–Click Connect / Disconnectto change the connection status.
Icon Feature Status ` 
Connection Status Connected 
Connection Status Disconnected 
Connection Status Connecting 
Connection Button Connected: Normal 
Connected: Over 
Connection Button Disconnected: Normal 
Disconnected: Over - Recording status–The camera’s recording schedule.
Icon Feature Status 
Recording Status No Recording 
Recording Status Always Recording – Recording 
Recording Status Always Recording – Stopped 
Recording Status Schedule Recording – Recording 
Recording Status Schedule Recording – Stopped - Frame rate–The camera’s frame rate.
- Bit rate–The camera’s bit rate.
- Estimated remaining recording time–Estimated remaining recording time. The time is determined by dividing the free capacity by the total dynamic bit rate.
View camera status details
- Click Status.
- Click the Details tab.
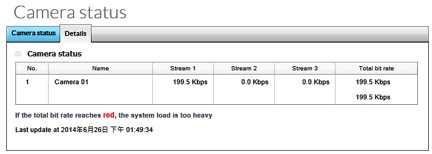
Important info: If the total bit rate is red, the load placed on the NAS’s CPU is too heavy.