This article provides some basic tips on using the now-VMware-certified BlackArmor NAS with VMware, but please consult your system documentation for more information on VMware or any VMware application. Familiarity with VMware is recommended.
This article will cover three topics:
- Enabling the NFS Service, create the NFS Share, and edit the Share to grant full access privileges
- Creating a basic VMware configuration
- Adding ISOs or images to the BlackArmor Datastore
Enabling the NFS Service, create the NFS Share, and edit the Share to grant full access privileges
- Open the BlackArmor Manager.
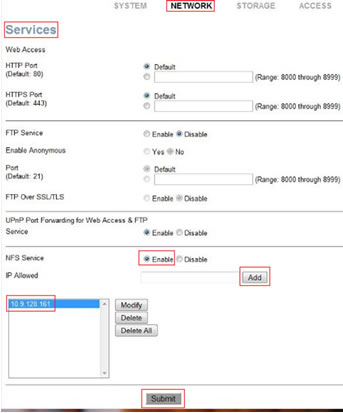
- Enable the NFS Service (Network > Services > NFS Service [Enable])
- Add the VMware Server IP Address(es) - (Network > Services > IP Allowed > Enter IP Address > Add)
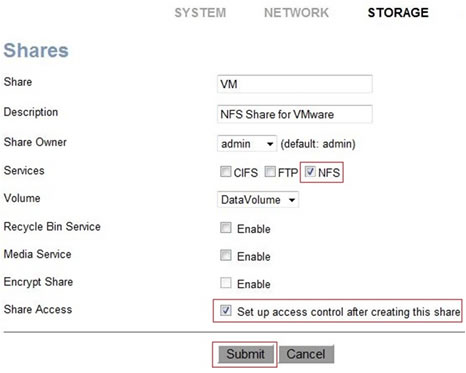
- Create a new NFS share - (Storage > Shares > Add > Name the Share > Enable only the NFS Service > check the Enable Setup access control after creating this share checkbox > Submit)
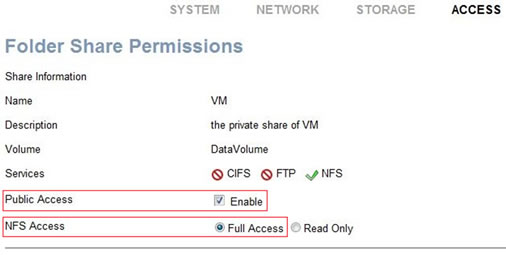
- Access > Folder Share Permissions > Enable Public Access > Enable Full NFS Access > Submit
Creating a basic VMware configuration
 The following describes a basic configuration. For more advanced setup and troubleshooting information, please consult VMware documentation and/or contact VMware support.
Next, the following network configurations should be completed prior to configuring NFS on an ESX server. All of the below steps will need to be applied to each ESX server.
- Configure at least one (two or more for redundancy) of your Ethernet port(s) for the Subnet for which the BlackArmor is configured.
- Complete this request if you are not using DHCP - New DNS (IP Address, Subnet Mask, and Gateway) for the ESX server (same Subnet that the BlackArmor has been configured).
This will be applied when creating a new vSwitch for NFS on the ESX server.
Once the above 2 requests/configuration have been completed, then proceed to Step 3, which will be implemented on a specific ESX server. - Create a New vSwitch for NFS Network Traffic.
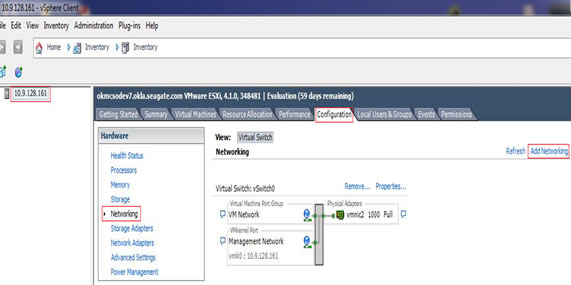
- Click on the ESX server or its IP Address.
- Click on the Configuration tab.
- Click on Networking in the left sidebar.
- Click Add Networking at the upper right.
- Connections Type:
- Click VMkernel - Required when configuring NFS, and click Next.
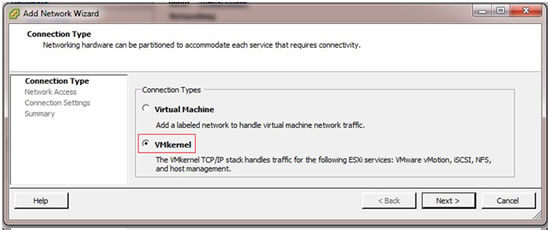
- Select the checkbox for the vmnic(s) that have been configured with the NFS Subnet used on the BlackArmor.
- Once selected, click Next.

- Click VMkernel - Required when configuring NFS, and click Next.
- Port Group Properties
- Network Label - Enter any name to describe the Port Group. Example: Test BlackArmor
- VLAN ID (optional) - Leave default (None (0)) unless the Ethernet port has been configured with multiple VLANs. If that is the case, then enter the VLAN ID for the BlackArmor NAS device.

- IP Settings:
- Select Obtain IP settings automatically if your BlackArmor is using DHCP. If not, then proceed with step ii.
- Use the following IP settings:
Enter IP Address, Subnet Mask, and VM kernel Default
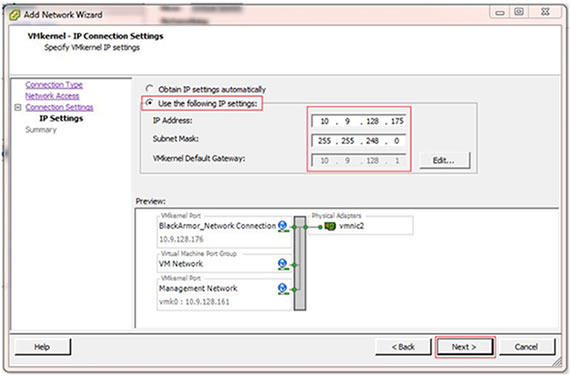
Then click Next. - Summary Page - Confirm, and then click Finished.
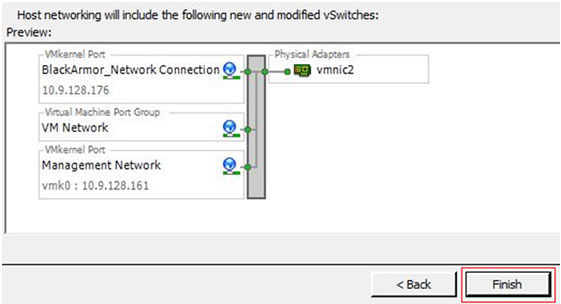
- If you have a Virtual Center Server, then the following applies:
- Click on the ESX server.
- Click on the Configuration tab.
- Click Storage in the left sidebar.
- Click Add Storage in the upper right.

- Click Network File System radio button and then Next.
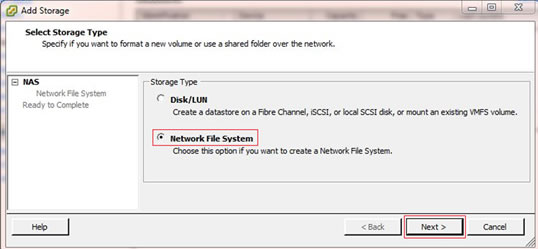
- Server - Enter either of the following:
- BlackArmor IP Address 10.9.128.176, or
- BlackArmor FQDN (Fully Qualified Domain Name)
- BlackArmor short name
- BlackArmor MAC Address
- Folder - Enter the following:
- /nfs/<NFS Share Name (/nfs/vm) >
- Have the option to mount NFS as read-only - check box if the NFS Mount needs to be read-only.
- Datastore Name - Enter any name for that specific NFS Mount.
- Click Next.
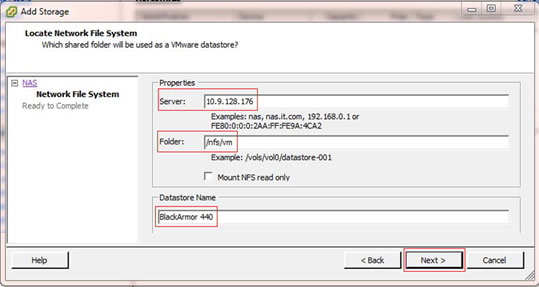
- At this point, click Next one more time, or click Finish.
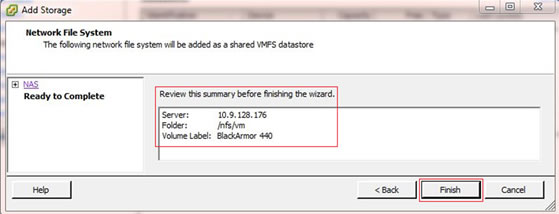
- There should now be an NFS Datastore mounting on that ESX server. You can start creating Virtual Machines.
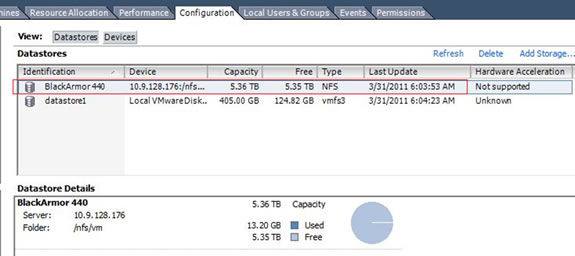
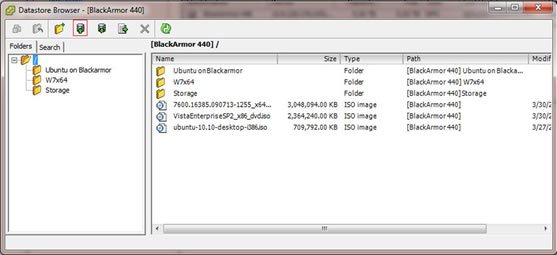
Adding ISOs or images to the BlackArmor Datastore
- Right-click the BlackArmor 440 Datastore.
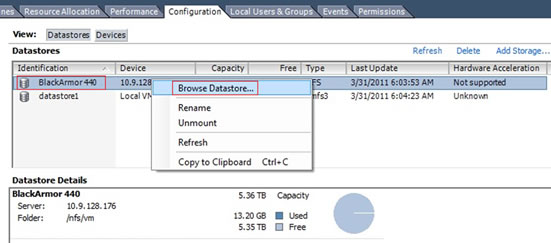
- Click the Upload button.
VMware support information:
http://www.vmware.com/support/contacts/
VMware, Inc.
World Headquarters
3401 Hillview Ave
Palo Alto, CA 94304 USA
Tel: 1-877-486-9273
Fax: 650-427-5001


