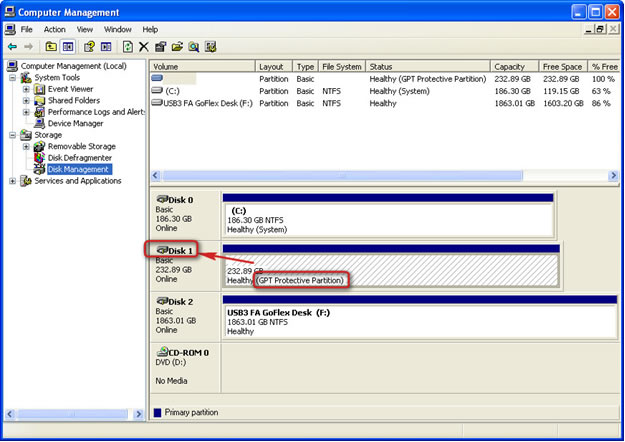
If a drive is not being listed under Windows Explorer but is showing up in the Disk Management as a healthy volume, but with EISA configuration, Disk Management will not allow you to format/partition/initialize the volume in question.
This indicates that Windows XP is recognizing the drive as an OEM volume. The drive needs to be erased, but there are varying methods, depending on the drive type, to be used to accomplish that. The drive must be erased before it can be re-initialized and partitioned/formatted.
Here are the ways to erase a drive in this situation:
For internal ATA/IDE, SATA, and SCSI drives, please use SeaTools for DOS. It includes a zero-fill feature, and once the zero-fill has been accomplished (the quick version should be fine), you can reformat the drive using Windows Disk Management.
For OneTouch 4 drives, you may use the Maxtor Manager to erase the drive. See Document ID: 200231 for guidance.
For OneTouch, OneTouch 2, OneTouch 3, and OneTouch 3 mini drives, you may use the OneTouch Manager to erase the drive.
- For Seagate Pocket Drives, please use the Toolkit software to Reset to Factory Default. If you need the software, you may download it here.
For all other external drives, such as:
Seagate FreeAgent
Seagate pushbutton external
Seagate external
Seagate Portable, and
Maxtor Personal Storage drives,
- If that fails, you can use DiscWizard to erase your external drive.
- If that fails, you can use the Windows diskpart command-line utility. The following procedure provides the steps for cleaning an EISA partition from a hard disk drive connected to an existing Windows XP (or newer), 32-bit operating system.
Note: This is a data destructive process. This procedure not only removes the drive's partition, but also removes the Drive Signature. It is highly recommended that you backup any/all critical data on the drive before proceeding.
Warning: You must open Disk Management and document the Disk Number of the drive containing the EISA partition, as you will need this information later in the procedure.- Determine the disknumber assigned to the EISA-protected drive.
- Right-click on (My) Computer.
- Choose Manage.
- Select Disk Management (listed under Storage).
- Look for the drive that is identified as EISA (or GPT, which is similar) and note the Disk number (such as Disk 1).

Open a Command Window. From the command prompt, type diskpart and press enter. The diskpart prompt will open.
From the diskpart prompt, type list disk and press enter. A list of disks will appear in a text format. You will return to the diskpart prompt.
From the diskpart prompt, type select disk disknumber (for instance, if the disk containing the EISA partition is Disk 2, you would type select disk 2)and press enter. A message appears saying that the disk is selected. You will return to the diskpart prompt.
From the diskpart prompt, type clean and press enter. At this point the drive's partition and signature a removed. You will return to the diskpart prompt.
From the diskpart prompt, type exit and press enter. Type exit once more to close the Command Window.
Use the Initialize and Convert Disk Wizard...
-OR-
Close the Wizard, right-click on the disk in question and select Initialize Disk from the drop-down menu.
Once the drive is initialized, continue using Disk Management to partition and format the drive.
Additional Information: For more information on the diskpart command, refer to the following Microsoft TechNet article. From this article, you will learn about other diskpart command line syntax as well as methods for converting an EISA partition to a MBR partition.
Flash Video Tutorial: EISA Partition Issues REFERENCE TO THIRD PARTIES AND THIRD PARTY WEB SITES. Seagate references third parties and third party products as an informational service only, it is not an endorsement or recommendation - implied or otherwise - of any of the listed companies. Seagate makes no warranty - implied or otherwise - regarding the performance or reliability of these companies or products. Each company listed is independent from Seagate and is not under the control of Seagate; therefore, Seagate accepts no responsibility for and disclaims any liability from the actions or products of the listed companies. You should make your own independent evaluation before conducting business with any company. To obtain product specifications and warranty information, please contact the respective vendor directly. There are links in this document that will permit you to connect to third-party web sites over which Seagate has no control. These links are provided for your convenience only and your use of them is at your own risk. Seagate makes no representations whatsoever about the content of any of these web sites. Seagate does not endorse or accept any responsibility for the content, or use, of any such web sites.
 - Determine the disknumber assigned to the EISA-protected drive.


