Was this content helpful?
How could we make this article more helpful?
Administrator's Guide - Bucket Management
Lyve Cloud allows you to store objects (like files) in buckets (like folders). Before you add or store any object, you must create a bucket. When you create a bucket, you must specify the region where you want to create the bucket.
Role-based access to buckets
Bucket access levels are defined by the user roles. The following table describes console access to bucket features based on the user's role:
| Actions | Admin | Storage Admin | Auditor (Read only) |
|---|---|---|---|
| Create bucket | ✓ | ✓ | × |
| Edit bucket | ✓ | ✓ | × |
| Delete | ✓ | ✓ | × |
| List and View | ✓ | ✓ | ✓ |
Creating buckets
To create a bucket:
- On the left-hand menu, select Buckets.
- On the Buckets page, select Create Bucket.
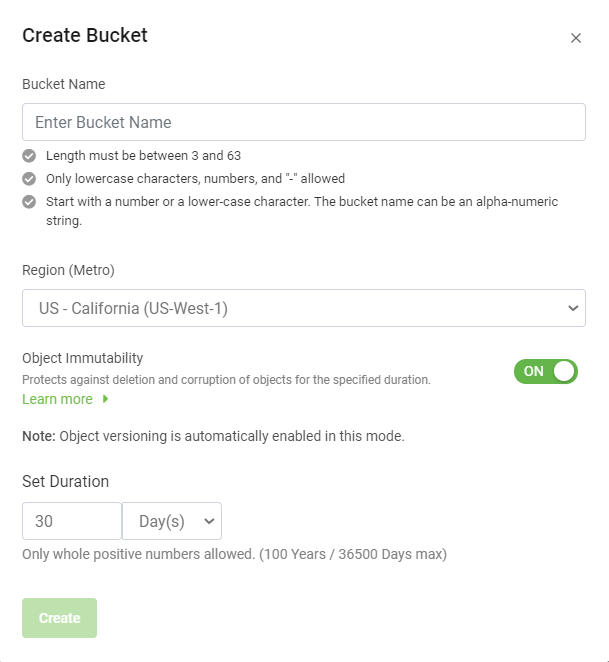
- Enter the bucket name:
Remember the following while creating a bucket name:
- The bucket name must be unique across all of Lyve Cloud.
- A bucket name containing a dot (.) is not allowed.
- After you create a bucket, you cannot change the bucket name.
- Select the region (metro) from the drop-down, where you want the bucket to reside. For more information, see Understanding Global Accounts.
- US - Virginia (us-east-1)
- US - California (us-west-1)
- AP - Singapore - (AP-Southeast-1)
- (Optional) Enable Object Immutability. For more information, see Using object immutability.
If Object Immutability is not enabled when a bucket is created, you cannot turn it on later. However, if you switch it on while creating a bucket, you can later switch it off and on again as needed.
If you enable Object Immutability, you can also set a duration to retain the objects. For more information, see Setting duration.
- After you create a bucket, it is listed on the Buckets page.
Editing bucket properties
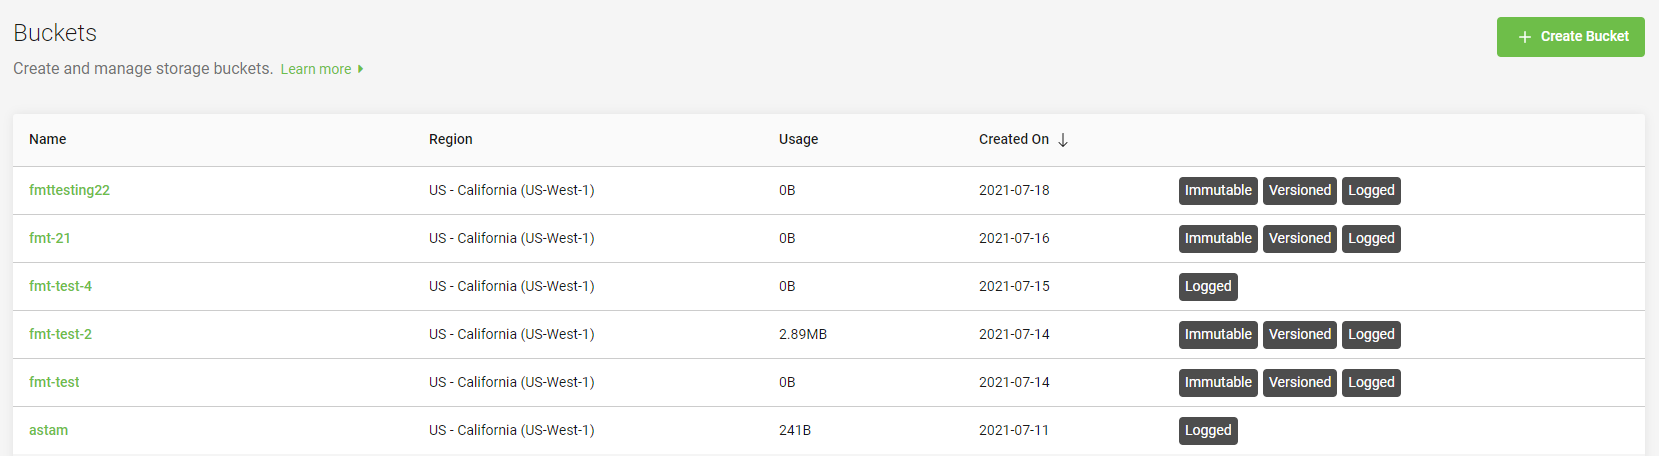
The Buckets page displays the bucket list. It also displays the labels for each bucket, such as Immutable, Versioned, and Logged. For more information on the labels, see Using object immutability and Administrator's Guide - Audit Log Management.
To edit a bucket:
- On the left-hand menu, select Buckets.
- On the Buckets page, choose and select the name to edit.
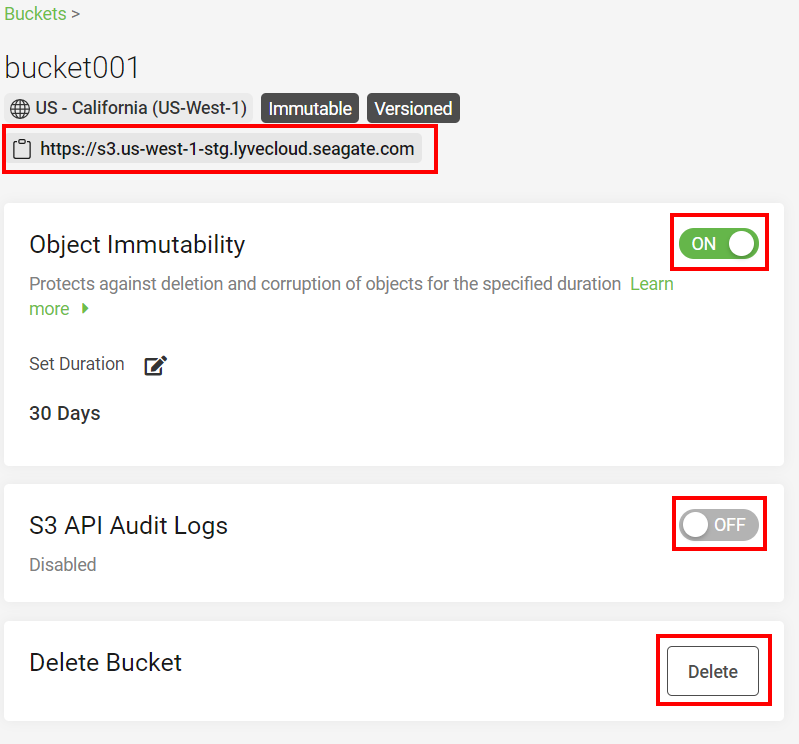
- Perform any of the following actions in the bucket properties:
- S3 endpoint URL allows copying the S3 endpoint URL to the clipboard. This URL is used to access the bucket. For more information on the S3 endpoint URL see S3 API endpoints.
- Object Immutability: You may choose to switch off Object Immutability if it is enabled. For more information, see Using object immutability.
- Set Duration: You can set duration only when Object Immutability is switched on. Select the pencil icon to edit the retention duration. For more information, see Setting duration.
- S3 API Audit Logs: Select the toggle switch to enable or disable the audit logs for this bucket. For more information on audit logs, see Administrator's Guide - Audit Log Management. After you enable the audit logs for the selected bucket, the bucket is labeled as Logged, and once you disable the audit logs, the label is removed.
- Delete Bucket: Select Delete to delete a bucket.
Before deleting a bucket, please make sure to:
- Delete all data from the bucket.
- Delete all permissions referencing this bucket. Deleting a bucket associated with bucket permissions is allowed only if you have applied permission to all buckets or all buckets with a prefix in the account.
- Verify that the bucket is not set as the target bucket for Audit Logs.
Listing buckets
To view the bucket list:
- On the left-hand menu, select Buckets.
By default, the Buckets page displays 10 buckets at a time. To increase or decrease the number of buckets per page, select the Rows per page arrow and select 10, 25, 50, or All.
- Select the left or right arrow to move between the pages.
The following table displays the description to the column names of the bucket list.
| Column Name | Description |
|---|---|
| Name | Displays the name of the bucket. |
| Region | Displays the region where the bucket is residing. You can select the region while creating a bucket. For more information, see Creating buckets. |
| Usage | Displays the total amount of data stored in the bucket in KiB, MiB, or GiB. |
| Created On | Displays when the bucket was created in YYYY-MM-DD format. |
| Immutable, Versioned, Logged | Displays the bucket labels.
For more information on these labels, see Using object immutability and Administrator's Guide - Audit Log Management. |
Video: Lyve Cloud - How to Create a Bucket
Seagate on Vimeo: Lyve Cloud - How to Create a Bucket
Using object immutability
Object immutability prevents objects from being deleted or overwritten by any user or application for a specified retention duration. This is especially useful when you want to meet regulatory data requirements or other scenarios where it is imperative that data cannot be changed or deleted. Object immutability must be used when you are certain that you do not want anyone, including the Administrator, to delete the objects during their retention duration. When you switch on object immutability, you must also set the duration and specify the defaretention period.
Video: Lyve Cloud - How to Prevent Objects From Being Deleted
Seagate on Vimeo: Lyve Cloud - How to Create a Bucket
How does versioning work in object immutability?
Versioning allows saving multiple variants of an object in the same bucket. It allows you to preserve, retrieve, and restore every version of an object stored in the bucket. Versioning enables the recovery of objects from any unintended or accidental user actions and application failures.
After switching on object immutability for a bucket, versioning is automatically enabled, Lyve Cloud automatically creates and stores an object version each time when:
- A new object is uploaded
- An existing object is overwritten
- An object is deleted
For example, if you accidentally delete an object, instead of removing it permanently from Lyve Cloud, this deleted object becomes the current object version. You can then restore the previously available version.
When you create a bucket and switch on object immutability, you can switch off object immutability afterwards. However, versioning cannot be suspended for that bucket.
Setting duration
The duration for immutability can be specified in days or years at the object level. When you set the duration, objects remain locked and cannot be overwritten or deleted. By default, the duration is set to 30 days. Setting the duration applies to individual object versions, and different versions of a single object can have different durations set.
For example, if you set duration to 10 days and then create an object A, object A will have its retention duration set to 10 days. If you later change the duration to 20 days and upload an object A again, in that case:
- The retention duration for the first version of object A remains to 10 days.
- The later version of the same object is set to 20 days.
When you place an object in the bucket, Lyve Cloud calculates the retention duration for an object version by adding the specified duration to the object version's creation timestamp. The calculated date is stored in an object's metadata and protects the object version until the retention duration ends. When retention duration ends for an object, you can retain or manually delete an object.
By default, object immutability is switched off, and you can switch it on only while creating a bucket. Once object immutability is switched on, Lyve Cloud automatically enables versioning for the bucket. For step-by-step instructions see below.
To set object immutability:
- Enable object immutability when creating a new bucket, see Creating buckets.
- Optionally, check the Delete objects after the retention duration ends check box.
Managing bucket access permissions
Permissions are used to control access to buckets and define which actions the service accounts are allowed for a bucket. Bucket permission and Policy permission are two options available for granting permission to your buckets.
- Bucket permission: Bucket permission is used to set Read only, Write only, or All operations permission for selected buckets. Using Bucket permission, you can grant access permissions to your bucket and the objects in the bucket. Only the admin and storage admin can associate permissions for the buckets. The permissions attached to the bucket apply to all of the objects in the bucket. For more information, see Creating bucket access permissions.
- Policy permission: Policy permission is used for creating policy permission by uploading a JSON file. You can also import a file which is compatible with the AWS IAM policy file. Using the Policy permission, you can allow or deny requests at a granular level based on the elements in the policy, resources, and aspects or conditions of the request. For more information, see Creating policy permissions.
Role-based access to permission management
The following table describes access to permission management features based on your role.
| Actions | Admin | Storage Admin | Auditor (Read only) |
|---|---|---|---|
| Create permission | ✓ | ✓ | × |
| Edit | ✓ | ✓ | × |
| Delete | ✓ | ✓ | × |
| Status | ✓ | ✓ | × |
| List and view | ✓ | ✓ | ✓ |
Creating bucket access permissions
You can create bucket permissions without any buckets in the account only if you apply permission to all buckets in the account or all buckets with a prefix.
To create bucket permissions:
- On the left-hand menu, select Permissions.
- On the Permissions page, select Create bucket permission.
- In the Create bucket permission dialog, enter the following:
- Name: Enter a name for the permission.
- Which buckets does this permission apply to?: Select any one from the following:
- One or more existing buckets: Choose one or more buckets from the Buckets list.
- Buckets: The buckets field is displayed on when you select one or more existing buckets.
- All buckets in this account with a prefix:
The bucket names must use the same few initial characters. For example, if four unique buckets for customer01 are created, such as customer01rawdata, customer01zipdata, customer01media and customer01, enter a prefix of the bucket names to assign and apply the permission. In this case, use the same beginning characters for each bucket for our prefix, customer01.
- Only one prefix is allowed for a single permission.
- The prefix field allows a maximum of 64 characters.
- All buckets in the account: Apply permission to all current and future buckets in the account.
- Actions: Select actions to assign privileges as:
- All Operations: Allows all operations in all buckets meeting the conditions defined under Which buckets this permission applies to?.
- Read only: This option allows you to perform a read only operation on one or more selected buckets and its objects.
- Write only: This option allows you to write objects into the selected buckets without reading them back.
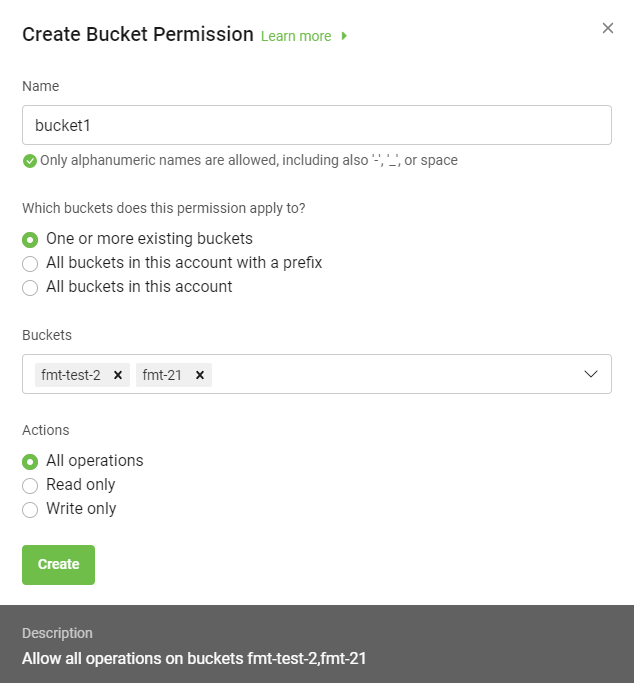
Once you select the desired options, the description of the permissions is displayed for that bucket permission.
- Select Create to save the permission for a bucket.
The permissions list page displays all permissions. To manage permissions, see Editing bucket permissions and Deleting bucket permissions.
Creating policy permissions
Lyve Cloud allows the migration of AWS IAM policy files to the Lyve Cloud policy permission, making it simple to start working with service accounts based on existing policies. A policy file uses a JSON file format that is compatible with an AWS IAM policy.
Working with policy files allows you to specify the Condition element. Query the exact request values to determine when a policy is in effect, or list specific actions such as Action: ["s3:GetObject","s3:PuObject"] and specify the Resource element for several buckets and objects. For more information, see Example policy permission file.
How to get an IAM policy file from AWS
You must manually copy policy permission details from AWS IAM policy to use in Lyve Cloud:
- Login to AWS Management Console using the credentials.
- Select Services on the top left to view the list of services.
- Select IAM in Security, Identity, & Compliance.
- Under Access Management, select Policies and use the search field to find the relevant policy to copy the policy details.
- Select the JSON tab, copy the policy details into a new file, and then save it as a JSON file.
Using policy permission files
The following table lists the mandatory, optional, and invalid elements in a policy permission file.
- Invalid elements must be removed from the file before importing, as these elements are not used in the Lyve Cloud policy permission file.
- Remove tags from elements available in AWS IAM policy, as tags cannot be used in the policy permission file.
| Elements | Mandatory/Optional/Invalid | Description |
|---|---|---|
| Statement | Mandatory | Contains a single statement or an array of individual statements. |
| Resource | Mandatory | Specifies object(s) or bucket(s) that is related to the statement. |
| Effect | Mandatory | Allows or denies access to the resource. |
| Action | Mandatory | Describes specific action(s) that will be allowed or denied. |
| Version | Mandatory | It defines the version of the policy language and specifies the language syntax rules that are to be used to process a policy file. |
| Condition | Optional | Allows you to specify conditions when a policy is in effect. The Condition element includes expressions that match the condition keys and values in the policy file against keys and values in the request. Specifying invalid condition keys returns an error. For more information, see Known Issues. |
| Sid | Optional | A statement ID. The statement ID must be unique when assigned to statements in the statement array. This value is used as sub ID for policy document's ID. |
| Id | Optional | A policy identifier, such as UUID (GUID). |
| Principal | Invalid | Specifies the service account that is allowed or denied to access a resource. |
| NotPrincipal | Invalid | The service accounts that are not specified, are allowed or denied access to the resource. |
| NotAction | Invalid | Specifies that it matches everything except the specified list of actions. If this element is part of the permission file, you need to replace it with the Action element. |
| NotResource | Invalid | Specifies that it matches every resource except the available specified list. If this element is part of the permission file, you need to replace it with the resource element. |
Example policy permission file
In the following example, the policy permission has three statements:
Statement1: Allows object listing with a prefixDavidin the bucketmybucket. It is done using a Condition element.Statement2: Allows read and write operations for objects with the prefixDavidin bucketmybucket.Statement3: Denies delete object operation for two resources:
- All the objects in
mybucket/David/* - All the objects in
mycorporatebucket/share/marketing/*
- All the objects in
{   "Version": "2012-10-17",
"Statement": [
{
"Sid": "statement1",
"Action": ["s3:ListBucket"],
"Effect": "Allow",
"Resource": ["arn:aws:s3:::mybucket"],
"Condition": {"StringLike": {"s3:prefix": ["David/*"]}}
},
{
"Sid": "statement2",
"Action": [         "s3:GetObject",         "s3:PutObject"       ],
"Effect": "Allow",       "Resource": ["arn:aws:s3:::mybucket/David/*"]
},
{
"Sid": "statement3",
"Action": ["s3:DeleteObject"],
"Effect": "Deny",
"Resource": ["arn:aws:s3:::mybucket/David/*",
"arn:aws:s3:::mycorporatebucket/share/marketing/*"]
}
]
}
Use the following policy to limit the bucket access to specific IP's:
{  "Version": "2012-10-17",
   "Statement": [
    {
         "Sid": "Sid-1",
         "Action": ["s3:*"],
         "Effect": "Deny",
         "Resource": ["arn:aws:s3:::mybucket"],
         "Condition": {"NotIpAddress": {"aws:SourceIp": ["134.204.220.36/32"]}}
    },
    {
     "Sid": "Sid-2",
     "Action": [
      "s3:*"
    ],
      "Effect": "Allow",
      "Resource": ["arn:aws:s3:::mybucket", "arn:aws:s3:::mybucket/*"]
    }
   ]
}
To create policy permission:
- On the left-hand menu, select Permissions.
- On the Permissions page, select Create Policy Permission.
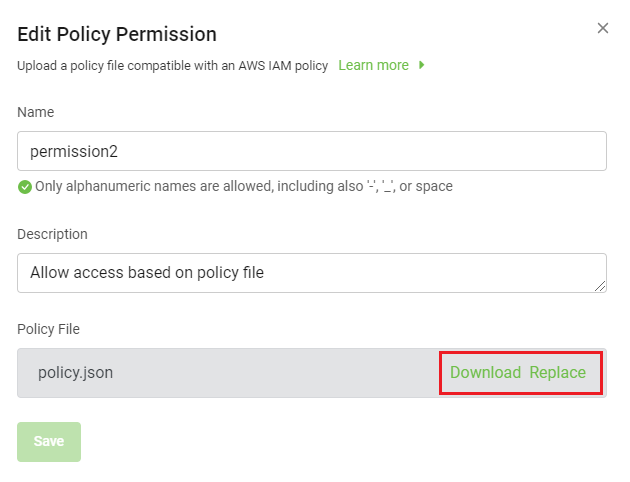
- In the Create Policy Permission dialog:
- Enter a name.
- Edit the description if desired.
- Drag and drop a policy permission file, or browse to upload a file.
- Once the new policy permission file is available, download or replace the existing file.
[ INSERT create-policy-permission-01.png ]
- Select Create.
You might encounter errors if the policy permission file (JSON) has any additional or missing elements. The following is the list of possible error messages. Read them carefully and update the policy permission file accordingly.
| Error Message | Resolution |
|---|---|
| File Import Failed: Invalid JSON file. | Check the JSON file structure. |
| File Import Failed: Effect field is required. | Add this element to the policy permission file. |
| File Import Failed: Resource field is required. | |
| File Import Failed: Action field is required. | |
| File Import Failed: Statement is required. | |
File Import Failed: Version field value is empty. |
Add a value to this element. |
| File Import Failed: Action canot be empty. | |
| File Import Failed: Resource canot be empty. | |
| File Import Failed: Condition canot be empty. | |
| File Import Failed: Effect value is invalid. | Add a valid value to this element. |
| File Import Failed: Action value < action> is not valid. | |
| File Import Failed: Resource value < resource> is not valid. | |
| File Import Failed: Condition name is not valid: <condition entered> . | Choose a valid condition name, such as StringLike. |
| File Import Failed: Condition key is not valid: <condition key entered> . | Choose a valid condition key, such as s3:prefix. |
Editing bucket permissions
Edit existing permissions to change selected buckets and their associated actions.
To edit permissions:
- On the left-hand menu, select Permissions.
- On the Permissions page, select the ellipsis of the permission to modify, and select Edit.
To modify Policy Permission-type permissions:
In the Edit Policy Permission dialog, edit the following:
- Name
- Description
- Policy File: Download or replace the existing file.
To modify Bucket Permission-type permissions:
In the Edit Policy Permission dialog, edit the following:
- Name
- Which buckets this permission applies to?
- Actions
- Select Save.
These changes take effect as soon as the updated permission is saved, and any subsequent application API calls will be affected.
Deleting bucket permissions
To delete permissions:
- In the menu, select Permissions.
- On the Permissions page, select the ellipsis (...).
- Select Delete, and then select OK in the confirmation.
After you delete a permission, you cannot restore. However, you can create a new permission and reuse that permission name.
Viewing permissions
By default, the Permissions page displays 10 permissions at a time. You can sort the columns in the table.
To view all permissions:
- In the left-hand navigation, select Permissions.

The following table describes the columns used to list permissions.
| Column Name | Description |
|---|---|
| Name | Displays name of the permission. |
| Description | Displays the permission description. |
| Type | Displays the type of permission created. The type can be Policy permission and Bucket permission. |
| Service Accounts | Displays the number of service accounts using that specific permission. You can hover the mouse on the number to view the names of the attached service account and the question mark icon to view the tooltip. |
| Creation On | Displays the date and time when the permission was created in the year, day, month YY:DD:MM AM/PM format. |
- Select the arrow next to Rows per page to change the number of permissions to list per page.