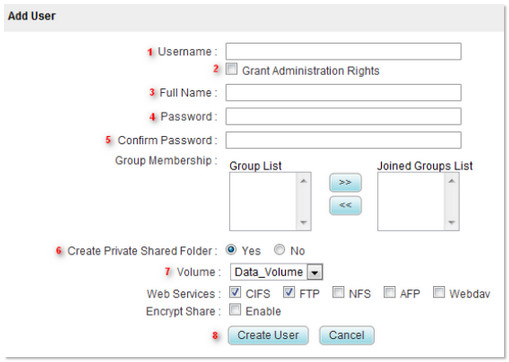
Please follow this procedure to create a user in the Seagate Business NAS Manager:
- Log into Seagate NAS Manager using Seagate NAS Discovery or by entering the IP address of the NAS device in the address bar of a web browser.
- To obtain the IP address of your NAS.
- Obtain the host name for the NAS. This can be found on the drive label. Example: \\ BA-XXXXXX
- Press the Windows key
 + R to open the run window.
 - In the Run window, type CMD and press Enter.
- In the Command Prompt window that opens, type: ping& (the host name) and press Enter. The drive will reply with it's IP address.
- In the left sidebar, select Users and Groups.
- Select Users.

- Select Add User.

Within the Add User window:- Select a Username.
- Check Grant Administration Rights if you want this user to be an Admin.
- Full Name can be the same as the Username.
- Create a Password.
- Confirm the Password.
- If multiple users exist, you can assign certain users to a specific group if you would like.
If you wish to create a Private Shared Folder, you will need to enable the Web Services you want that share to inherit. - Select the Volume on which you wish to create the user.
- Select Create User.


