Prerequisites for these steps to work
-
The Storage Pool must have been configured with Parity, with a fixed capacity, and without a hot spare.
-
Backup the data in the Virtual Disk before beginning this process.
-
The replacement drive must be blank and has never been part of the current Storage Pool or Virtual Disk.
Replace the Hard Drive
In this example the disk in slot 2 has failed and is no longer detected.
-
Remove the drive from slot 2. Replace it with a drive that is blank with the same capacity as the original or larger.
-
Restart the Seagate WSS NAS.
Use Remote Desktop to login to the Seagate WSS NAS.
-
Launch Microsoft Remote Desktop from a PC on the local network.
-
Enter the default name of the Seagate WSS NAS: seagate-wss-nas
-
Choose Connect.
-
Enter the default login, administrator, and the password. Note: If you never changed the password, then it’s the default which is admin.
-
Choose OK.
Use Server Manager to re-connect to the Storage Pool and Virtual Disk
-
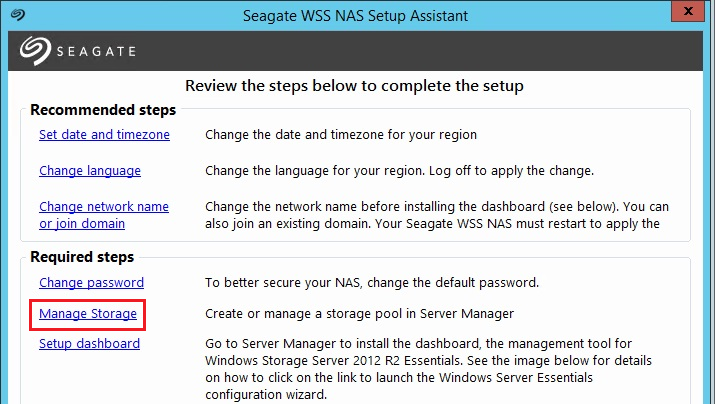
Launch the Server Manager by clicking Manage Storage in the Seagate WSS NAS Setup Assistant or click the Server Manager icon on the Taskbar.
 or
or
-
In the Server Manager click File and Storage Services > Storage Pools
-
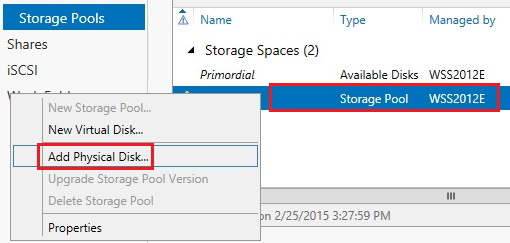
Right click the Storage Pool and choose Add Physical Disk… The new drive will now be added.
-
In the Add Physical Disk window select the disk and click OK.
Use PowerShell to Retire a Drive
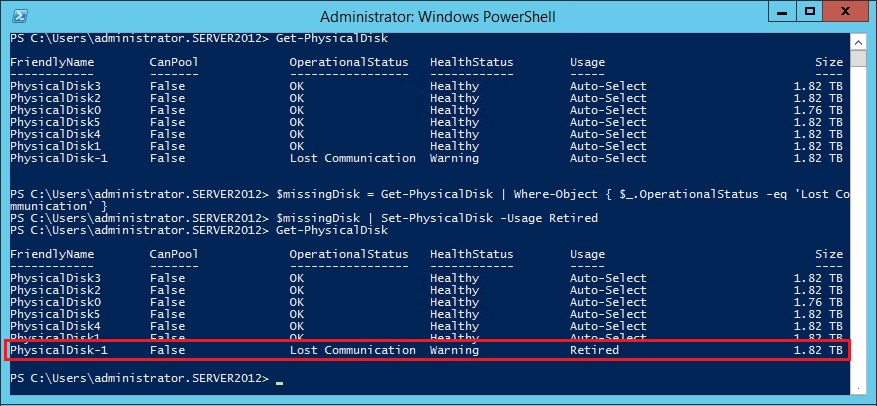
Note: Under Physical Disks, the drive with the Yellow Warning indicates the failed drive that has already been removed from the Seagate WSS NAS. Also note, regardless of which one of the 2 through 6 drives that have been removed, the failed drive will always show as PhysicalDisk-1 and the new drive will show as PhysicalDisk1 without the hyphen.
PhysicalDisk-1 will need to be removed so the Storage Pool will no longer be Degraded. The PowerShell Utility will be used to correct this issue.
-
In Server Manager click Tools and open PowerShell.
-
At the PowerShell prompt copy and paste the following commands one at a time and hit Enter after each.
Get-PhysicalDisk
$missingDisk = Get-PhysicalDisk | Where-Object { $_.OperationalStatus -eq 'Lost Communication' }
$missingDisk | Set-PhysicalDisk -Usage Retired
Get-PhysicalDisk
PhysicalDisk-1 has now been retired and can be removed.
Repair the Virtual Disk
-
In Server Manager > Storage Pools under Virtual Disks, right click the Virtual Disk and choose Repair Virtual Disk.
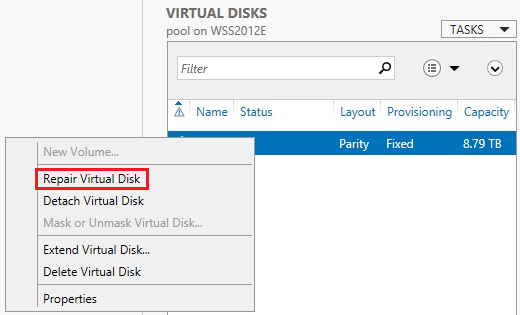
Now that the Virtual Disk is repaired, the reference to the original failed drive can be removed.
Remove the Retired Drive
-
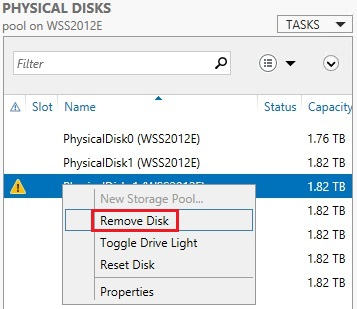
In Server Manager > Storage Pools under Physical Disks, right click on PhysicalDisk-1 and choose Remove Disk.
-
The Remove Physical Disk box will open. Read the Warning and click Yes.
-
Another Remove Physical Disk box will open. Read the Information and click OK.
The Storage Pool and Virtual Disk are no longer degraded and the reference to the failed Disk has been removed.


