Find the perfect storage for your loved ones with our holiday gift guide! Shop now
Free standard shipping on all orders over $100 Shop now
Open

Disk Utility Errors and Questions for macOS 10.11 and higher


This article covers some of the common error messages and questions you might encounter while using Disk Utility. The following is not an exhaustive list of error messages, so you may not find your specific error here.

This article applies to the following versions of macOS:

  • macOS 10.15 (Catalina)
  • macOS 10.14 (Mojave)
  • macOS 10.13 (High Sierra)
  • macOS 10.12 (Sierra)
  • macOS 10.11 (El Capitan)

Not sure what version you are using? Click here to determine your version of macOS.


Note: Reformatting the drive will erase all data on the drive, so you should copy any data you want off the drive prior to formatting. 

If you are running macOS 10.13 (High Sierra) or later it is important to change the view in Disk Utility. Change the view to Show All Devices instead of the default which is Show Only Volumes. If you are running 10.12 or 10.11 this step is not required as the option is not available.


You should see at least two, sometimes three, entries for your drive depending on how it is formatted. The non-indented entry is the physical disk which typically has Media in the name. The indented entries directly below are the volumes (partitions). 


This is important because when erasing the drive you will get different options depending on whether you have the volume or disk selected. Which is why selecting the non-indented entry is important when formatting the drive. 


What is that 134.2 MB volume on the drive?

This volume exists because the drive is set up for Windows using GUID/ NTFS.  It is shown as Microsoft Reserved in Disk Utility. This is typical and not an issue when using the drive as NTFS. For more technical information see Microsoft documentation - here. If you plan on using the drive for Mac only then you will want to erase the disk. If you will be going between Mac and Windows then there should be no issues.

Why is the partition button grayed out?

This was first seen in macOS 10.11 (El Capitan) and has continued. The button is grayed out because the drive is set up as MBR which is typically used for drives less than 3TB.  If you hover your mouse over the partition button you can see the tooltip provided by Apple.


To resolve this, you must first erase the disk and set the Scheme to GUID Partition Map. If you are using it for Mac only then select a format specifically for macOS. For example Mac OS Extended (Journaled) or APFS. If you need to go between Mac and Windows then you would want to select ExFAT.

If you are using this drive between macOS and Windows, back up any important data on the drive and reformat the drive ExFAT on macOS. Instructions for ExFAT formatting can be found here.

If you are using this drive for macOS only, then reformat the drive Mac OS Extended (Journaled) also referred to as HFS+ for best compatibility. Instructions for HFS+ formatting can be found here. 


Error Message - MediaKit reports not enough space​


This error can occur when either erasing or partitioning the disk. It’s caused by Apple trying to use the 134.2 MB Microsoft Reserved volume for their EFI volume. Apple requires at least 200 MB for this volume which is why this error occurs. For more technical information see Apple documentation - here.

There may be other ways to resolve this issue but the easiest way is to erase the disk and set it up with a GUID scheme. This will allow Apple's Disk Utility to create its own volumes. Remember if GUID is not an available option then Show All Devices in the upper left is not selected as shown in the beginning of the article.

If you are using this drive between macOS and Windows then back up any important data on the drive and reformat the drive ExFAT on macOS. Instructions for ExFAT formatting can be found here.

If you are using this drive for macOS only, then reformat the drive Mac OS Extended (Journaled) also referred to as HFS+ for best compatibility. Instructions for HFS+ formatting can be found here. 


Error Message - Couldn’t unmount disk


This error can be caused for a few reasons. If you have something open on the drive like a Disk Image or if something else is keeping the drive busy, you may see this error. Eject the Disk Image and try formatting again.

If you believe there is nothing keeping the drive busy then simply try to format the drive again. If that does not work then highlight the volume and click unmount. With the volume unmounted it should allow the process to complete.

If that doesn’t resolve the issue then try shutting your computer down, then unplug the disk and reboot with the drive disconnected. Once rebooted, reconnect the drive and try to format the drive again. 


Error Message - com.apple.DiskManagement.disenter error 49223
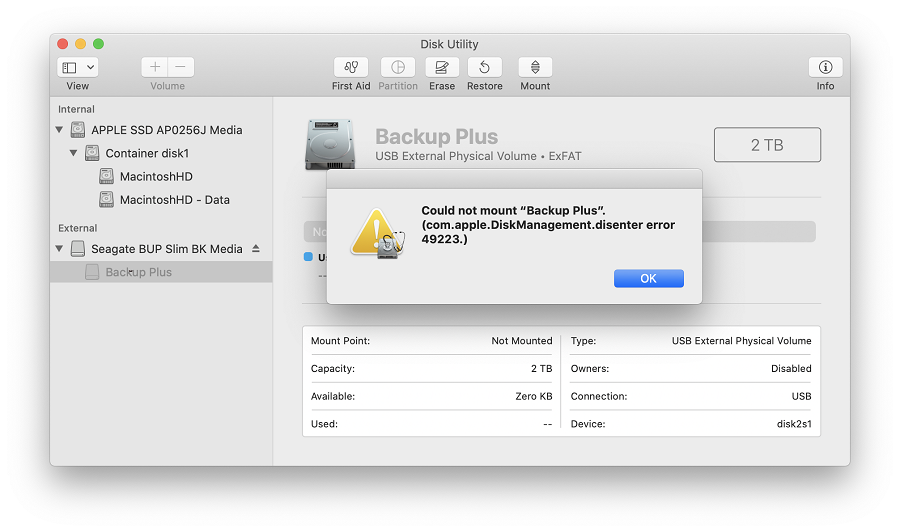
 

This error message has been seen with drives formatted ExFAT. When using a drive between macOS and Windows, drives should always be formatted on macOS because not all Windows allocation unit sizes (block sizes) are supported by macOS. An unsupported allocation unit size will keep the drive from mounting. This error will be displayed when trying to mount the drive manually with Disk Utility. 

If you are using this drive between macOS and Windows then back up any important data on the drive and reformat the drive ExFAT on macOS. Instructions for ExFAT formatting can be found here.

If you are using this drive for macOS only, then reformat the drive Mac OS Extended (Journaled) also referred to as HFS+ for best compatibility. Instructions for HFS+ formatting can be found here. 


Error Message - com.apple.DiskManagement.disenter error 49153

This error has been seen with external hard drives as well has other media. This error may be seen when the external drive is formatted NTFS and using the Paragon driver software. If you are using the Paragon driver software then there may be an issue related to the software. 

To resolve this issue, try uninstalling Paragon driver software and reinstall the software. Instructions for uninstalling Paragon can be found here. For customers using macOS 10.13 (High Sierra) or later, please make sure to 'Allow' the kernel extension during the install process. If the 'Allow' button is not visible then try mounting the drive using the Paragon software to see if it provides an error message. This may cause the 'Allow' button to become visbile in Security & Privacy. 

NOTE: If you are using a LaCie drive the Seagate version of Paragon will not work with your drive. If you are using the full version of Paragon, uninstall and reinstall according to Paragon's instructions.


What to do if nothing else is working?

If you have access to another Mac then try the Erase process there.

If you have access to a Windows machine then you can try to diskpart the drive there. Instructions for diskpart can be found - here. Then bring it back to your Mac and try to erase the drive again.